Servings: 6 buns
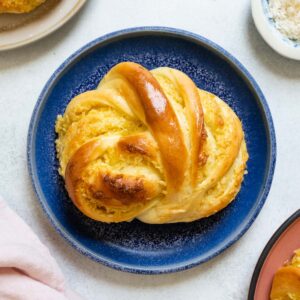
Coconut Buns (椰絲包)
Sink your teeth into these pillowy Chinese bakery-inspired coconut buns. These milky soft buns are laced with fragrant ribbons of coconut and vanilla flavor.
I generally weigh most of the ingredients (except salt) with my bread recipes because I find volume measurements to be quite inconsistent. If you have a scale, use it here! Note that the volume measurement of the bread flour is based on the spoon-and-sweep method. Read more about it in Note 1. Make-ahead and freezer directions are also provided in the notes section.
Ingredients
Dough
- oil for greasing bowl, any neutral flavored oil
- 175 grams whole milk, 3/4 cup
- 35 grams sugar, 3 tablespoons
- 3 grams active dry yeast, 1 teaspoon
- 360 grams bread flour, 3 cups measured with spoon and sweep method (see note 1)
- 5 grams powdered milk, 1 tablespoon
- 2 grams kosher salt, 1/2 teaspoon
- 55 grams unsalted butter, melted
- 1 large egg
Coconut Filling
- 50 grams unsweetened shredded coconut, 1/2 cup
- 40 grams sugar, 3 tablespoons plus 1 teaspoon
- 1/16 teaspoon ground turmeric (optional), (see note 2)
- 40 grams unsalted butter, 3 tablespoons, melted
- 1 egg yolk, from a large egg
- 6 grams vanilla bean paste, 1 teaspoon, can substitute with vanilla extract
Egg Wash (see note 3)
- 1 egg
- 1 tablespoon milk
Instructions
Make the Dough
- Lightly grease a large mixing bowl with oil. Set it aside.
- In a microwave-safe bowl, heat the milk in the microwave on high for about 30 to 35 seconds. Use a thermometer to check the temperature of the milk. It should be somewhere around 100ºF to 115ºF (37ºC to 46ºC). If the milk is too hot, quickly whisk the milk and let it cool for several minutes.
- Add the sugar and yeast to the milk. Stir to hydrate the yeast. Let it sit for 5 minutes while you prepare the other ingredients. After 5 minutes, you should see a layer of foam on the top (an indication that the yeast is active).
- In the bowl of a stand mixer, add the bread flour, powdered milk, salt, foamy milk/yeast mixture, melted butter, and egg.
- Fit the mixer with the dough hook. Mix the dough on low until you don’t see any loose flour on the sides of the bowl. This should take 30 seconds to 1 minute. Then, increase the speed to medium-low and work the dough for 8 minutes. The dough should feel supple and moist but not overly sticky. If it is very sticky, add another tablespoon of flour and work the flour into the dough. (See note 4)
- Scrape the dough out of the bowl onto a surface and knead a few times. If the dough is feeling tacky, lightly dust the surface with flour and continue kneading a few times.
- Shape the dough into a ball and place inside the greased mixing bowl. Cover the bowl with a damp towel (or a silicone lid) and let it rise in a warm place for about 1 hour, until the dough doubles in size.
Make the Filling
- In a bowl, mix the coconut, sugar, and turmeric. Then, add the melted butter, egg yolk, and vanilla bean paste. Mix everything together until combined.
- Transfer the bowl to the refrigerator to chill the filling while the dough rises (about 20 to 30 minutes). If you leave the bowl inside the fridge uncovered for over an hour, the filling can harden. Either keep an eye on the time or cover the bowl before refrigerating.
Shape the Buns
- Stack 2 large baking sheets of the same size (13” x 18” or larger). Line the top sheet with parchment paper. Stacking the baking sheets ensures that the bottoms of the buns won’t brown too much. (See note 5 for more information)
- Take the chilled filling out of the refrigerator and divide it into 6 pieces of about 25 to 28 grams each (about 1 1/2 tablespoons). I usually use a medium cookie scoop and measure out a scant scoopful of filling for each piece.
- Punch down the dough to release excess air. Divide the dough into 6 equal pieces, about 112 to 115 grams each. Shape the dough into an oval. Cover 5 pieces of dough with a towel while you shape the first bun.
- Roll out one piece of dough until you get a rectangle of about 10 to 10.5 inches long and 4 to 4.5 inches wide. I don’t flour the surface before I roll out the dough. This way, the dough grips onto the surface as I roll it out without shrinking back significantly.
- Take 1 piece of the filling and spread it over half of the rectangle (along the long edge). See photos in the blog post or the video below for reference. Pick up the side of the dough without filling and fold it over the half with the filling. You should now have a long and thin rectangle. It’s okay if the rectangle doesn’t look perfect at this stage.
- Using a knife, make 2 or 3 long cuts inside the rectangle, leaving 1/4 to 1/2 inch border along the short side of the rectangle uncut. The border ensures that the strips are attached together, making the next step easier. By now, you should have created 3 or 4 strips inside the rectangle. It’s up to you how many cuts you want to make as I think the finished buns look very similar either way.
- Grab a hold of the short ends of the dough and twist the dough a few times. Then tie the dough into a knot (see video below or photos in the blog post for reference).
- Transfer the knotted dough onto the lined baking sheet. I also like to make sure that some of the coconut filling is exposed by lightly pulling apart some of the layers of the twisted bun. Continue shaping the remaining pieces of dough into buns.
- Cover the knotted buns with plastic wrap and let the buns rise for an hour, until they double in size.
Bake
- When the second rise is nearly done, preheat the oven to 350ºF (175ºC). Position an oven rack to the center position.
- Whisk an egg with a tablespoon of milk. Gently apply a thin layer of egg wash over the risen buns. (See note 6 for what to do with leftover eggs).
- Place the coconut buns in the oven and bake for 22 to 25 minutes, until they are golden at the top. I like to rotate the baking sheet after 15 minutes to ensure even browning.
- Take the coconut buns out of the oven. Let them cool on the baking sheet for 5 minutes before transferring them to a cooling rack. These coconut buns are best consumed while they’re still a little warm.
Storing Baked Buns
- I usually store the baked buns in a container and leave them out on my counter. They should keep for 2 or 3 days. If you don't think you can finish the coconut buns within 2 or 3 days but will consume them within a week, store the coconut buns in the refrigerator. When you are ready to eat the buns, heat them in the microwave on high for 10 to 20 seconds. This is the easiest way to reheat the coconut buns while maintaining their soft texture.
- Freezing: If you want to keep the buns for longer than a week, freeze the baked buns and store them in a freezer bag. When you are ready to heat them, bake the frozen buns at 350ºF for 10 to 12 minutes. You do not need to thaw them beforehand.
Video
Notes
- Spoon-and-sweep method of measuring flour: If you do not have a scale, use a fork to fluff up the flour in the bag or container. Then, use a spoon to scoop flour into the measuring cup, until it is overflowing with flour. DO NOT tap the measuring cup on the counter to try to get more flour into the measuring cup. Sweep the top of the measuring cup with a knife to level the flour. Finally, transfer the flour to the bowl of the stand mixer.
- To enhance the yellow color of the filling, I added a trace amount of ground turmeric to the filling. However, you can omit the turmeric if you don’t like it.
- If you don’t want to crack open another egg for the egg wash, you can actually use the leftover egg whites reserved from the filling. Thin out the whites with 1 teaspoon (instead of 1 tablespoon) of milk. The buns won’t look as golden once they’re baked, but the whites will add some color to the buns. I usually combine the leftover egg whites and egg from the egg wash. I’ll either scramble them on their own or use it for fried rice.
- Even though I provide weighted measurements for the ingredients, I know we all work in different kitchen conditions, which can affect the hydration levels of the dough. If the dough feels very sticky when you squeeze it with your fingers, add another tablespoon of bread flour and work the flour into the dough. Then test the texture of the dough again with clean hands. If the dough is still very sticky, add another tablespoon of flour and work it in. Conversely, if the dough is dry (and you can tell because the dough isn’t wrapping around the dough hook consistently), add 1 tablespoon of milk and work it into the dough.
- If you have another baking sheet of the exact same size, I recommend stacking it underneath the lined baking sheet. When you stack 2 baking sheets of the same size, the rim of the sheets will touch, but there will be a gap between the top and bottom sheets. The gap helps to keep the buns from over-browning at the bottom.
Nutrition
Serving: 1bun | Calories: 471kcal | Carbohydrates: 60.8g | Protein: 10.6g | Fat: 21g | Saturated Fat: 13.7g | Cholesterol: 96mg | Sodium: 162mg | Fiber: 2.7g | Sugar: 15.5g
Did you make this recipe?Tag @hellolisalin or leave a star rating and comment on the blog!