Servings: 16
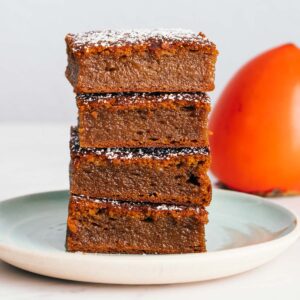
Ginger Persimmon Mochi
This ginger persimmon mochi is an ode to one of my favorite fruits. The mochi tastes like gingerbread but with a chewy center and a crust on the outside. Persimmons give the mochi natural sweetness to this delicious treat that’s not too sweet. I weighed most of the ingredients in the recipe, which are specified below. You can easily cut this mochi into 16 to 20 pieces.
Equipment
- 8x8-inch baking pan
Ingredients
- 1 3/4 cups (280g) sweet rice flour or mochiko, measured with the dip-and-sweep method (see note 1)
- 2 teaspoons ground ginger
- 1 1/2 teaspoons ground cinnamon
- 1/4 teaspoon ground cardamom, I prefer freshly ground
- 1/8 teaspoon cayenne powder, (see note 2 about spice levels)
- 1/4 teaspoon Diamond Crystal kosher salt, or 1/8 teaspoon fine sea salt
- 1 teaspoon baking power
- 1 to 2 very ripe hachiya persimmons, (see note 3)
- 2 large eggs, at room temperature
- 3/4 cup (175g) canned full-fat coconut milk
- 1/4 cup (56g) unsalted butter, melted and cooled slightly, plus more for greasing baking pan
- 1/4 cup (50g) dark brown sugar, (see note 4)
- 1/4 cup (50g) granulated sugar
- 1 tablespoon unsulphured molasses
- 1 teaspoon vanilla extract
- powdered sugar for topping
Instructions
- Preheat the oven to 350ºF (175ºC) and position an oven rack to the center position.
- Grease an 8x8-inch baking pan well with butter. You can use a 9x9-inch pan, but the mochi will be thinner.
- In a medium bowl, whisk together the sweet rice flour, ginger, cinnamon, cardamom, cayenne, salt, and baking powder. Set aside.
- Make Persimmon Purée: You’ll need 1/2 cup (140g) of persimmon purée for this recipe (I usually weigh this). You should be able to get this from 1 large or 2 medium-sized ripe hachiya persimmons. Remove the calyx from the persimmon and then rip open the persimmon. Scoop out the persimmon flesh. You can blend the persimmons in a food processor, or transfer the flesh into a jar and use an immersion blender to blend. Measure out 1/2 cup of persimmon purée.

- In a large bowl, whisk together the eggs, persimmon purée, coconut milk, butter, and the brown and white sugars. Next, and the molasses and vanilla extract and whisk until smooth.
- Add the flour mixture to the wet ingredients all at once. Use a wooden spoon to mix everything together, until well combined and you can only see tiny lumps of flour.

- Pour the batter into the greased baking pan. Use an offset spatula or a rubber/silicone spatula to spread the batter to an even layer.

- Bake the mochi for 60 to 65 minutes, rotating the pan after 30 minutes of baking. When you tap the top of the mochi with your fingernails, it should feel firm. If you're using a 9x9-inch pan, reduce the cooking time by 5 to 8 minutes) Let the mochi cool in the pan for 15 to 20 minutes before unmolding. To unmold the mochi, I like to flip the entire pan onto a wire cooling rack. Once the mochi drops from the pan, place another wire rack over the bottom of the mochi. Flip everything over once again so that the mochi is right-side up. Let the mochi cool completely before serving.

- Slice the mochi into 16 or 20 pieces. Sprinkle powdered sugar on top of the mochi and serve! See notes for storing and reheating directions.

Notes
- Sweet rice flour is not the same as rice flour or brown rice flour. Make sure you are using sweet rice flour or mochiko for this recipe. Thai-style glutinous rice flour should also work, but I have not tested this recipe with that type of flour.
- Cayenne Powder: If you are spice averse, feel free to leave out the cayenne. Increase the amount to 1/4 teaspoon if you want a bit more spice.
- Hachiya Persimmons: Make sure the hachiya persimmons are absolutely ripe before baking with them. Refer to this post for tips on how to ripen hachiya persimmons. You can also use 2 or 3 medium to large fuyu persimmons that are ripe and soft.
- Black Sugar: I tested a batch using black sugar that I found at an Asian grocery store. I loved the flavor, but decided not to use it for my final recipe as it is more difficult to find. If you want to try this recipe with black sugar, substitute the dark brown sugar with black sugar and omit the molasses.
- Reheating: Store the mochi in a container at room temperature. for 1 to 2 days. Reheat the mochi on a baking sheet at 350ºF (175ºC) for 7 to 9 minutes. Let the mochi cool for 10 to 15 minutes before eating. That way, the edges have more time to harden. You can refrigerate the mochi for up to 4 days. Reheat the mochi on a baking pan at 350ºF for 10 to 12 minutes. Let the mochi cool before eating. If you want to freeze the mochi, cut it up before freezing to shorten the reheating time. Reheat at 350ºF for 17 to 20 minutes and let cool.
- Lining the Pan: If you are very paranoid about the mochi sticking to the pan, you can line it with parchment paper. I prefer the texture of the cake unlined, as the bottom develops a better crust.
Nutrition
Serving: 1piece | Calories: 160kcal | Carbohydrates: 25.4g | Protein: 2.3g | Fat: 5.8g | Saturated Fat: 4g | Cholesterol: 31mg | Sodium: 109mg | Fiber: 0.2g | Sugar: 7.2g
Did you make this recipe?Tag @hellolisalin or leave a star rating and comment on the blog!