Servings: 24 cookies
Thin Ginger & Sesame Cookies
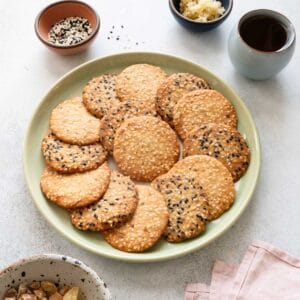
These thin Chinese-style ginger and sesame cookies have a lovely snap, nuttiness from sesame seeds, and a zingy touch of ginger flavor. They’re not too sweet and are great on their own or served with ice cream!While the cookie batter is relatively easy to prepare, the trickiest part of this recipe is nailing down the cooking time for your oven. All of our ovens are different, with various hot spots, so it is difficult to write precise directions for a sesame cookie recipe where even heat distribution is important. Use the cooking times below as a guide, but pay attention to the visual cues. Note also that some cookies on a single baking sheet may brown faster due to hot spots in the oven.I know it is not normal for cookie recipes to give you a choice in terms of baking temperature, but for this particular sesame cookie recipe, I genuinely think this depends on your preference. If you want cookies that look more evenly baked (i.e., more uniform browning), I recommend baking them at 275ºF (135ºC), but the cooking time will be longer. If you want cookies with richer caramelized flavor and a guaranteed snap, I recommend baking them at 300ºF (148ºC). I specify the different baking times further below.As always, I generally weigh most of my dry ingredients in recipes, which I specify in the ingredients list. If you have a scale, I recommend weighing the ingredien
Ingredients
- 1/3 cup + 4 teaspoons (50g) all-purpose flour , (see note 1)
- 1 tablespoon (7g) ground ginger
- 7 tablespoons (70g) raw white sesame seeds, can use a combo of white and black sesame seeds (see note 2)
- 2 large egg whites
- 5 tablespoons (70g) unsalted butter
- 1/3 cup (66g) granulated sugar
- 1/8 teaspoon fine sea salt, or 1/4 teaspoon kosher salt
- 1 teaspoon vanilla extract
- 2 tablespoons (20g) finely chopped crystallized (or candied) ginger, (see note 3)
- cooking spray, (see note 4)
Instructions
Prepare Cookie Dough
- In a bowl whisk together the flour and ground ginger. Set the bowl aside.
- Add the sesame seeds to a pan and toast on medium heat for about 3 minutes, stirring occasionally. Toast the seeds until the white sesame seeds just start to turn golden and you can smell the aroma of the seeds. Use a spatula to help transfer the seeds from the pan to a bowl.

- Whisk the egg whites in a mixing bowl for about 30 seconds, until the whites turn frothy and light. Set the bowl aside.

- Melt the butter in a saucepan. Turn off the heat, add the granulated sugar, and whisk together for 20 to 30 seconds, until you get a creamy mixture. Add this butter and sugar mixture to the whisked eggs, and whisk until incorporated. Add the salt and vanilla and whisk again.

- Sift the flour and ginger into the bowl with the wet mixture. Whisk until the batter is completely smooth and you don’t see any lumps of flour. This should take about 30 seconds. The batter will resemble a slightly thick caramel.

- Carefully pour in the toasted sesame seeds and crystallized ginger into the batter and mix until incorporated.

- Pour the batter into a container and chill for several hours or overnight. Chilling the batter into a cookie dough-like consistency makes it easier to work with and will yield cookies of more uniform shape. If you are pressed for time, you can also freeze the batter for 30 to 45 minutes, until the batter stiffens.
Preheat the Oven
- Position an oven rack to the center of the oven.
- If you want cookies with more even browning that look more visually appealing (see photo below, left), preheat the oven to 275ºF (135ºC). The cookies will need to bake for a longer period because of the lower temperature.

- If you want cookies that have richer caramelized flavor and a shorter baking time, preheat the oven to 300ºF (148ºC). Note that the edges of the cookies will be darker brown than the center (see photo above, right).
Prepare Baking Sheets
- Line 2 large baking sheets (about 13” x 18”) with silicone mats or parchment paper (see note 5 about different colored baking sheets). I prefer using silicone mats (see note 6).
Shape Cookie Dough
- If possible, use a small cookie scoop to measure out the dough. Level off the top of the cookie scoop before placing a piece of dough onto the lined baking sheet. Add 12 pieces of cookie dough onto a baking sheet, leaving about 1.5 to 2 inches of space between each ball of dough.

- If you don’t have a small cookie scoop, spray a teaspoon measuring spoon with cooking spray and measure 2 teaspoons of dough for each cookie. You’ll need to roll up the dough into a ball with greased hands. If that’s too time consuming, you can make slightly larger cookies with a tablespoon measure. If the dough starts sticking to the spoon, apply more cooking spray to the measuring spoon.
- Use cooking spray to grease both sides of a mini silicone spatula or the bottom of a drinking glass or measuring cup. Using a silicone spatula gives you the most control over shaping the cookies, but using a drinking glass or measuring cup is faster.
- If you’re using a silicone spatula, start by gently pressing the spatula down on a piece of cookie dough. Then, lift the spatula and press down on another part of the cookie to flatten it. Keep pressing and lifting the spatula until you get a flat disc of about 2 inches in diameter. Resist the urge to drag the spatula over the cookie dough to try to shape it into a circle. The dough will stick to the spatula more quickly this way.

- Alternatively, press the bottom of the greased glass or measuring cup over a piece of dough to flatten it into a circle of about 2 inches in diameter. The circle might not be perfectly round, so use a greased spatula or butter knife to shift the edges into a neat circle.
- When the dough is starting to stick to the spatula, glass, or measuring cup, reapply cooking spray. I like to spray a small bowl with cooking spray so that I can easily reapply cooking spray with my fingers.
- Once you’ve flattened all 12 cookies, they are ready to bake. Place the remaining cookie dough back into the fridge.
Bake Cookies at 275ºF (135ºC) (More Even Browning, Longer Baking Time)
- Transfer the baking sheet to the oven and bake the cookies for 15 minutes. At this point, the cookies should still look quite pale and have barely started to turn brown at the bottom. Turn the baking sheet around and bake the cookies for another 15 minutes.
- Take the cookie sheet out of the oven and check the color of the cookies. If they’re starting to turn golden around the edges, but the center is still very pale, they’re likely not done yet. Flip over some of the cookies and check the underside. You’re looking for cookies with even golden bottoms. If there are large spots in the center that are still pale, they’re not ready to come out of the oven. All the cookies should be evenly golden at the bottom in order for them to snap nicely.
- Keep baking the cookies at 2 to 3 minute intervals until all the cookies have an even golden color at the top and the bottoms are nice and golden (see photo below for a visual reference). Also take note of which cookies are browning a lot faster than the others, as they won’t need as much baking time and can be transferred to a cooling rack sooner. For reference, I generally bake the cookies for an additional 3 minutes (after the initial 30 minutes of baking). Then, I check the cookies and pull out any that look very golden. Then, I usually bake any remaining cookies at 2-minute intervals until they are evenly golden. Your cookies may need more or less time.

- Once all the cookies are done baking, transfer them to a cooling rack. The cookies will continue to crisp up as they cool.
Bake Cookies at 300ºF (148ºC) (More Caramelization, Shorter Baking Time)
- Transfer the baking sheet to the oven and bake the cookies for 12 minutes. At this point, you can see the bottom edges of the cookies just start to turn brown. Turn the baking sheet around and bake the cookies for another 12 minutes.
- Take the cookie sheet out of the oven and check the color of the cookies. At this point, most of the cookies on my baking sheet have started to brown significantly and are nearly done. The edges of the cookies tend to be darker than the center. Turn the cookies around and check the underside. If they are evenly golden brown, you can take the cookies off the baking sheet and on to a cooling rack. If several or all of your cookies still haven’t browned enough, continue cooking them at 2-minute intervals until they all have nice golden brown bottoms (see photo below for reference).

- Once all the cookies are done baking, transfer them to a cooling rack. The cookies will continue to crisp up as they cool.
Prepare Second Batch
- While the first batch of cookies are nearly done baking, prepare the second batch. If you only have one baking sheet or silicone mat, let those cool completely before adding cookie dough to the baking sheet. Bake the second batch using the directions above.
- Once cooled, check the snap of one of the cookies. If the centers are nice and crisp, they have been baked perfectly! Enjoy the cooled cookies with a cup of tea or serve them with ice cream! Store the cookies in an airtight container for up to a week.
Notes
- Measuring Flour: I measured the 1/3 cup of flour using the spoon-and-sweep method. I did not measure the 4 additional teaspoons of flour using that method, as it is easier just to dip the teaspoon measure into the bag of flour.
- Sesame Seeds: If you want to use a blend of white and black sesame seeds, I recommend using 4 tablespoons (40g) of white sesame seeds and 3 tablespoons (30g) of black sesame seeds. If possible, use raw seeds and toast them for 3 minutes. If you can only find pre-roasted sesame seeds, toast them in a pan over medium heat for 2 minutes before adding to the batter.
- Crystallized Ginger: At the grocery store, you’ll likely find 2 common varieties of crystallized ginger: chopped up ginger chunks with a white powdery exterior or slices of candied ginger with granulated sugar coating the exterior. Both types of crystallized ginger work well for this recipe. However, the candied ginger slices tend to be stickier, so they’re a little more difficult to chop up. Use whichever crystallized ginger you can find!
- Cooking Spray works best to prevent the cookie dough from sticking to your spatulas, cups, measuring spoons, etc. You can use regular oil but you’ll likely need to reapply the oil more often.
- Light vs Dark Baking Sheets: Most of my test batches of cookies were baked on light-colored aluminum sheet pans. Darker colored baking sheets heat up faster than lighter colored ones. If you are using darker sheets, reduce the cooking time by about 2 to 3 minutes and check the progress of the cookies. They may be done when you first check them, or they may need an extra minute or two.
- Silicone Mats: I recommend lining your baking sheets with silicone mats, if you have them. Silicone mats encourage the dough to spread more as it’s baking, leading to cookies with crispier texture. The cookies, once baked, will also have a nice and flat underside. The cookie dough is more difficult to shape on parchment paper because the paper keeps lifting as you flatten the cookies.
- Additional Cooking Time References: I use an electric double oven with oven slots that are smaller than the standard slide-in oven ranges in the US. That’s why I asked my assistant to test the recipe in a gas oven that’s more of the standard size. They also used cooking sheets lined with parchment paper instead of silicone mats. Overall, their cookies needed longer baking times. When baking the cookies at 275ºF, they baked the cookies for the initial 30 minutes, then continued to bake the cookies at 2 to 3-minute intervals. Their cookies were done in around 37 minutes (whereas mine were done around 35 minutes). When baking cookies at 300ºF, they baked the cookies for the initial 24 minutes, then continued to bake the cookies at 2 to 3-minute intervals. Their cookies were done at about 27 to 29 minutes (some browned a lot faster).
Nutrition
Serving: 2cookies | Calories: 143kcal | Carbohydrates: 16.6g | Protein: 2.7g | Fat: 7.5g | Saturated Fat: 3.4g | Sodium: 36mg | Fiber: 1g | Sugar: 6.7g
Did you make this recipe?Tag @hellolisalin or leave a star rating and comment on the blog!