Thank you to Bob’s Red Mill for sponsoring this post!
Milk bread was a staple of my youth. My brother and I delighted in toasting sliced milk bread and serving it with a drizzle of condensed milk. It was our pastime to eat milk toast and watch baseball together. Every time I buy milk bread, I recall these fond memories I had with my brother.
Childhood memories aside, I wanted to develop a milk bread recipe because it is the key to understanding how to make Asian-style baked goods. Many Asian pastries, such as pineapple buns and BBQ pork buns, use some form of milk bread as the dough. Hopefully, by mastering milk bread, I will be a step closer to making more Asian pastries at home!
WHAT IS MILK BREAD?
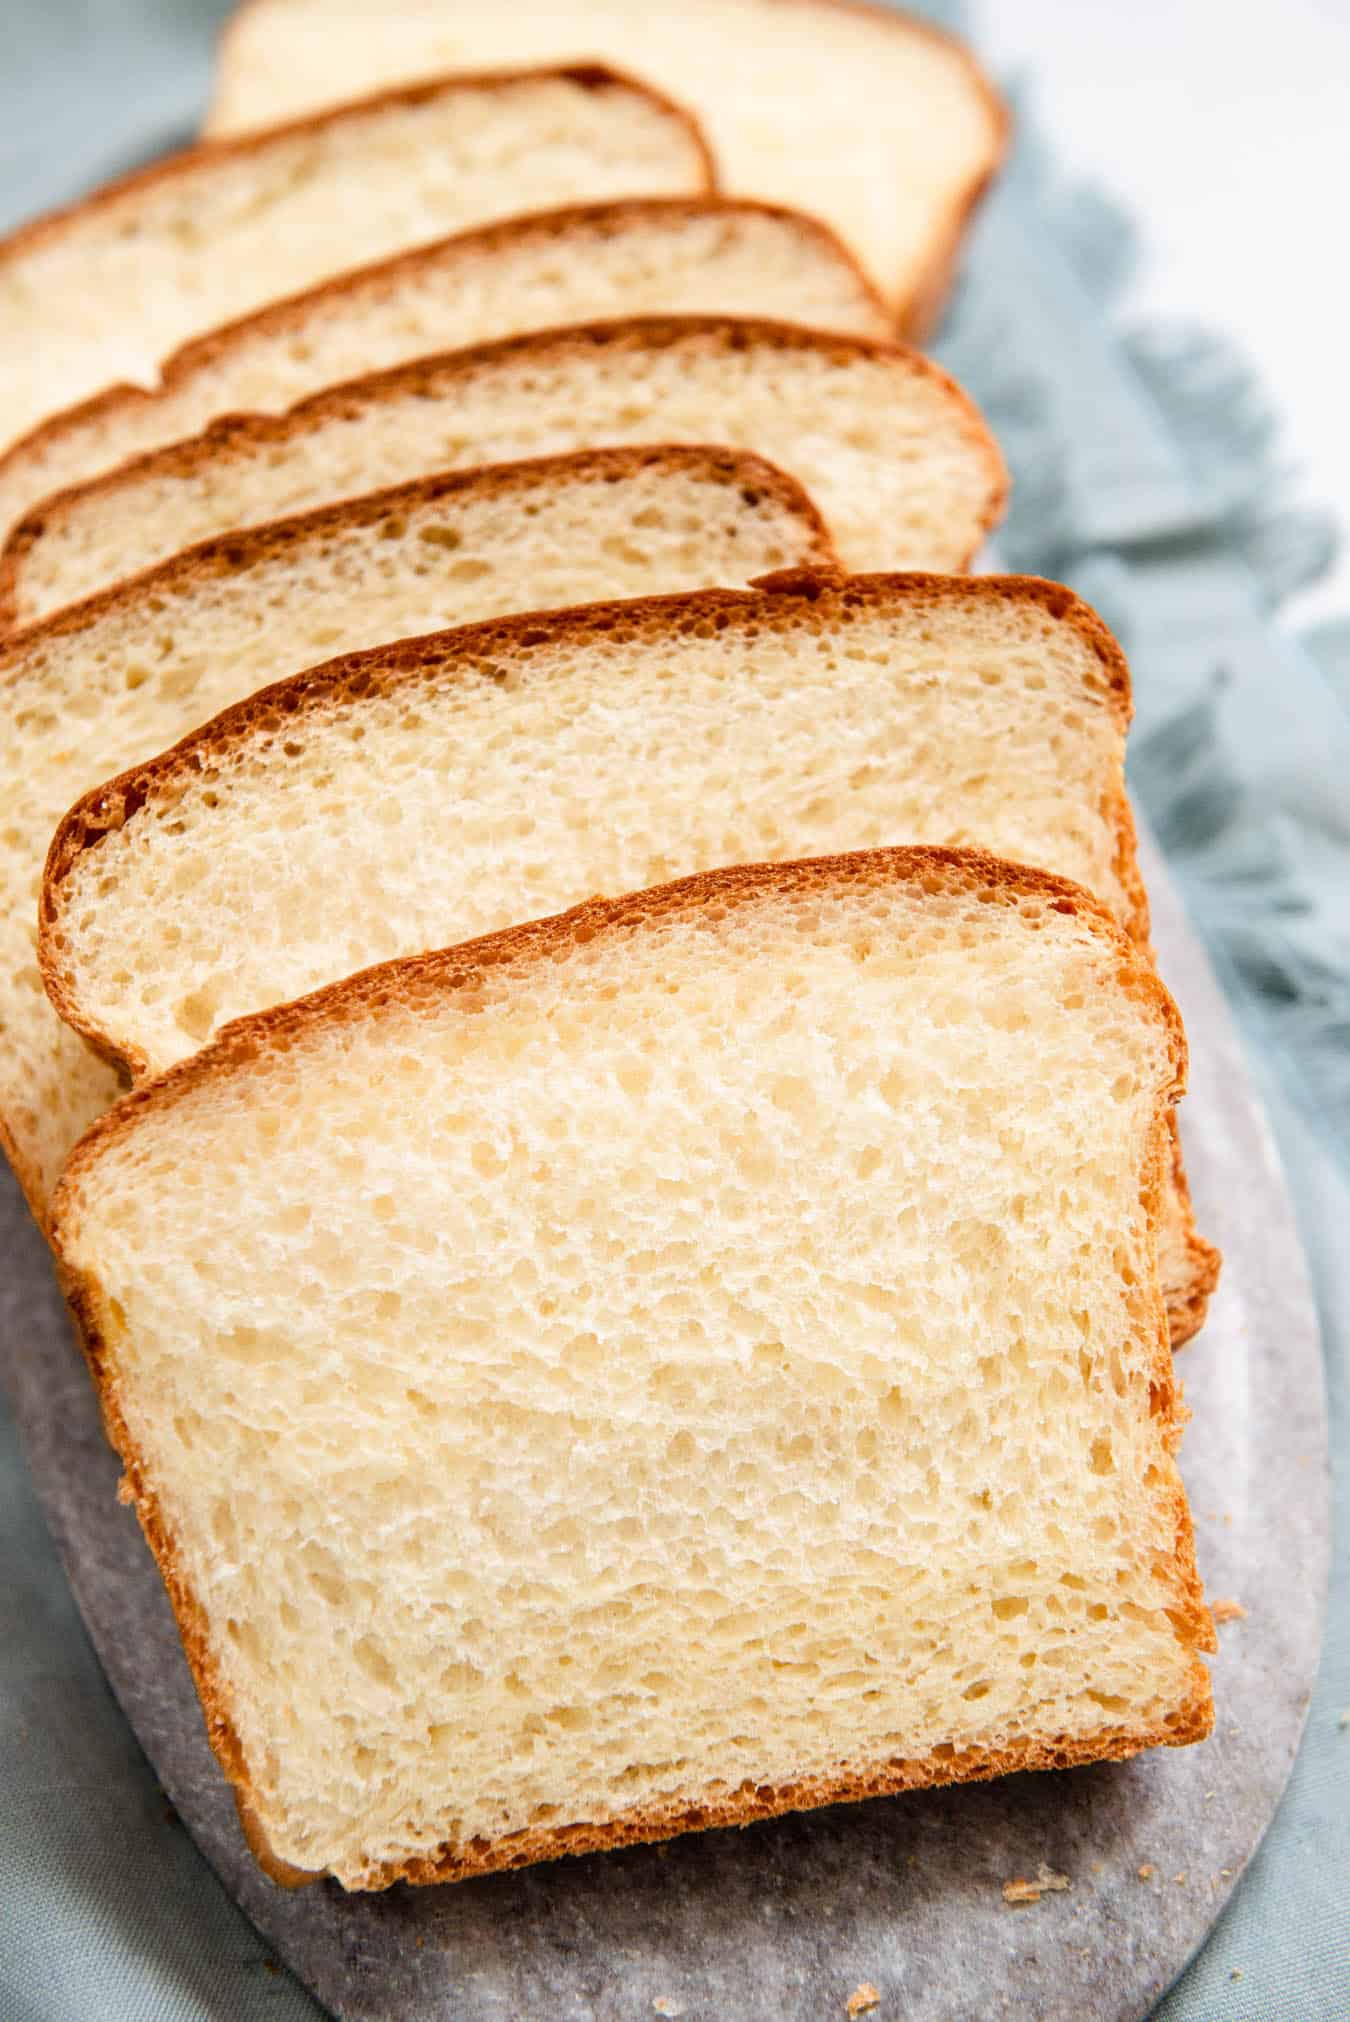
Before diving into the details of the baking process, let me go over some background on milk bread. Often referred to as “Japanese milk bread” or “Hokkaidō milk bread” in English, this enriched bread is known for its feathery center and its lightly sweet, milky flavor. In Japanese, this type of bread is called shokupan (食パン), which is a regular loaf of bread that you slice and eat.
The exact origins of the bread is unknown. Some sources say that the bread was developed in Japan in the 20th century, while others say that it was the 19th century.
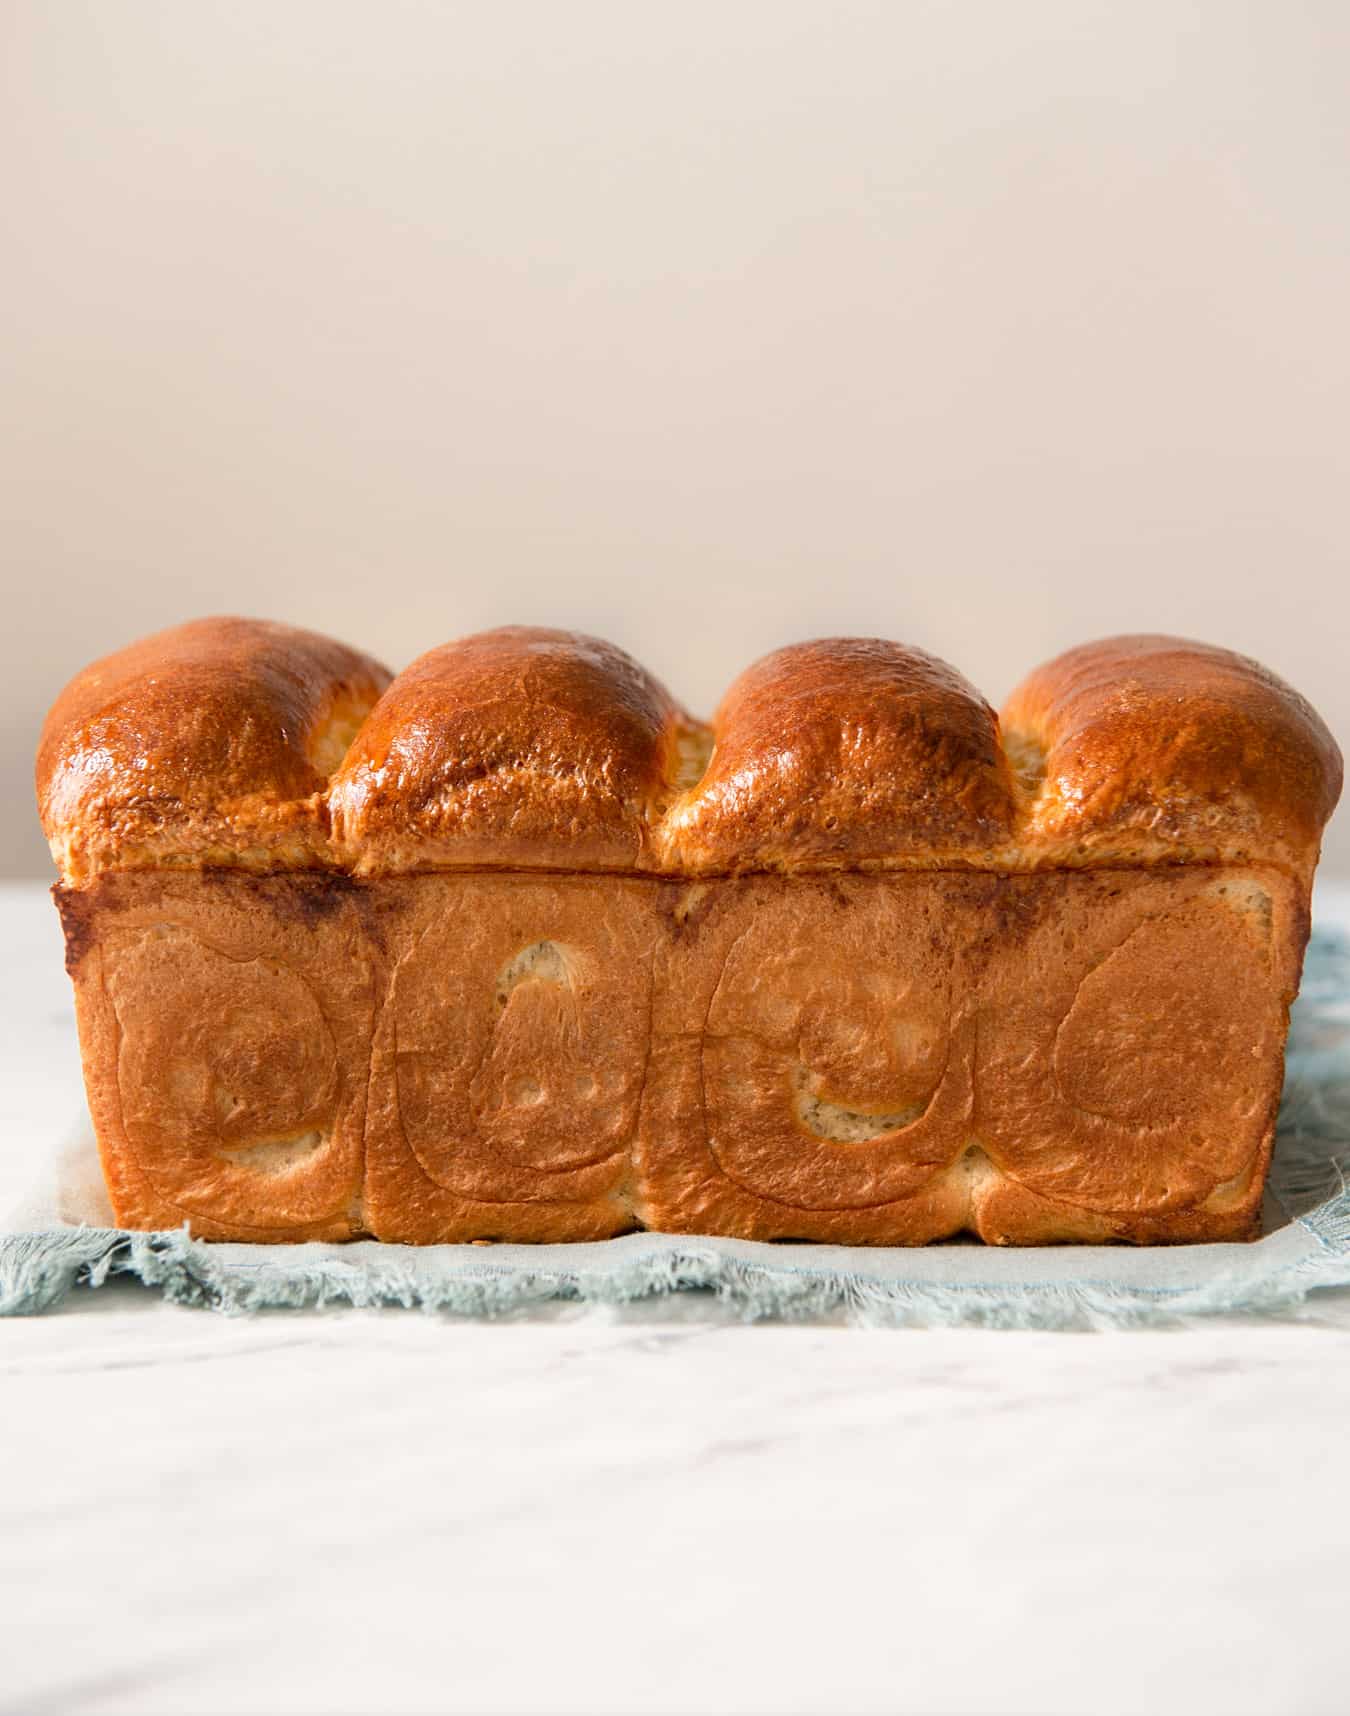
There are two common shapes for milk bread: the boxy, rectangular loaf kakushoku, (角食) or the domed, “mountain-shaped” loaf, yamagata shokupan (山型食パン, sometimes also written as 山形食パン).
This recipe walks through how to make the domed loaf. Because it doesn’t require a Pullman loaf pan to make, this version is more accessible to the average baker.
TIPS ON HOW TO MAKE MILK BREAD
ALL-PURPOSE VS. BREAD FLOUR
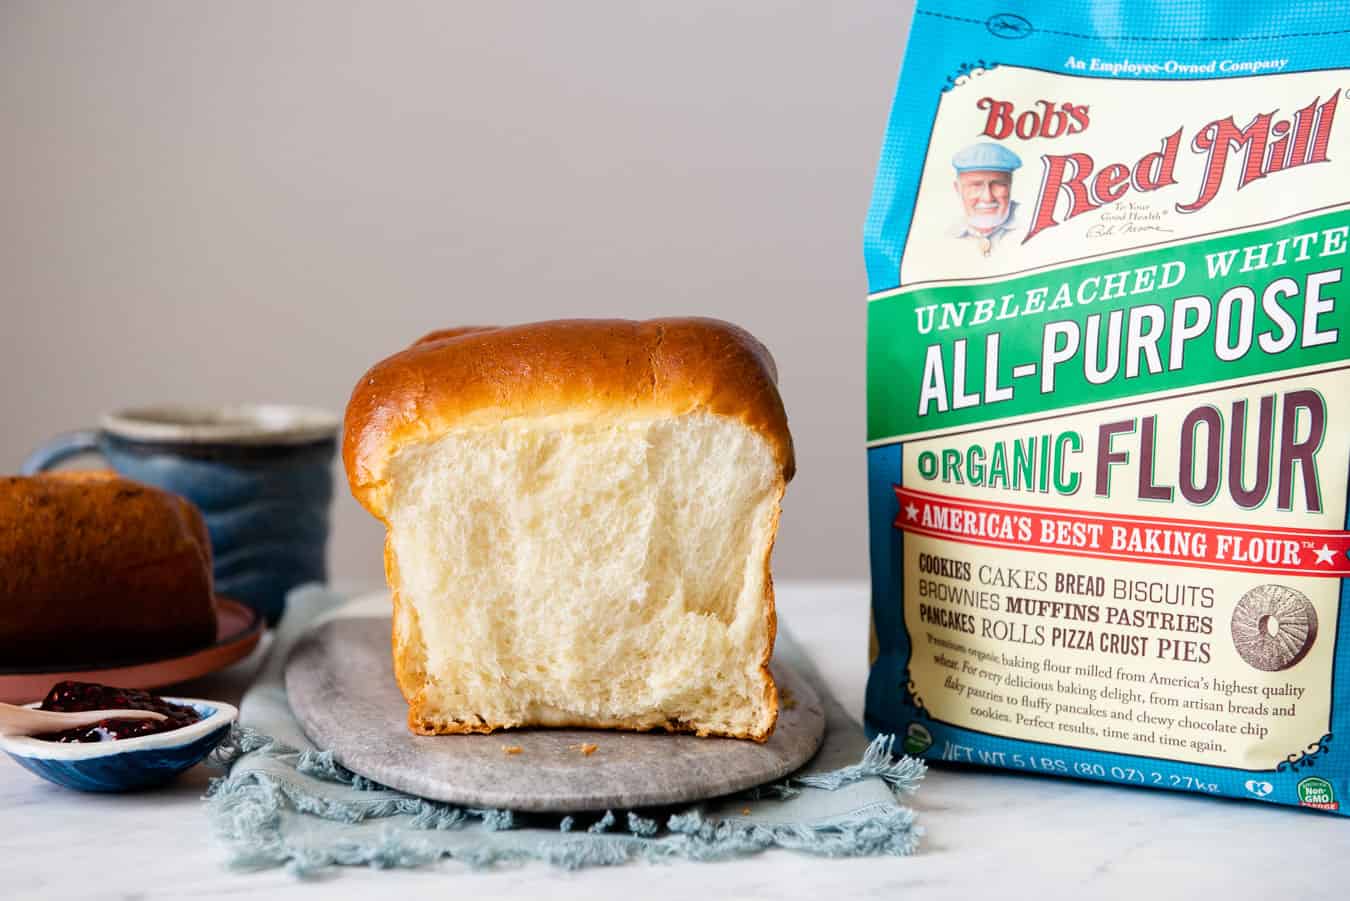
Most milk bread recipes use bread flour because of the higher protein content, which gives the bread a chewy texture. However, I used Bob’s Red Mill’s Unbleached Organic White All-Purpose Flour for this recipe because it is something we’re more likely to have in our pantries. Plus, all-purpose makes delicious milk bread.
During my (many) test batches of the recipe, I compared the results between doughs made with bread flour and all-purpose flour. Overall, both types of loaves were very similar. Loaves made with bread flour were slightly chewier and had prettier swirls along the sides of the bread. However, the loaves made with all-purpose flour were softer, which I prefer.
TANGZHONG & FAT: THE KEY TO SOFT BREAD
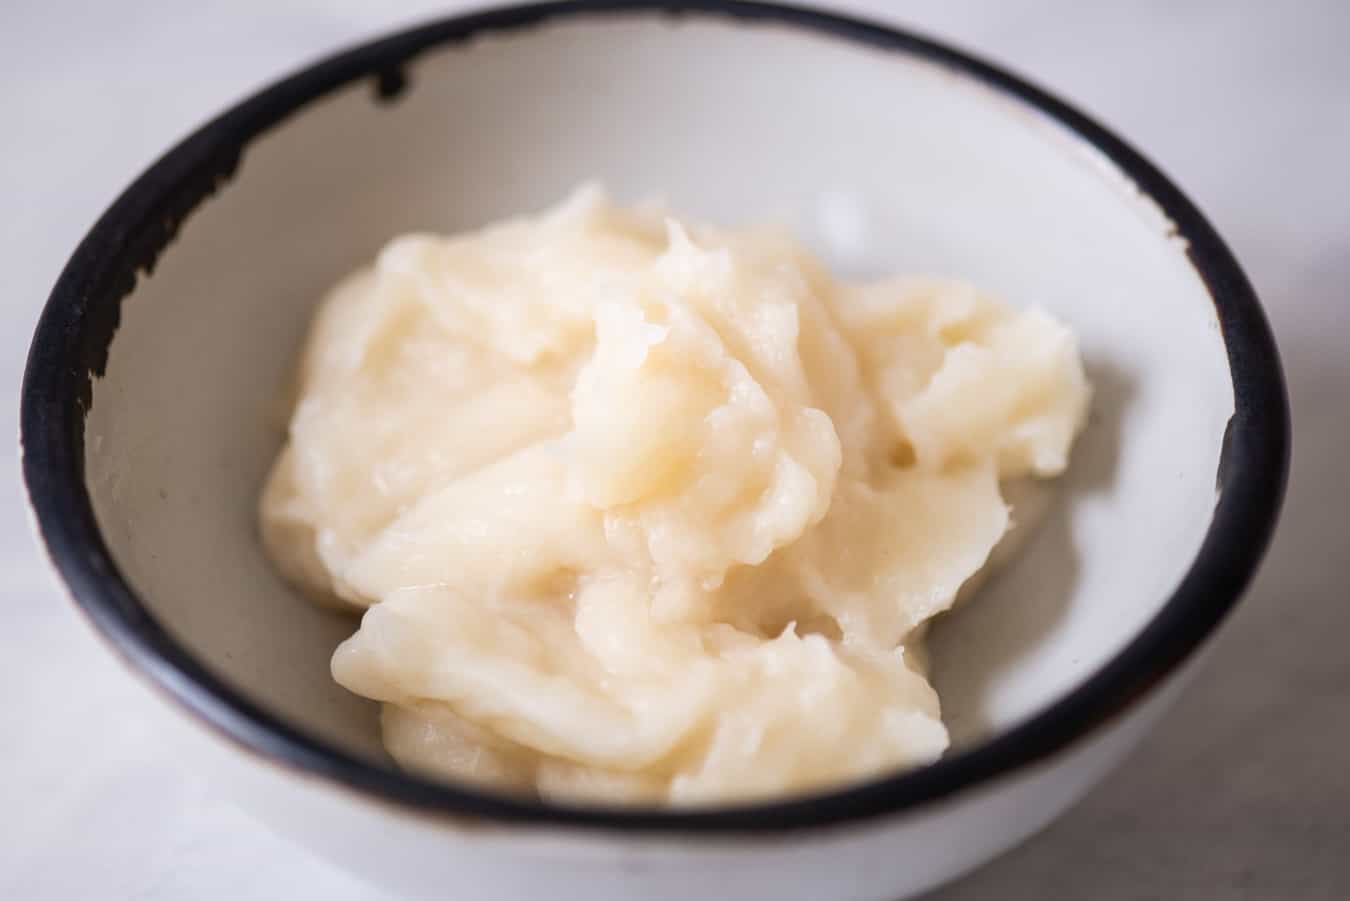
Tangzhong (湯種) is a Chinese technique of heating flour and water into a paste that is then added to the bread dough. The consistency of tangzhong is similar to a roux (see photo above). Once cooled, add the tangzhong with the other ingredients for the dough. The tangzhong helps give the milk bread its feathery texture.
Milk bread is a type of enriched bread, which means it relies on fats to give the loaf its soft texture. Use whole milk for the recipe. I also like to use butter to give the bread more aroma. However, you can also substitute the butter with neutral-flavored oil, like safflower or vegetable oil.
ACTIVATING DRY YEAST
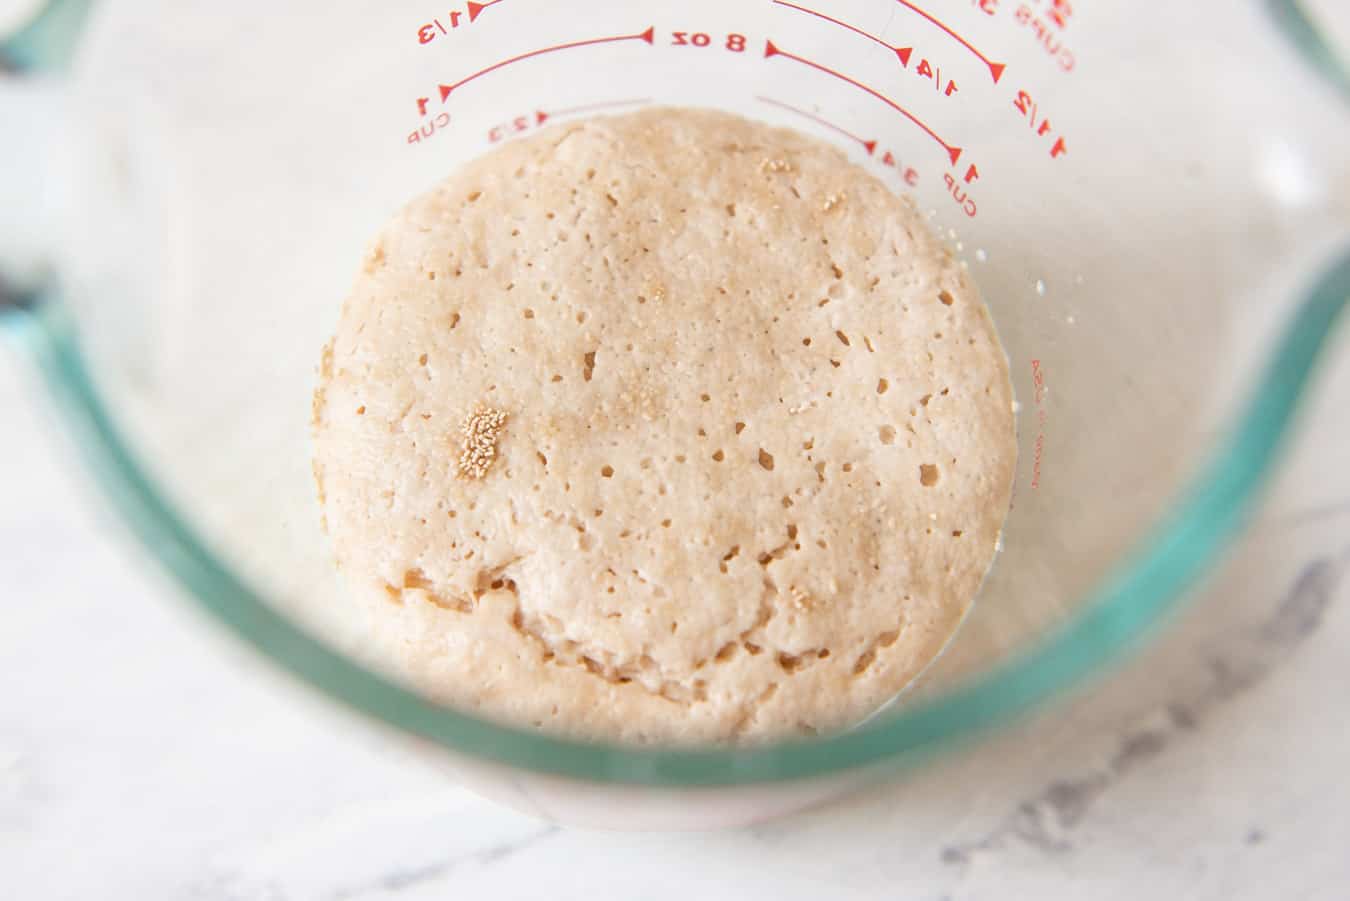
I use active dry yeast to give the bread its lift. To activate the yeast, heat up some milk before mixing in the yeast. I do so by microwaving the milk for 30 to 40 seconds. Then, I add 1 tablespoon of sugar into the heated milk and check the temperature. It should be somewhere between 110ºF to 120ºF. If the milk is much warmer, the heat can kill the activity in the yeast. Once you confirm that the milk is at the right temperature, stir in the yeast.
After about 5 to 8 minutes, the yeast should foam up, like you see in the photo above. If the milk still looks flat, it can mean that the yeast is out of date or the milk was too hot.

MAKING THE DOUGH
Because of the amount of liquids and fats in the dough, I highly recommend using a stand mixer. I usually mix the dough on low until there isn’t much loose flour on the edges of the mixing bowl (see photo above). Then, I increase the speed to medium-low and let the mixer work the dough for 8 minutes.
After 8 minutes, turn the dough over a lightly floured surface and knead it a few times. The dough should be smooth and soft. Then, shape the dough into a ball and place inside a greased bowl. Cover the bowl with plastic or a silicone lid, and let the dough rise for an hour in a warm place.
CAN YOU MAKE THE MILK BREAD DOUGH AHEAD?
Yes! If you like to break up the work, you can refrigerate the dough overnight. Place the ball of dough into the greased bowl, cover with plastic wrap and refrigerate. The cold temperatures of the refrigerator will slow down the activity of the yeast (it doesn’t eat the sugars as quickly). As a result, the dough develops more flavor.

SHAPING THE LOAF
After the first rise, punch down the dough to release the air. Then, divide the dough into 4 pieces. The dough will be about 710-720 grams, so each piece should be about 177-180 grams. By the way, this is about as good a time as any to mention that I recommend using a scale to weigh your ingredients and dough.
On a lightly floured surface, take one of the 4 pieces of dough and knead it several times to release excess air. Then, knead it into an oval shape (see photo above). Lightly dust the top of the dough with flour. Use a rolling pin to roll out the dough. As you roll the dough, you’ll probably notice air bubbles forming around the edges. This is particularly true for dough made the same day. Try to pop those bubbles as you roll. This helps to prevent large air pockets from forming inside the bread.
Now that you have a large flat oval, make an envelope fold. Take the bottom third of the rolled out dough and fold it upwards towards the center. Then, take the top third of the oval and fold it down. You should have somewhat of a rectangle at this point.

Rotate the dough 90 degrees so that a short side of the rectangle is facing you. Lightly dust the top of the dough with flour.
Next, roll out the dough again into a larger rectangle that is about 9 inches by 4 1/2 inches. Starting from one end, roll the dough into a log. After the dough is rolled up, place it in a 9×5-inch loaf pan. Make sure to set the roll seam side down. The bread pan does not need to be greased. Repeat with the remaining 3 pieces.

THE SECOND RISE
The trickiest part about making this bread is knowing when the second rise is done. I messed this part up about 5 times and baked the bread too early. Instead of doubling in size, you want the loaves to triple in size with the second rise. The two loaves in the center should rise just over an inch above the top lip of the bread pan. (By the way, it’s not unusual for the loaves on the edges to rise slightly higher.) When you gently brush the tops of the bread, it will feel like the loaves can be easily deflated.

It is important to be patient with the second rise because this helps the tops of the bread to bake evenly. If you stick the bread into the oven too early, you’ll notice that the fully baked bread will develop massive tears on the top, like you see in the photos above. The rips are a sign of underproofed bread. The bread is still edible, it’s just not as visually appealing.
Here’s some more bad news: the second rise can take forever. I worked on this recipe in the winter months, and it took at least 2.5 hours for the bread to rise to the desired level on my countertop. If you are working with dough that’s been refrigerated overnight, that timeline might be longer.

Because the second rise can take a long time, you may notice small air bubbles forming on the top of the loaf (see photo above). It’s just the activity from the yeast eating away at the sugars. These bubbles may seem benign, but they expand and harden in the oven, creating small bumps on the top of your loaf. To prevent this from happening, I recommend using a toothpick to pop those bubbles before you bake the bread.
A SHORTCUT FOR THE SECOND RISE
If you don’t have the time to wait 2.5 hours for the second rise (and I don’t blame you), you can do the second rise in a warm oven. I preheat my oven to the lowest heat setting possible, which is 170ºF. Right when the oven reaches that temperature, I immediately turn off the oven and turn the oven light on. Then, I transfer the bread pan into the oven, uncovered. In about 55 minutes to an hour, the bread will rise to the desired level.
EGG WASH
To make the tops of the loaves even prettier, I brush a thin layer of egg wash over the tops. It’s not necessary, but the bread will look golden and glossy.
One important thing to note: make sure the egg wash isn’t too cold. During one of my test batches, I used refrigerated egg wash left over from the day before. When I brushed it over the proved bread, the cold temperature of the egg wash caused the loaf to deflate. The bread was still edible once baked, but the crumb lost some of the light texture.

COOLING THE BREAD
The bread takes only 28 to 30 minutes to bake. When you first take it out of the oven, the tops of the bread will be very hard. Don’t worry, the bread softens as it cools.
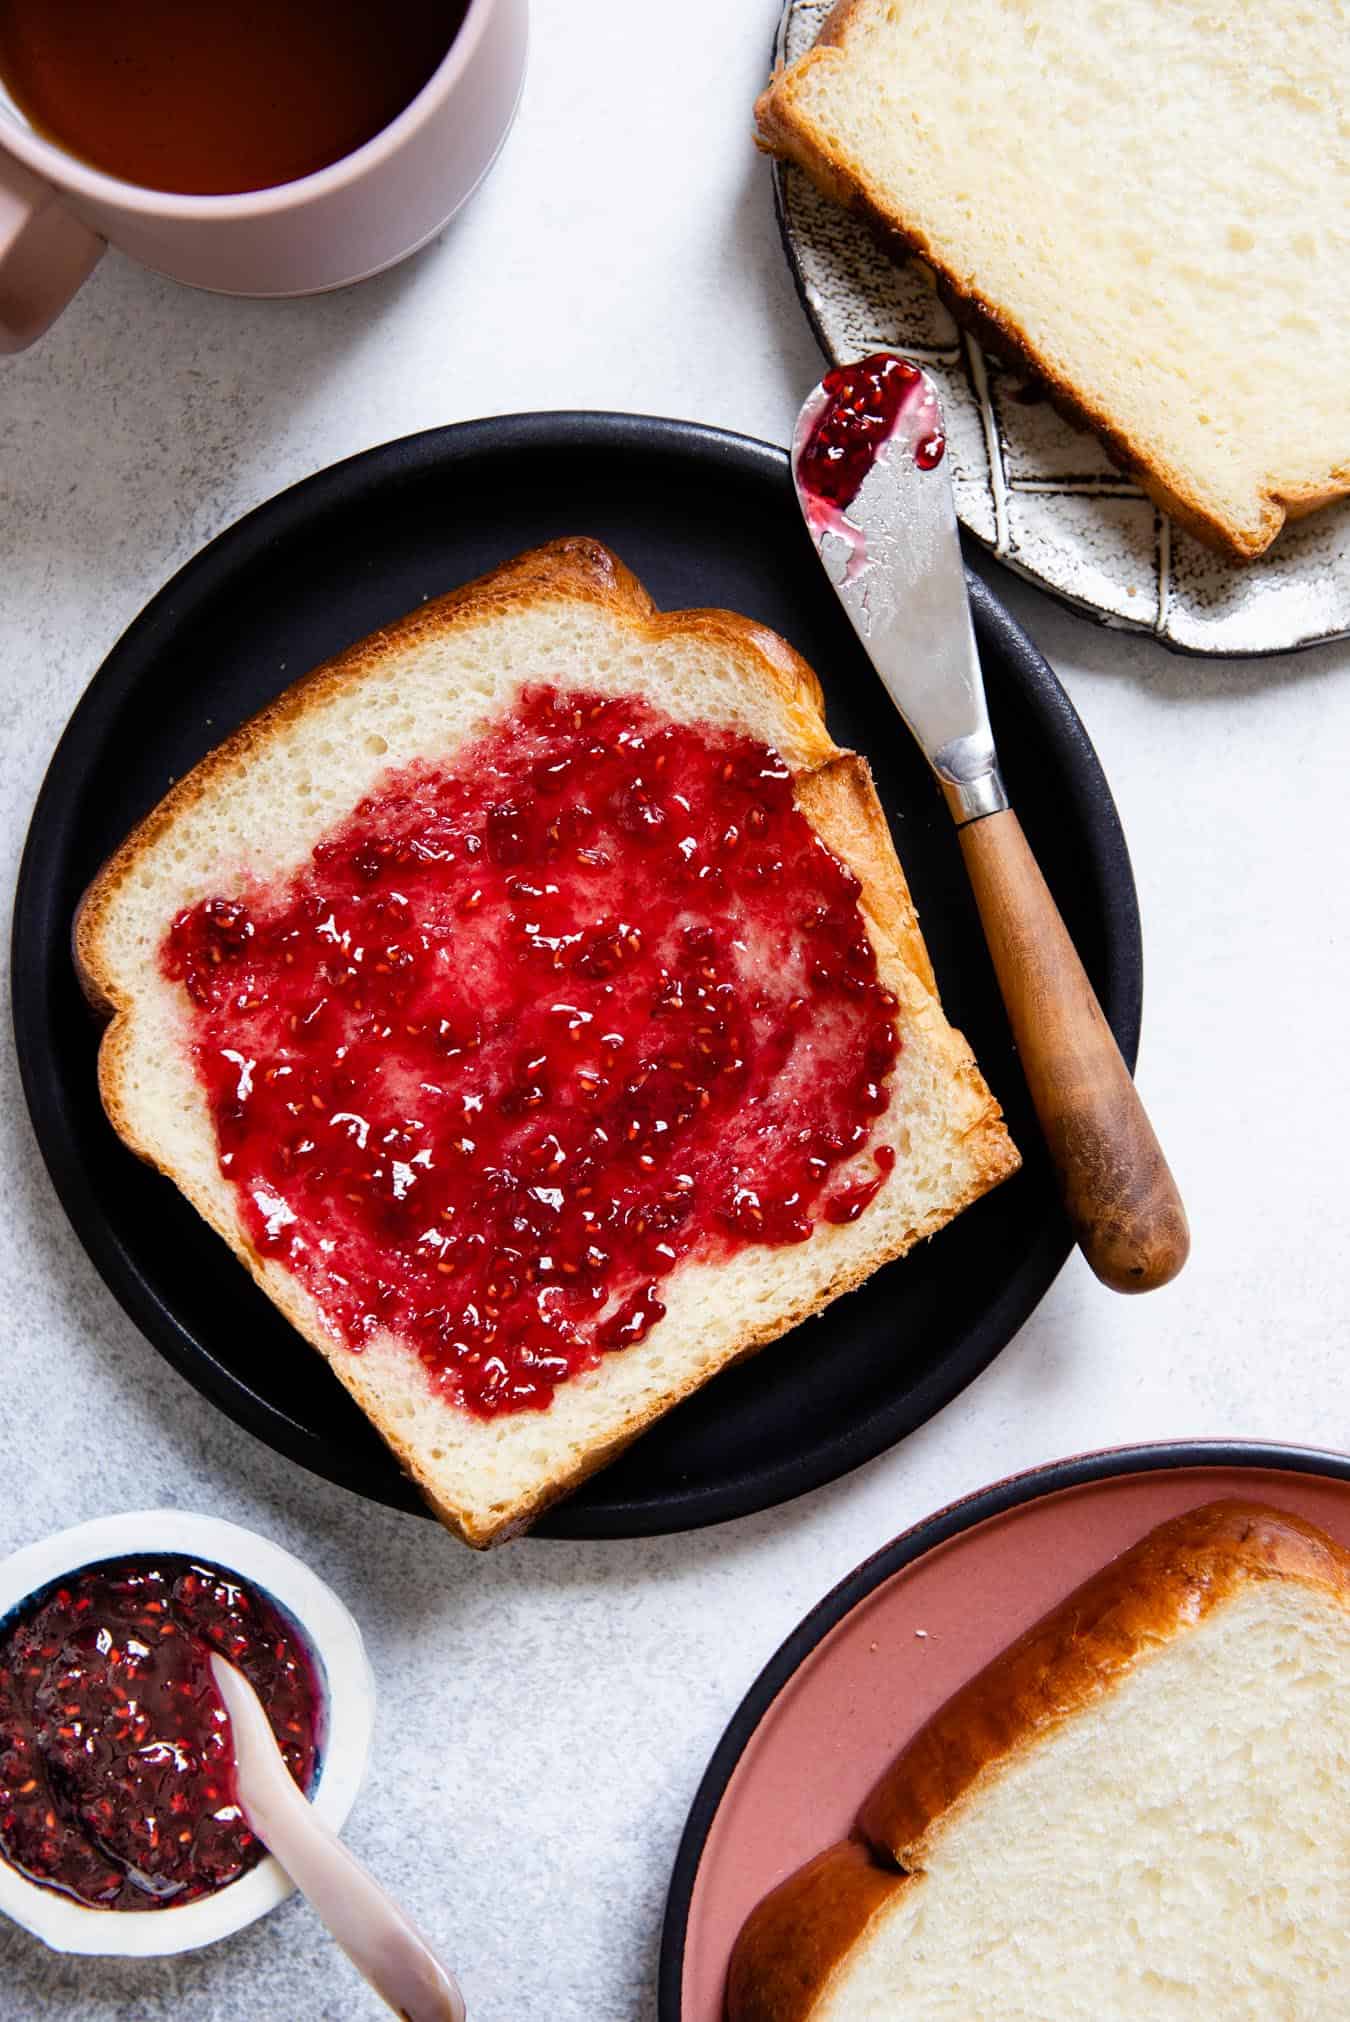
Once you let the bread cool in the pan for a few minutes, remove the bread from the pan. DO NOT let it cool inside the bread pan as moisture develops inside the pan and will turn your bread soggy. Now, you’re ready to enjoy freshly baked milk bread! I love it with jam or condensed milk.
How to Make Milk Bread
Ingredients
Tangzhong
- 20 grams all-purpose flour (2 tablespoons + 1 teaspoon)
- 75 grams water (1/3 cup)
Dough
- safflower or any neutral oil for greasing bowl
- 115 grams whole milk (1/2 cup)
- 12 grams granulated sugar (1 tablespoon)
- 5 grams active dry yeast (1 1/2 teaspoons)
- 320 grams all-purpose flour (2 2/3 cups) , (see note 1)
- 3 grams kosher salt (1 teaspoon)
- 60 grams sweetened condensed milk (3 tablespoons), (see note 2)
- 1 large egg
- 55 grams butter (4 tablespoons), melted (see note 3)
Egg Wash
- 1 large egg
- 1 tablespoon whole milk
Equipment
- large mixing bowl
- stand mixer
- plastic wrap
- 9×5-inch nonstick bread pan (preferably metal), (see note 4)
Instructions
Make the Tangzhong
- Whisk the flour and water inside a saucepan until the flour dissolves.
- Place the saucepan over medium heat and stir the mixture frequently. In about a minute, the flour will start to thicken. Don’t walk away during this process as you can quickly burn the tangzhong! Once the flour develops into a light paste, turn off the heat.
- Transfer the tangzhong to a bowl to cool. It will thicken as it cools.
Prepare the Dough
- Lightly grease a large mixing bowl with oil. Set it aside.
- In a microwave-safe bowl, heat the milk for about 30 to 40 seconds. Add the sugar to the milk. Use a thermometer to check the temperature of the milk. It should be somewhere around 110ºF to 120ºF.
- Add the yeast and stir to hydrate the yeast. Let it sit for 5 to 8 minutes while you prepare the other ingredients. After 5 to 8 minutes, the milk/yeast mixture will foam up.
- In the bowl of a stand mixer, combine the all-purpose flour and salt. Fit the mixer with the dough hook.
- Add the condensed milk, egg, melted butter, tangzhong, and foamy milk/yeast mixture.
- Mix the dough on low until you don’t see any loose flour on the sides of the bowl. Then, increase the speed to medium-low and work the dough for 8 minutes.
- Scrape the dough out of the bowl onto a lightly floured surface and knead a few times. If the dough is feeling tacky, lightly dust your hands with flour.
- Shape the dough into a ball and place inside the greased mixing bowl. Cover the bowl with plastic and let it rise in a warm area for about 1 hour, until the dough doubles in size.
Shape the Dough (Use Photos in Blog Post for Reference)
- Once doubled, punch down the dough to release excess air. Turn the dough onto a lightly floured surface. Divide the dough into 4 equal portions (they should be about 177 to 180 grams per piece).
- Take one piece and knead it a few times. Shape it into an oval. Lightly dust the top of the dough with flour. Roll the dough into a larger oval.
- Make an envelope fold. Take the bottom third of the dough and fold it up towards the center. Then, take the top third and fold it down towards the center. The dough should now look somewhat like a rectangle.
- Rotate the rectangle 90 degrees so that a short side is facing you. Roll out the rectangle until it is about 9 x 4 inches (doesn’t need to be exact). Starting from one end, roll up the rectangle into a spiraled log. Place the rolled up dough into the loaf pan, seam side down.
- Repeat with the remaining 3 pieces of dough.
- Cover the loaf pan with plastic and let it rise in a warm spot until it triples in size. The center loaves should rise just over an inch above the top lip of the pan. (See photos in post for reference.) Depending on the time of the year, and the temperature in your kitchen, this can be anywhere between 1.5 to just over 2 hours. See note 5 for instructions on how to speed up the second rise.
Bake the Bread
- When the loaves look like it is just about done proofing, preheat the oven to 350ºF. Position an oven rack to the center position.
- Prepare the egg wash. In a small bowl, beat an egg. Add the milk. This helps to thin out the egg so that the egg wash brushes over the bread in a nice thin layer.
- Carefully brush the egg wash over the tops of the loaves.
- Transfer the loaf pan to the oven and bake the bread for 28 to 30 minutes, until the loaf is a deep golden color. It takes only 28 minutes in my oven.
- Take the bread out of the oven. The top of the loaf will feel very firm right now, but it softens as it cools.
- After 3 to 5 minutes, turn the loaf pan over to remove the bread from the pan. The bread should slide out easily. Do not cool the loaf inside the pan as moisture will build up inside the pan, causing the bread to turn soggy. Let the loaf cool on a wire rack. You can start eating the bread while it’s still slightly warm or wait for it to cool completely.
- Slice the bread and serve with jam, butter, or condensed milk. Store the bread in a container for several days.
Notes
- I recommend using a scale for this recipe. If you do not have one, make sure to use a fork to fluff up the flour in the bag or container. Then, use a spoon to scoop flour into the measuring cup, until it is overflowing with flour. DO NOT tap the measuring cup on the counter to try to get more flour into the measuring cup. Sweep the top of the measuring cup with a knife to level the flour.
- I used condensed milk so that the bread has richer flavor. You can substitute it entirely with sugar or half instant milk powder and half sugar.
- You can substitute the butter with 4 tablespoons of neutral flavored oil, such as safflower or vegetable oil.
- Loaf pans come in all different sizes. Ones that are “1-pound loaf pans” should be about 9×5 inches in diameter. For this recipe, it’s better to use a pan that is 5 inches wide. Try to use metal pans for this recipe as the heat transfer is better in metal pans.
- If you don’t have the time to wait 2.5 hours for the second rise (and I don’t blame you), you can do the second rise in a warm oven. I preheat my oven to the lowest heat setting possible, which is 170ºF. Right when the oven reaches that temperature, I immediately turn off the oven and turn the oven light on. Then, I transfer the bread pan into the oven, uncovered. In about 55 minutes to an hour, the bread will rise to the desired level.
Nutrition
Disclosure: This post was sponsored by Bob’s Red Mill! To learn more about their products and to get more recipe inspiration, follow them on Instagram or Facebook.


Natalia Mulé says
It’s PERFECTION! So fluffy!
Thanks for sharing! My kids are devouring the bread!
Lisa Lin says
Natalia, I’m so glad this recipe worked for you!! Thank you so much for making it!
Joel says
Your meticulous guide is what I have to thank for perfect shokupan. When I read through your recipes, I’m reminded of Deb Perelman’s work. Dare I saw Healthy Nibbles is the next Smitten Kitchen.
Lisa Lin says
Thanks for trying the recipe, Joel! Wow, what a compliment to be mentioned with Deb! I am nowhere near where she is, but thank you so much!
samira says
hiii.thank you for this recipe!i am sooo excited to make it.i dont have a pan like this. do you think it is okey to use a tray instead?will it destroy it?????
Lisa Lin says
Nope! It’ll work best if you have a try that has relatively high slides, like an 8×8 pan or something like that. Just shape the dough into small pieces. The baking time should be slightly less too.
Marithia says
Making this for the third day in a row! It tastes the same as when I had it as a kid. Kneeding it by hand is tough but so worth it. I ran out of active dry yeast today so testing it with instant.
Day 1 was a loaf. Day 2 was cheese and bacon scrolls. Day 3 is char siu buns!
Thank you so much for the detailed guide! 😭❤
Lisa Lin says
Marithia, thank you SO MUCH for making this recipe. Also, that is such dedication to knead this all by hand!
Lovely says
Hi can i use instant dry east?
Lisa Lin says
Yes. If you do, just skip the section where I ask you to warm the milk to activate the yeast. Ideally, the milk should be closer to room temperature though (i.e. not straight out the fridge).
Arianna says
Hello!
Thanks so much for the recipe. Can’t wait to try it! I don’t have dry active yeast (sold out everywhere in my area) but I do have instant yeast (Saf). Can I use that instead? If yes, same quantity?
Thank you!
Lisa Lin says
Hi, Arianna. Yes, I think you’d use the same amount of instant yeast!
JD says
This recipe looks really good! Thank you, can I use a
Sourdough starter for this ?
Lisa Lin says
Hi, JD! I think you can, but I’m not sure what amount of the starter you’d use….
LB says
Awesome recipe, thanks for sharing! My bread turned out perfectly light, fluffy, and delicious. I did add a LOT more flour before the first rise than directed in the recipe in order to get it to a workable consistency, and I was afraid that I screwed it up, but it turned out just great. My family finished the whole loaf in one day. I will definitely make this again!
Suzana says
Thanks for the comment, how much more you are talking about, mine wasn’t successful as I think it might be it was too wet
Nidah Shah says
I love your directions, the bread came out marvelous and your pointers helped so much. I kept the dough in a warm oven and things started working. My yeast proofed for once :). Additionally, the dough kept rising as you mentioned.
Thanks so much for the pointers and recipe!
Lara says
I prepared this bread last night and let it to prove in the fridge overnight already shaped. We baked it this morning. It is soooo good. Super fluffy. I will definitely make it again. Thank you for sharing the recipe!
Chris Crittenden says
This Shokupan recipe is awesome! I was craving milk bread during quarantine and this recipe was easy to follow and worked very well doubled to make 2 loaves! First loaf didn’t even last 12 hours and we were asleep for half of them.
Kim says
This bread looked so pretty that I just had to try making it. It was amazing! I have tried my hand at quite a few breads and this is one of the most yummiest loaves I’ve ever eaten! Needless to say it is gone but not forgotten 😍😍. The technique is easy .. just follow along Lisa’s excellent directions.
Bonus round is that I made Vietnamese coffee this morning with the leftover condensed milk! You rock Lisa! Thank you for posting this!!
Alice says
Thank you for this recipe, Can you make bread rolls with this recipe?
Lisa Lin says
Yes, you can, Alice! I think the baking time will be a little shorter because the bread is in smaller pieces. I will definitely test that myself, too!
Jo L says
Very delicious bread, I made twice in the last 2 days. First one just as the milk bread, 2nd one I used the dough and made the coconut bun 雞尾包. This is exactly the fluffiest & taste of the coconut bun. I am so happy to get to make these breads that I miss so much.. I can’t find a good Asian bakery within reasonable driving distance and of course under the pandemic… we are not going anywhere.
THANK YOU so much for this awesome recipe! Love it!!!
PS, I used bread machine to make the dough, super easy.
Lli says
I am trying this now! Q- how long was your rise? From fridge or no? How long to bake, or did you use a different setting? TY!
Jen says
I’ve never made milk bread before and am so happy I found this post for my first go!
I didn’t have sweetened condensed milk, so I used sugar + milk powder as recommended, and it seemed to work great.
I *also* discovered that I couldn’t find the dough hook for my kitchenaid, so I ended up kneading by hand. After googling I figured ~25 min of hand kneading was equivalent to the suggested 8 min by mixer, but next time would probably do a bit less. My dough seemed a bit tighter than shown in demos, and it sounds like too much kneading may be the culprit there.
Even with the slightly tight dough, my loaf turned out beautifully. I will absolutely be making this recipe again.
So thankful for the super clear instructions and technique!
Flora says
Thanks for the guide and recipe! Such useful tips, so helpful 🙂
It’s quite cold for me here so I did my second rise in the microwave, put it in there with a glass of hot water, door slightly ajar, worked a treat!
Flora says
I also kneaded by hand (the pain!) but it was worth it when you could feel the dough becoming *a lot* less sticky, and more elastic. Just gotta keep going – good workout for quarantine times.
Cindy Zhang says
Really lucky that I stumbled across this recipe! I’ve tried this bread before and failed, but this step by step guide really helped me finally successfully make this bread!!
Michelle says
Can you substitute the whole milk with 2% milk?
Cherie says
Everyone is loving the bread and I can’t stop making it! I’m having a problem with the bread sticking to the loaf pan though, any tips?
Nikki says
Love this recipe so much!!! My loaf came out perfect!!! Thank you.
M says
Can you prove the dough overnight rather than for 2.5 hours? In fridge or room? Would be great to be able to bake this in the morning 🙂
Lenci says
This recipe is just WOW! I tried so many different one and almost gave up on it. It’s completely what I was expecting: fluffy and so delicious. I always had it in my childhood when I visited my family in Hong Kong. And now I can finally bake it myself. Love this recipe and love your blog, Lisa! Thank you so much ❤️
Grace says
Hi Lisa! Love this recipe and turned out exactly as described. This is definitely a keeper! One question, have you tried or recommend with whole wheat flour? If so, it is an equal substitution or would it alter other ingredients as well? Thanks so much!
JJSL says
Thank you so much for this recipe. Pretty much every recipe online for shokupan called for bread flour but who can find bread flour these days? I was relieved to see your recipe and post about using AP flour instead. I also loved your little tips about refrigerating the dough and about waiting enough for the second rise! This was a wonderfully detailed post with helpful tips peppered throughout. The photos were gorgeous. I’ll be looking at your other recipes!
Nguyen Tran Anh Thu says
Hello, i just found ur recipe and decided to try it. However, it didnt work well for me :((.
I dont know for some reason my dough didnt rise at all. I dont know if it is because i was kneading by hand or is it because i did add a bit more flour since it is so sticky to work with. Or is it because of the condensed milk?
Lisa Lin says
Hi! Did the yeast foam up when you activated it? What kind of yeast did you use?
Bridget says
Hi Lisa, this bread was easy to make and delicious! I used white flour for the tangzhong and whole wheat for the rest of the dough. I thought the whole wheat might make the loaf less soft, but it was still pillowy and delicious! It took only half an hour to make the dough, which was astonishingly fast. Your milk bread is a wonderful (and quick!) recipe. The final loaf turned out beautifully – it rose well, didn’t have tearing issues, and was beautifully soft without being too rich. Your notes about substitutions, rising times, and shaping the final loaf were well-written, very helpful, and easy to understand. Thank you for a great recipe! This will be my go-to recipe for milk bread.
Karen says
Hi! This recipe looks great and I can’t wait to try it out. I’m wondering if it could be adapted to make a brioche loaf by putting a spread like chocolate or red bean in, rolling, then braiding? Would that change any of the proofing time? Also do you have any advice for kneading by hand? Should I refrain from adding more flour even if it feels too sticky?
Lisa Lin says
Hi, Karen! I would try to avoid adding more flour if kneading by hand. However, I have tried doing this by hand myself and it was so sticky. I was constantly scraping dough off my hands with a bench scraper. It will also take a lot longer to knead. In terms of the resting time, I think the second proof won’t need as long, but probably 1 hour at least.
Richard says
My oven has a prove position does that change the proofing time
JJSL says
Hi Karen, I kneaded by hand. I would recommend using your bench scraper at first and then doing fraisage and slap & fold method. There’s a great article summarizing on how to hand knead rich doughs like this one:
https://stellaculinary.com/cooking-videos/stella-bread/sb-011-how-mix-and-knead-brioche-hand
Holly says
This was the first recipe I used in my new journey to breadmaking. It worked out wonderfully, although I couldn’t get to the recommended weight suggested in the recipe. My proofed dough always yielded four pieces that were around the 165g to 173g mark on average; however, it still turned out. Would you be able to advise what I should do in the initial proof to get it to the recommended weight?
Regardless, thank you Lisa for this wonderful recipe! You’ve definitely boosted my confidence in my ability to produce something by means of baking.
Lisa Lin says
Hi, Holly. Don’t worry too much about the dough pieces being slightly smaller. As long as they are relatively even, that’s all that matters. The weight I listed in the recipe is there for reference. I think it might have to do with the tangzhong. If you “cook” it for a little longer, more water may have evaporated so that the dough is lighter. But being off by 10g won’t be that big of a deal. Hope this helps!
Johanna Gallant says
Hi! I absolutely adored this recipe, but after two tries my bread keeps sticking to the sides of my pan! How can I mitigate this?
Lisa Lin says
You can grease the pan if it keeps sticking again!
Maggme says
Oh this bread is so good! I have been making it at least 2’xs a week, everyone loves it. FYI I purchased a “Wilton perfect results Large loaf pan” and the loaf falls right out, (the loaf was sticking in my kitchenaid not sure why)
Thank you for the recipe, your instructions were so easy to follow with the included weights.
Lina says
Made this yesterday by hand kneading (great arm workout!), shaped it and put it in the fridge for the second proofing and it was ready for breakfast. Everybody loved it!
PD: is there a way to replace the egg?
Sara says
Hi Lisa,
So excited and glad to have found your blog!! Can’t wait to try this recipe!! I’m a total beginner in bread making. Can I make this with a bread maker ? I don’t have a stand mixer and recently replaced my 25+ year old Hamilton Beach hand mixer with its equivalent successor, but even the lowest setting sent flour flying all over my kitchen! So I definitely can’t use it for making this dough lol
Thanks for such detailed instructions – made me feel assured enough to try making it!
Nathasha Punnoose Wasdani says
Thank you so much, your recipe and tips were so helpful I could make a perfect loaf of bread for the first time. It is so amazing of you to share it. I am so happy right now like I’m over the moon thank you so so so very much for sure I will try yr other recipes thanks a million once again.
bye.
Mocha - an amateur baker says
Quick question though: it says to “Cover the loaf pan with plastic and let it rise in a warm spot until it triples in size.” I followed it so my loaf didn’t rise over the tin (oops…) How am I supposed to do that step so it will rise as nicely as the one in your pictures? Thanks in advance!
Mocha - an amateur baker says
Hi Lisa! The top part of my message got cut off (my 15mo little ninja grabbed my phone). Thanks so much for this amazing recipe! I have always hated baking bread due to multiple failures so I was quite scared to try this recipe – but my baby, MIL, and hubby all love it! Thank you!!!
Lisa Lin says
Hi! It might take a few tries to figure out. In the winter time, it might mean that you let it rise for up to 2 hours (less time if your kitchen is warm). It also depends on the size of your loaf pan. If your pan is about the same size as might, you do want to be patient and wait til it rises above the tin (if possible).
Andrea says
I tried to make two different recipes 3 x before I looked for advice on troubleshooting. Thanks so much for this as I managed to succeed the fourth time due to your advice. I will also make your loaf recipe in the next couple of day which is sure to be a success.
Lisa Lin says
Thanks for try this recipe again!! I’m so glad it worked out for you!
J says
Such a great recipe!
I have had issues with the rolls rising at drastically different paces for the 2nd rise. The outer rolls end up being overproofed and the inner rolls are underproofed. Any tips?
Emma says
Hi! Will I be able to use whole wheat flour in place of all purpose flour in this recipe? Will the weight measurement change?
Lisa Lin says
The weight measurement shouldn’t change much, but the bread itself will likely be tough.
Confused says
Hi, regarding the substitution for condensed milk. I don’t understand how sugar and milk powder can be an equal substitute for what is essentially a liquid? Or did you actually mean to reconstitute the milk powder into milk?
Hi says
Can I use a hand held electric beater I don’t hv a mixer
Lisa Lin says
I’d recommend just kneading it by hand. The handheld will struggle to knead the dough properly. The kneading takes a lot longer because the dough will feel very sticky to begin with, but you’ll get there eventually.
Brenda says
Wondering the same thing.
Patricia says
Hi, Lisa, thanks for sharing this recipe. Just looking at the bread, memories of my childhood come by.
Belem says
I love this bread, I have made it multiple times and it is delicious. Thanks for sharing the recipes.
Dina says
I love bread making this recipe was easy to follow with great deliciously fluffy results.
Lisa Lin says
Thank you, Dina!
Thalia says
Hi I just read through the recipe and would really like to try and make this but I don’t have a stand mixer will this recipe work just as well without it? Also can I find the flour in a local supermarket like sainsburys or tesco?
Lisa Lin says
So you can make this by hand, but it’ll take a lot longer because the dough is really wet and will stick to your hand constantly. Also, buy plain flour from Sainsbury’s or Tesco!
Ayesha says
Hi! Im planning to make this with a friend i do not have a stand mixer is it alright if i do it by Hand?
Lisa Lin says
Yup, you can do it by hand, but it just takes a lot longer to knead because the dough is so wet.
Ayesha says
Hi! Im planning to make this with a friend i do not have a stand mixer is it alright if i do it by Hand? :))
Olivia says
This is an incredible recipe! The blog instructions are so helpful to understand exactly what’s happening with the dough. Made this twice now, didnt let it fully triple the first time and it tore but the second time i made a double batch and turned out two gorgeous loaves. Thank you so much!!
Lisa Lin says
Thanks for trying this recipe, Olivia!! So glad you enjoyed it!
Nontuthuzelo Conjwa-Dia says
I am happy to find recipe, I can’t wait to try it out with my grandson.
Robbin says
I really appreciated your recipe for all the science-y aspects! I’m in the midst of trying out a bunch of different shokupan recipes because I live in an area where I can’t find it, so I have to make it myself. When you explained why whole milk was necessary vs. 2% milk, that was instrumental in me understanding what I was looking for.
This was by far the recipe that has helped the most. A friend of mine shared the recipe after two failed attempts at shokupan and I’m over the moon with how this turned out. Also, thank you for answering some of the q’s in the comments section — I also want to try this with instant yeast, though I’m a little scared, because it’s harder to tell if it’s alive or not!
Anyway, thank you so much for this recipe. I’m very happy with my bread and I could’ve cried.
Lisa Lin says
Robbin, thank you so much for trying this recipe! I’m so glad it worked for you!
Rose says
Hi lisa can i use white spelt flour in place of all purpose flour in your brioche please. I can’t tolerate the actual wheat flour
Lisa Lin says
Hi Rose, I’m not sure spelt alone will yield the same texture. I feel it can be combine with another type of gf flour (to make a flour blend), but I honestly don’t know what it should be!
Denise H says
Can I use this recipe with a pullman loaf pan?
Lisa Lin says
Yes, you should@ I’ve been meaning to try it in my pullman loaf pan, but I haven’t yet….
Denise H says
I will definitely try it! My loaf pans are being delivered today! Only one pan for the recipe, correct?
Denise H says
Update: Used one pullman pan and it is in the oven now! Can’t wait to try it. Your recipe was perfectly described.
Lisa Lin says
Thanks for letting me know! I hope the bread turned out well after the bake!!
Denise H says
Delicious! It’s our new favorite bread! Thank you so much for the detailed instructions. I’m making my second loaf today…I think it’ll be a weekly recipe!
Brenda says
I am also curious on how to replace the condensed mlik with the milk powder and sugar. One is liquid while the other is dry ingredients.
Debra says
My first time making this kind of bread and it turned out so soft and delicious!
Lisa Lin says
Thanks for trying this recipe, Debra!!
Molly Roberts says
So much better than NYT milk bread recipe. Excellent and consistent. Thank you!
Lisa Lin says
Thank you, Molly!!
Wiraman says
Your post is worthy of everyone’s attention. I’m excited to learn more and more. Thanks for sharing!
Amanda says
Hi Lisa, I’ve been making your bread for years and it has always reminded me of all the fluffy Chinese bakery bread I grew up eating. Now that I have a child of my own I was so excited to make this for them but unfortunately they have a dairy and egg allergy. Do you have any good substitution suggestions for both of them for this recipe?
Susan Tifental says
Excellent milk bread! I’ve tried several milk bread recipes and this is by far the best product, and the clearest instructions for the various parts. I did opt to use three tablespoons of sugar instead of the sweetened condensed milk.
This is now my go to recipe. Thank you!
Lisa Lin says
Susan, thank you so much for trying this recipe!! So glad you liked the bread!