Thank you to Bob’s Red Mill for sponsoring this post!
Baked scallion bread (蔥油麵包) is one of my favorite types of bao from Chinese bakeries. Whenever I had field trips in elementary school, Mama Lin often bought scallion bread for me to eat for lunch. I loved the strong scallion flavor that came through the bao. It is probably where I developed a love for scallions.
This scallion bread is inspired by those Chinese bakery scallion breads. The dough is based on my milk bread recipe, which relies on tangzhong (湯種) to give the bread a nice soft texture. Tangzhong is a Chinese technique of heating flour and water into a paste that is then added to the bread dough. This will give the bread a light, feathery texture.
Admittedly, this scallion bread recipe is more complicated than my milk bread. Having tested this recipe many times, I have a lot of cooking tips for you below. Make sure to read through the post before you make the bread!
HOW TO MAKE BAKED SCALLION BREAD
MAKE THE TANGZHONG
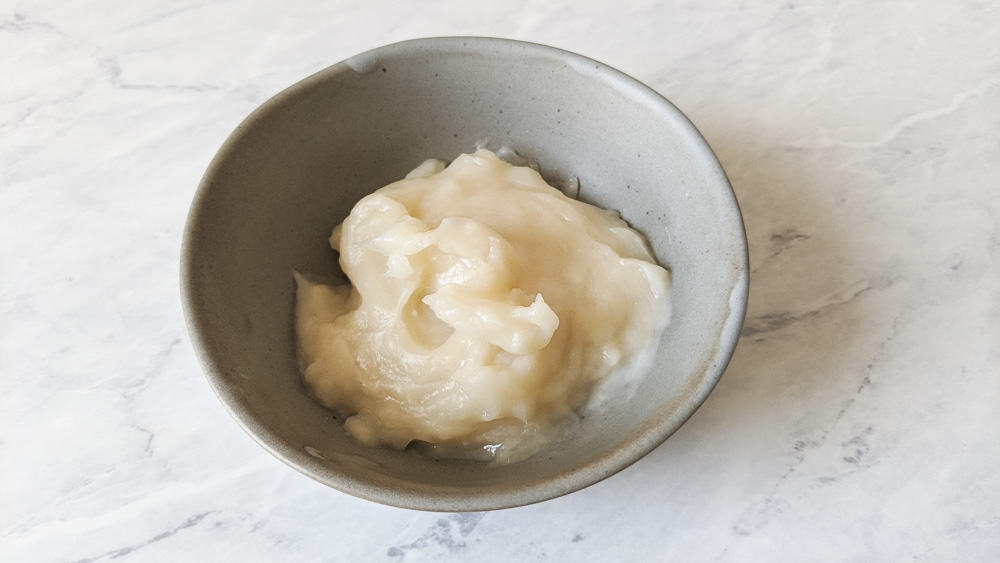
The first thing you need to make is the tangzhong. In a saucepan, whisk 20 grams (2 tablespoons + 1 teaspoon) of Bob’s Red Mill All-Purpose Flour with 75 grams (1/3 cup) of water. Heat the mixture over medium heat, stirring frequently. Once a paste starts to form, keep stirring until all the runny liquid absorbs into the paste. Transfer the tangzhong to a bowl. Let the tangzhong cool while you prepare the rest of the ingredients for the dough. For microwave directions, see the notes to the recipe.
ACTIVATE THE YEAST
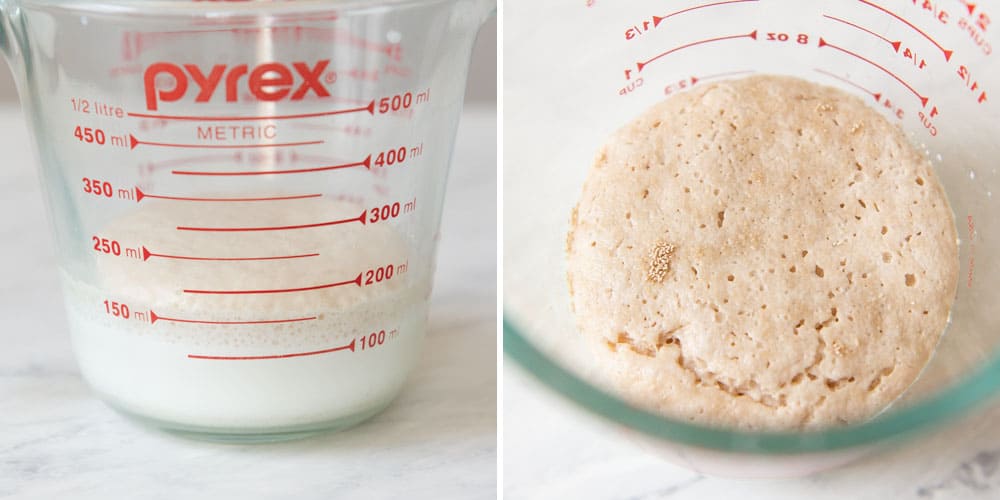
If you use active dry yeast for this recipe, you need to activate the yeast. Heat up 115g (1/2 cup) whole milk in the microwave on high for 30 to 40 seconds. Then, add 1 tablespoon of sugar into the heated milk and check the temperature. It should be somewhere around 110ºF to 120ºF. If the temperature is within the range, stir in the yeast. You don’t want the milk to be too hot because it can kill the activity in the yeast.
After about 5 to 8 minutes, the yeast should foam up like you see in the photos above. If the milk still looks flat, it can mean that the yeast is out of date or the milk was too hot.
INSTANT YEAST
If you are using instant yeast, you do not need to activate it. In other words, you do not need to heat the milk and mix the yeast with the milk. Simply add the instant yeast along with the other ingredients for the dough into the bowl of your stand mixer. Then, start mixing and kneading the dough.
MAKE THE DOUGH
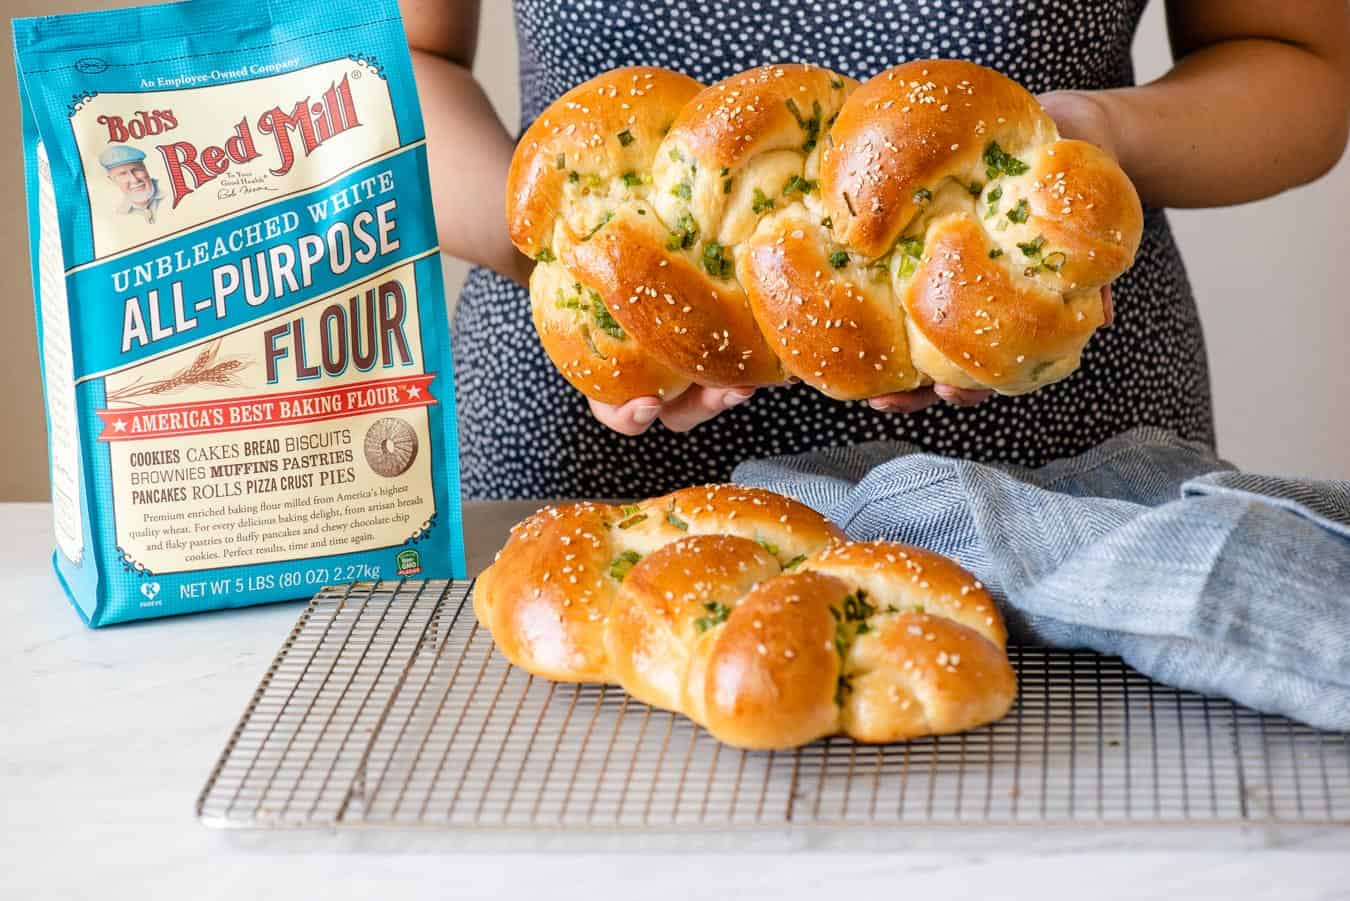
While the tangzhong is cooling and the yeast is activating, gather all the other ingredients for the dough. For this recipe, I used Bob’s Red Mill All-Purpose Flour. Bob’s Red Mill flours work wonderfully for various Asian-style breads. Not only are the flours readily available in my supermarkets, but the taste and texture of my bakes are always great. Furthermore, the all-purpose flour allows me to get the soft, fluffy texture that I expect in Asian-style breads.
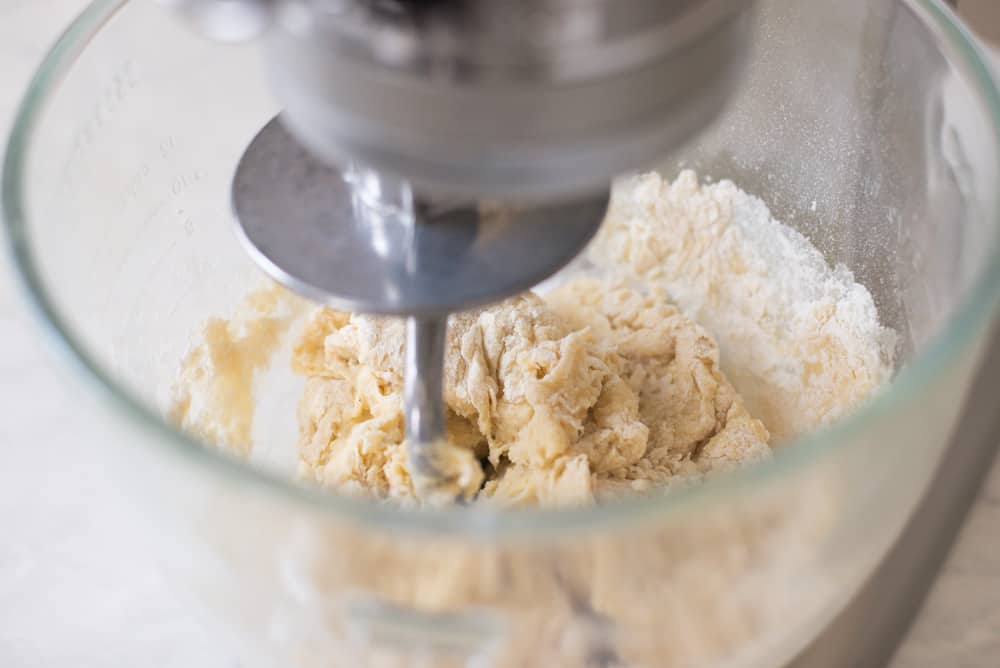
Because of the amount of liquids and fats in the dough, I highly recommend using a stand mixer. I usually mix the dough on low until there isn’t much loose flour on the edges of the mixing bowl (see photo above). Then, I increase the speed to medium-low and let the mixer work the dough for 8 minutes.
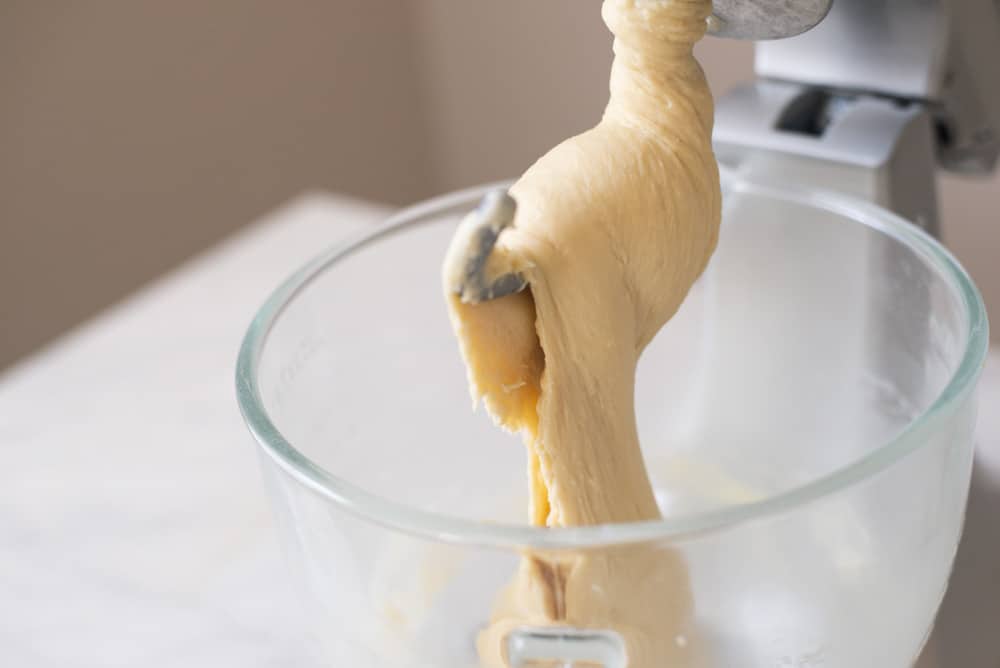
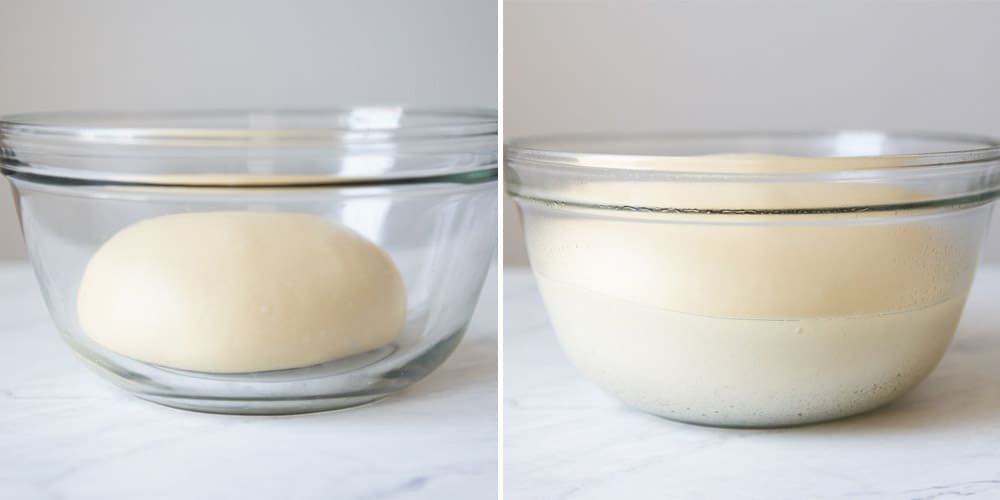
After 8 minutes, turn the dough over a lightly floured surface and knead it a few times. The dough should be smooth and supple. Then, shape the dough into a ball and place it inside a greased bowl. Cover the bowl with plastic or a silicone lid, and let the dough rise for an hour in a warm place, until it doubles in size (see photos below).
MIX SCALLION AND OIL
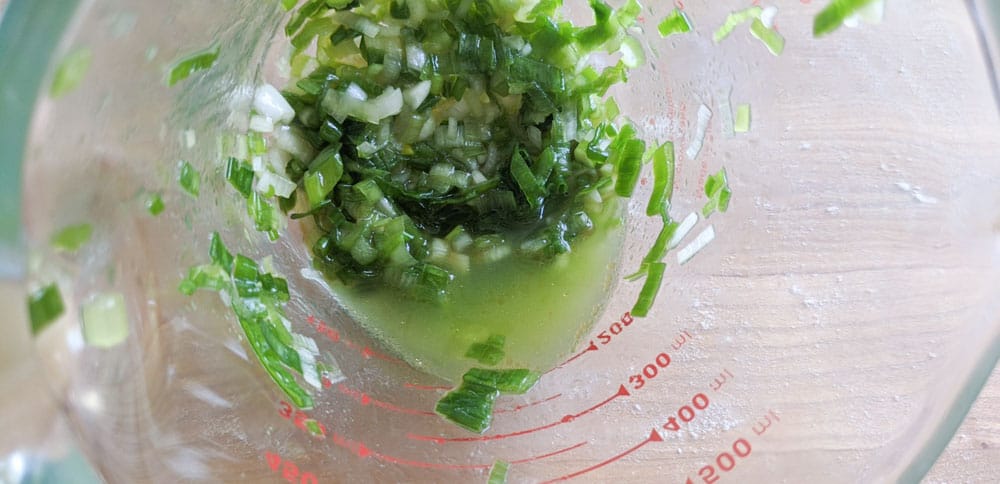
About 5 to 10 minutes before you’re ready to shape the loaves, prepare the scallions. In a bowl, stir 80 grams (1 cup) of thinly sliced scallions with 1 1/2 tablespoons sesame oil, and 1/4 teaspoon kosher salt. I like using sesame oil because it imparts a nutty aroma to the bread. However, any neutral flavored oil (such as vegetable oil) works as well. Set the bowl aside and let the scallions soften slightly.
SHAPE THE LOAVES
Line a large baking sheet with parchment paper (I used a half sheet). Set the baking sheet aside.
After the first rise, punch down the dough to release excess air. Then, divide the dough in half (about 365 to 370 grams each). Place one half back into the bowl and cover it. Take the other half and divide the dough into 3 equal pieces, about 120 to 125 grams each.
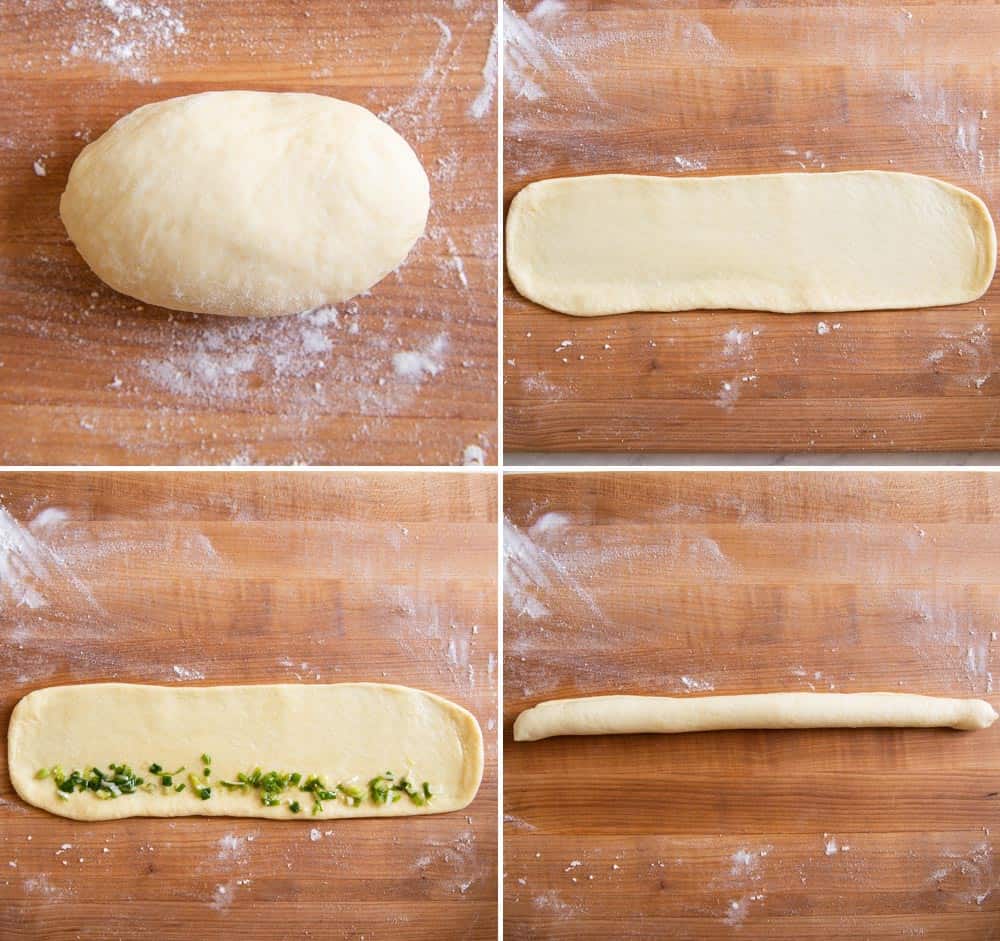
Take 1 small piece of dough and knead it a few times to get rid of any air pockets. Then, shape the dough into a small oval. Roll out the dough into a long rectangle of about 14 inches by 4 inches. Brush 3/4 teaspoon of sesame oil over the dough.
Scoop up about 1 tablespoon of the scallions, and spread it alongside the bottom edge of the dough rectangle. Starting with the bottom edge, roll up the dough into a rope. Pinch the ends of the dough rope to seal the openings. Set this piece of dough aside.
Roll out the 2 other small pieces of dough, top with scallions, and roll them up into dough ropes.
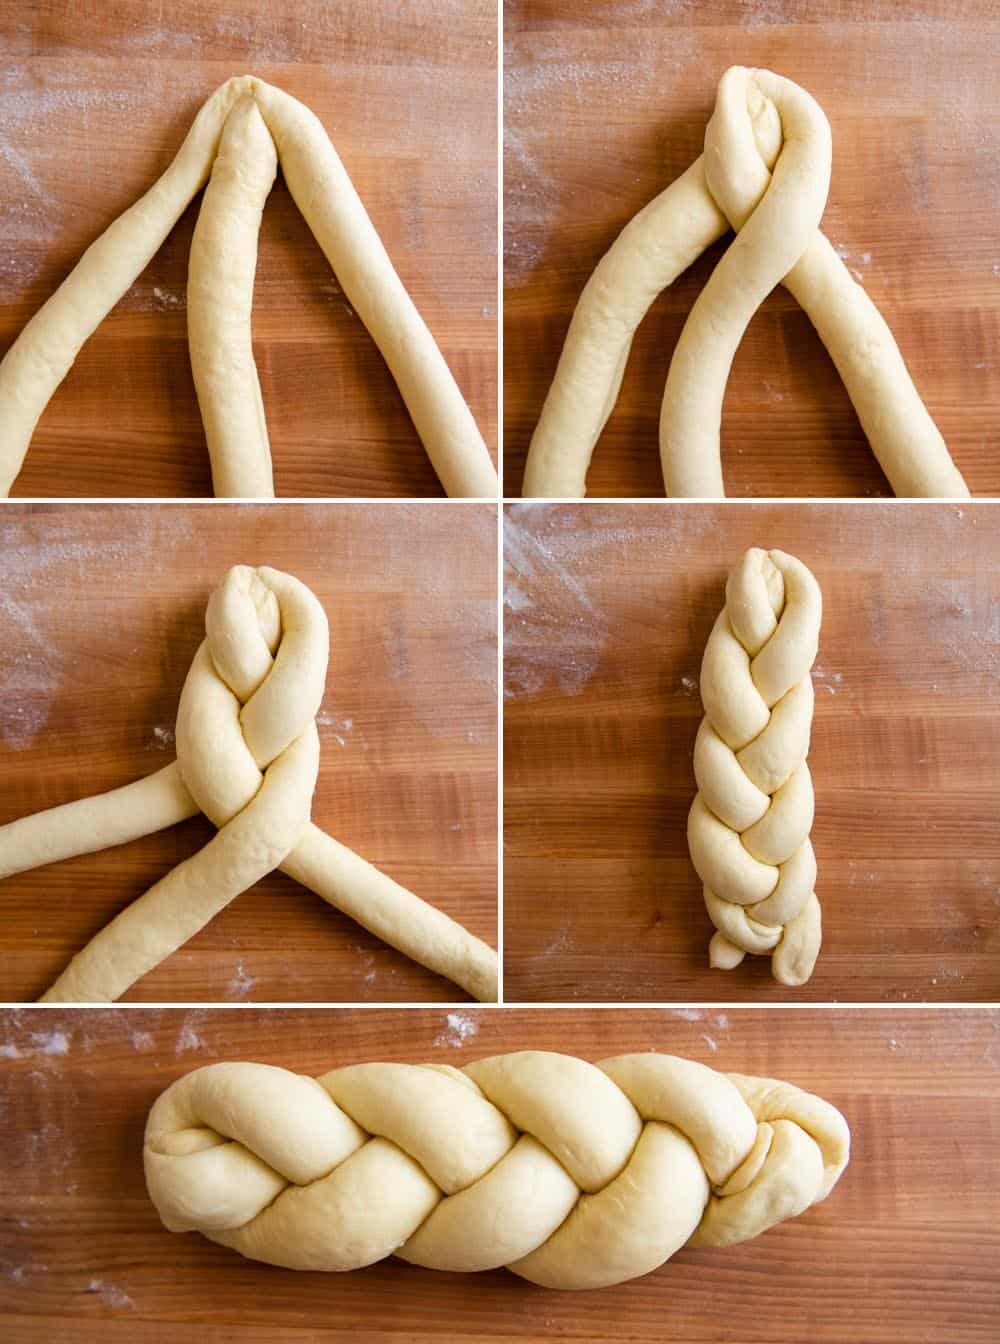
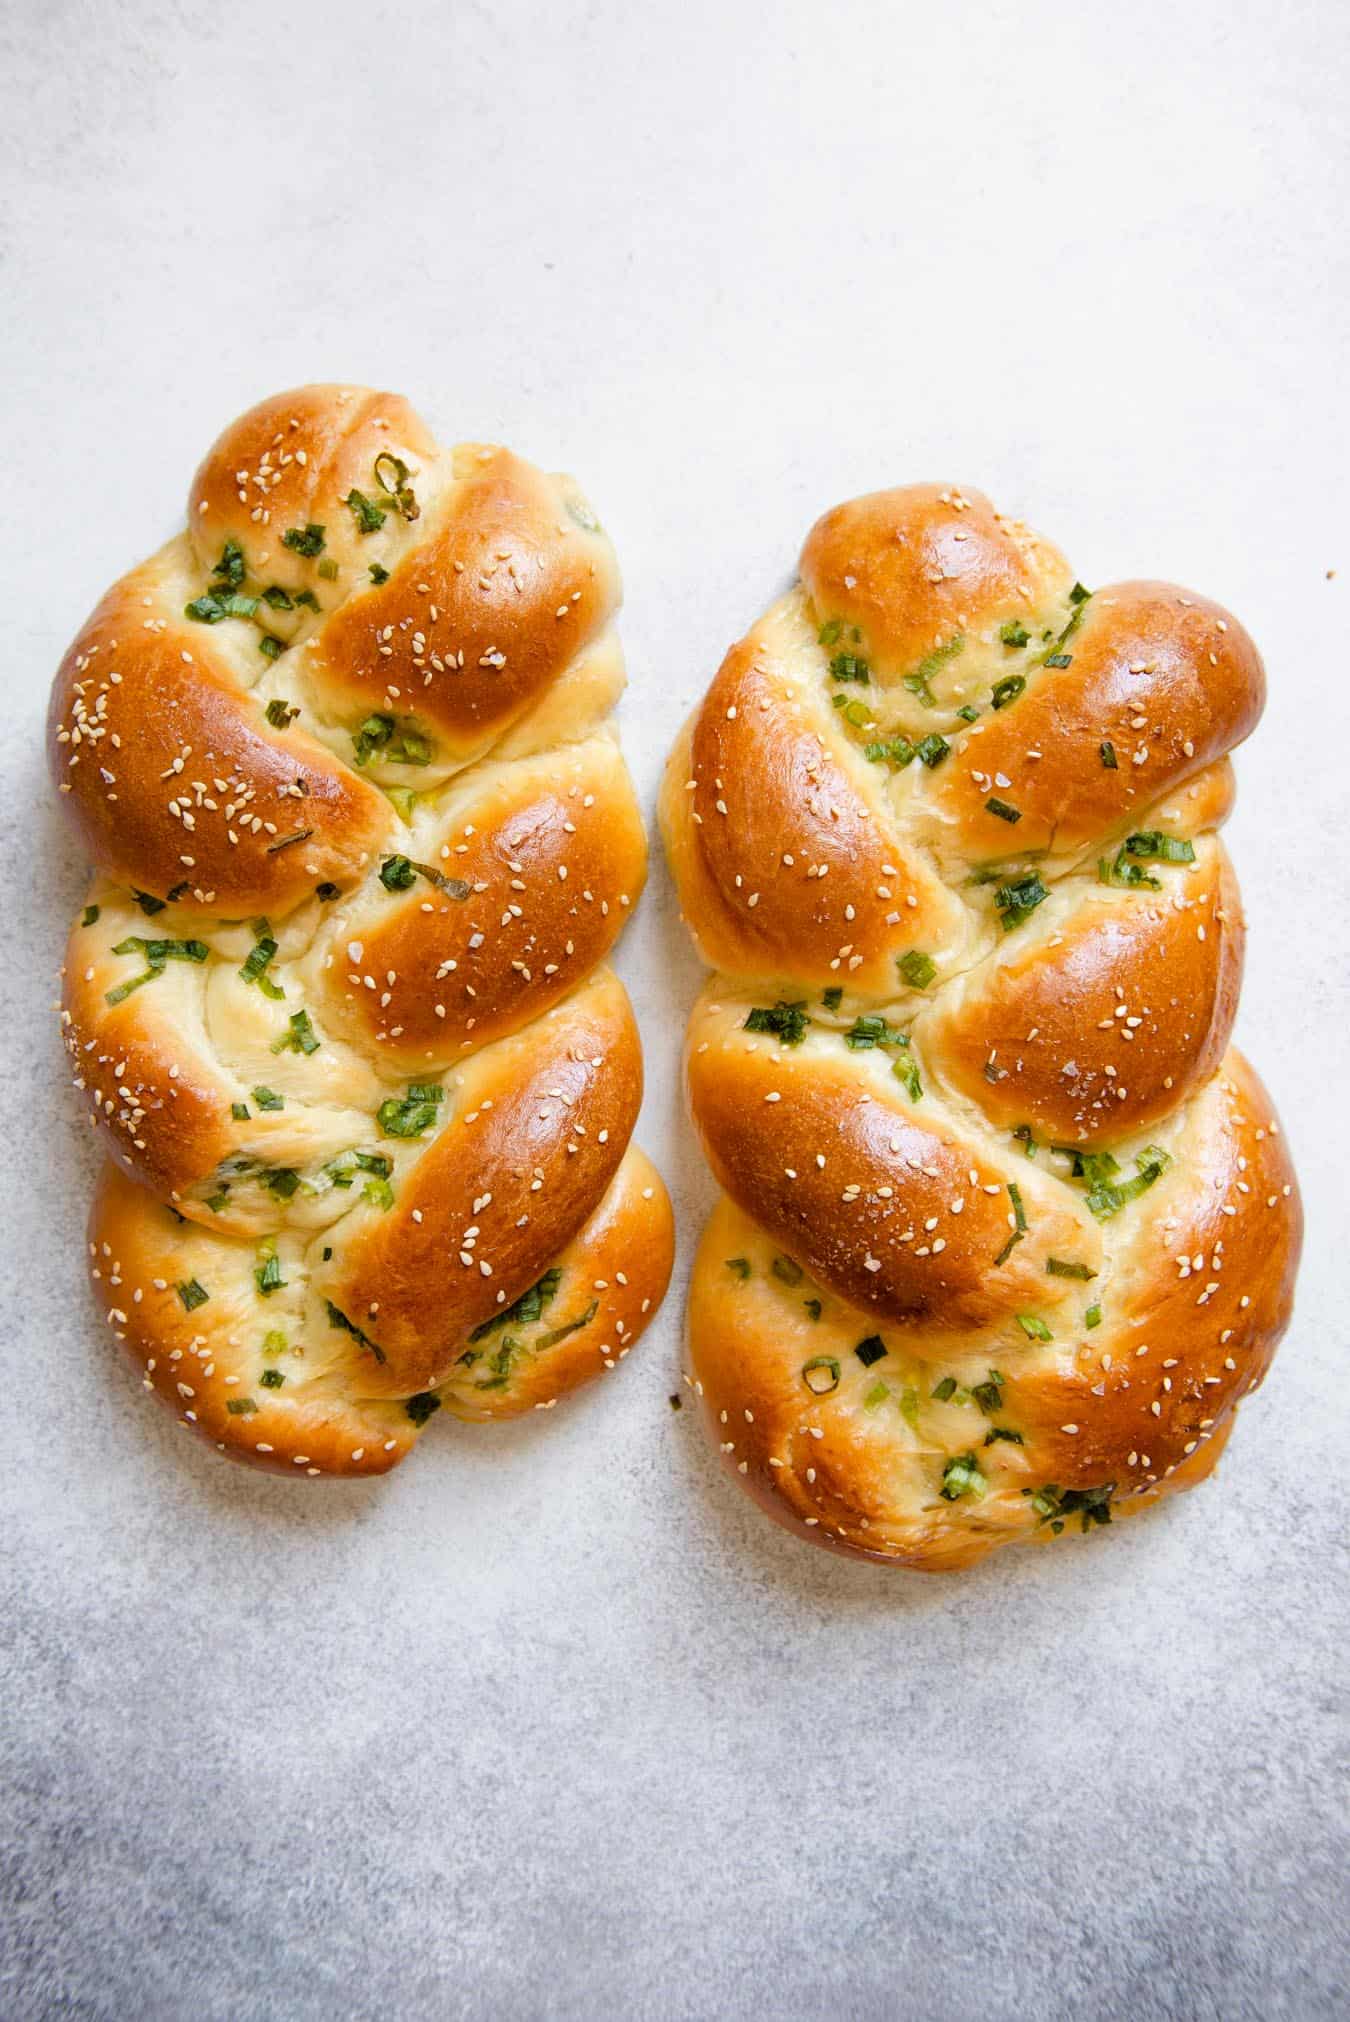
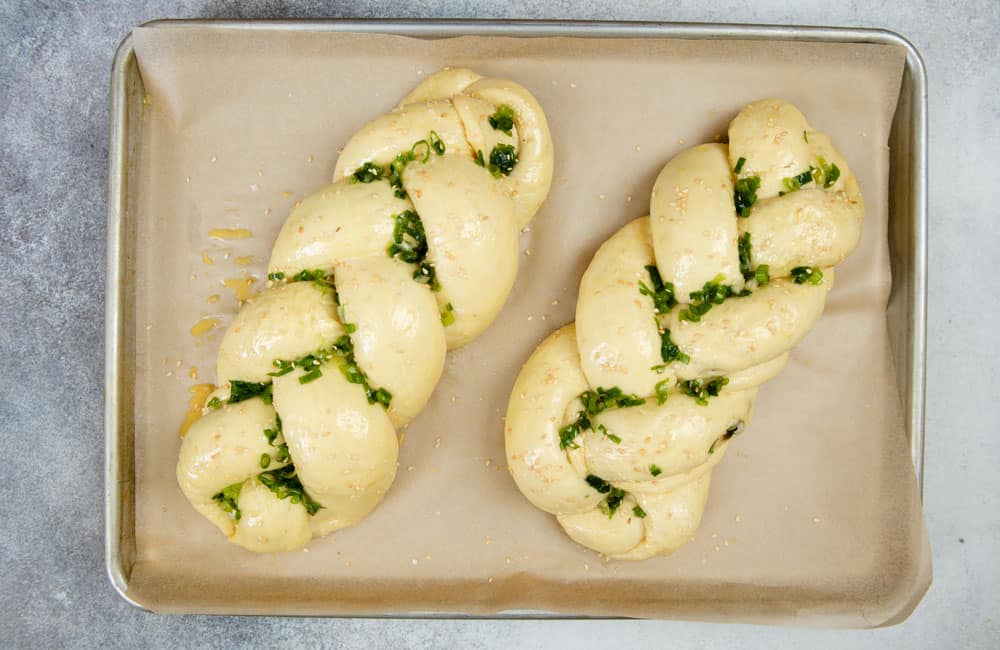
Line up the 3 ropes of dough and pinch together the ends on one side. Braid the ropes together (use photos above for reference). Once you reach the end of the braid, pinch the ends together. Tuck both ends underneath the braided loaf.
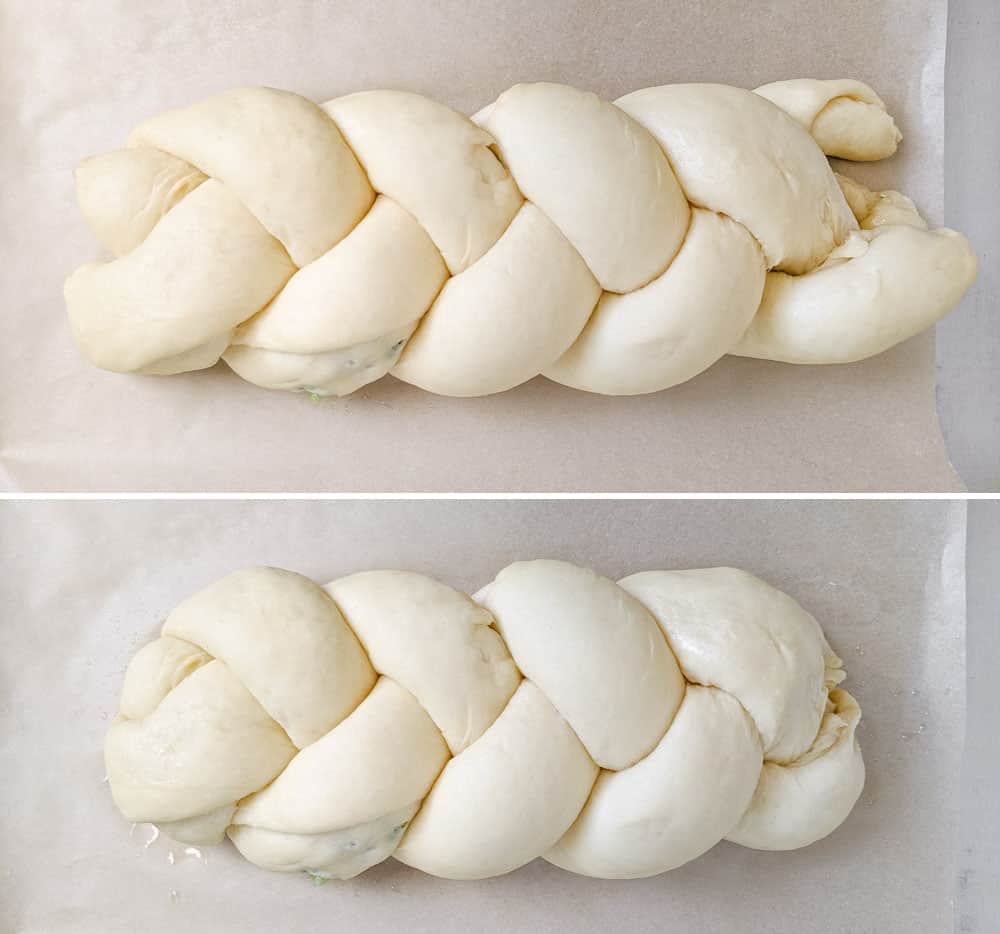
Transfer the loaf to the lined baking sheet. I laid my loaves diagonally on the sheet pan so that they have room to expand when they proof and bake.
Now, shape the remaining dough into another loaf. As you shape the second loaf, you may notice that the scallions have released a lot of liquid (see photo above). I like to rinse my scallions before slicing them, which causes a lot of moisture to accumulate at the bottom of the bowl over time. Also, the kosher salt mixed with the scallions will cause the scallions to release some moisture. Try not to scoop up the watery liquid because it can cause the loaves to turn soggy during the second rise.
PROOF THE LOAVES
Loosely drape both loaves with plastic wrap. Let the loaves proof for 1 hour 30 minutes to 2 hours, until the loaves double in size. Note that the proofing times can vary, depending on the temperature of the room. I developed this recipe in the summer, and the proofing time was about 1 hour 30 minutes. In the winter, I expect the dough needs an additional 30 to 45 minutes of proofing time because of the colder room temperature.
Technically speaking, you can bake the loaves after an hour of proofing. However, the crumb of the baked scallion bread might be tight. Also, the loaves will look like they are tearing apart at the top (see photo above). These are signs that the loaves are underproofed.
PREHEAT THE OVEN & FINISH PREPARING THE LOAVES
When the loaves are nearly done proofing, preheat the oven to 350ºF. Position an oven rack to the center position. Uncover the loaves. You’ll notice that the ends of the loaves have unraveled when they are proofed (see photo above). That is completely normal for this type of dough. Simply pinch the ends together and tuck the ends underneath the loaf again. They shouldn’t unravel during the baking process.
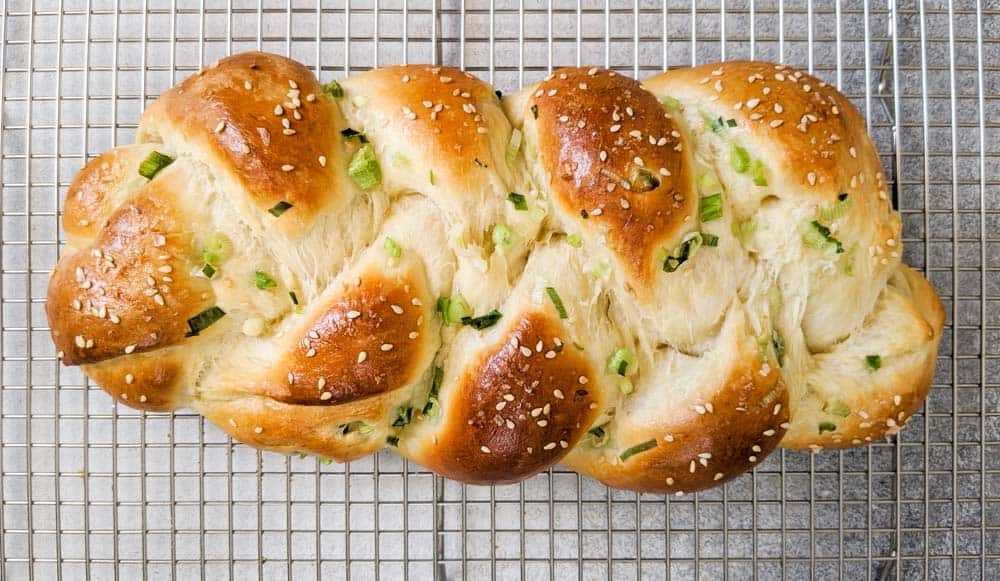
Prepare the egg wash by beating an egg with 1 tablespoon of milk. The egg wash gives the scallion bread a nice golden shine on top once the loaves are baked. Using a brush, gently apply a thin layer of egg wash over both loaves. Try not to flood the creases with egg wash.
For the topping, sprinkle a pinch of sesame seeds over both loaves. Spread the remaining scallions over both loaves (I like to fill the creases with the scallions). Finally, sprinkle a small pinch of flaked salt (about 1/8 teaspoon) atop both loaves, if you like.
BAKE THE BREAD
Bake the bread for 22 to 24 minutes, until the tops are golden brown. Take the bread out of the oven. Let the loaves cool on the baking sheet for several minutes before transferring them to a cooling rack.
CAN I PREPARE THE DOUGH AHEAD?
Yes, you can prepare the dough ahead. Transfer the dough to a greased bowl, cover it with plastic or a silicone lid, and let the dough rise overnight in the refrigerator. The dough will be stiff when you first knead it because of the cold temperatures of the refrigerator. If you are having trouble rolling out the smaller pieces of dough to a rectangle, let the dough rest for 15 minutes before rolling them again.
The tricky thing about working with chilled dough is proofing the loaves. Because the dough is colder, it’ll take more time for the loaves to double in size. You can speed up the process by preheating your oven to 150ºF. Turn the oven off immediately. Transfer the baking sheet with the loaves into the oven, uncovered. Let the loaves proof for about 20 minutes and check to see if they have doubled in size. Don’t leave the loaves in the oven for more than 30 minutes.
The danger about proofing your loaves with this method is that it is very easy to overproof the loaves. You’ll know that you overproofed when you see that the loaves have melted into a pool of doughy misery. This happened to me during one of my test batches, so I have become much more diligent about checking the process of the proofing every 10 minutes.
The loaves will be delicate to touch with this sped up proofing method. They’ll feel like they can easily deflate under the slightest of pressure. Therefore, be very careful when you brush the egg wash over the dough.
Because there are so many ways that things can go wrong, I recommend this sped up proofing method only if you have made the scallion bread successfully before without the sped up proofing. That way, you’ll have a frame of reference for how the loaves should look like after the second rise.
CAN I MAKE SMALLER LOAVES?
Yes, you can use this recipe to make 4 smaller loaves. That is something I tried when testing the recipe. However, shaping 4 loaves can take almost an hour. As a result, your first loaf can have almost 45 extra minutes of proofing time compared to the last loaf.
Of course, you can place the lined baking sheet into the refrigerator and transfer the braided loaves to the fridge as you work. The cold temperature of the fridge will slow down the proofing process. To me, that is adding unnecessary steps to an already complicated recipe. For the sake of simplicity, I recommend shaping 2 loaves for this recipe.
DOES THE BREAD FREEZE WELL?
Yes! To reheat the scallion bread, place the frozen loaf (or loaves) on a baking sheet. Then, bake it at 350ºF for about 13 to 15 minutes, until the center is nice and warm.
CAN I BRUSH THE LOAVES WITH DOUBLE EGG WASH?
If you have made other braided breads (like challah), you may be familiar with the double egg wash technique: brushing a thin layer of egg wash over the loaf before and after the proofing process. The double egg wash generally yields loaves with a shinier and more golden top.
Because of the scallions inside the loaves, I don’t recommend the double egg wash technique. It adds considerable moisture to the loaves, making them soggy and more likely to tear apart. 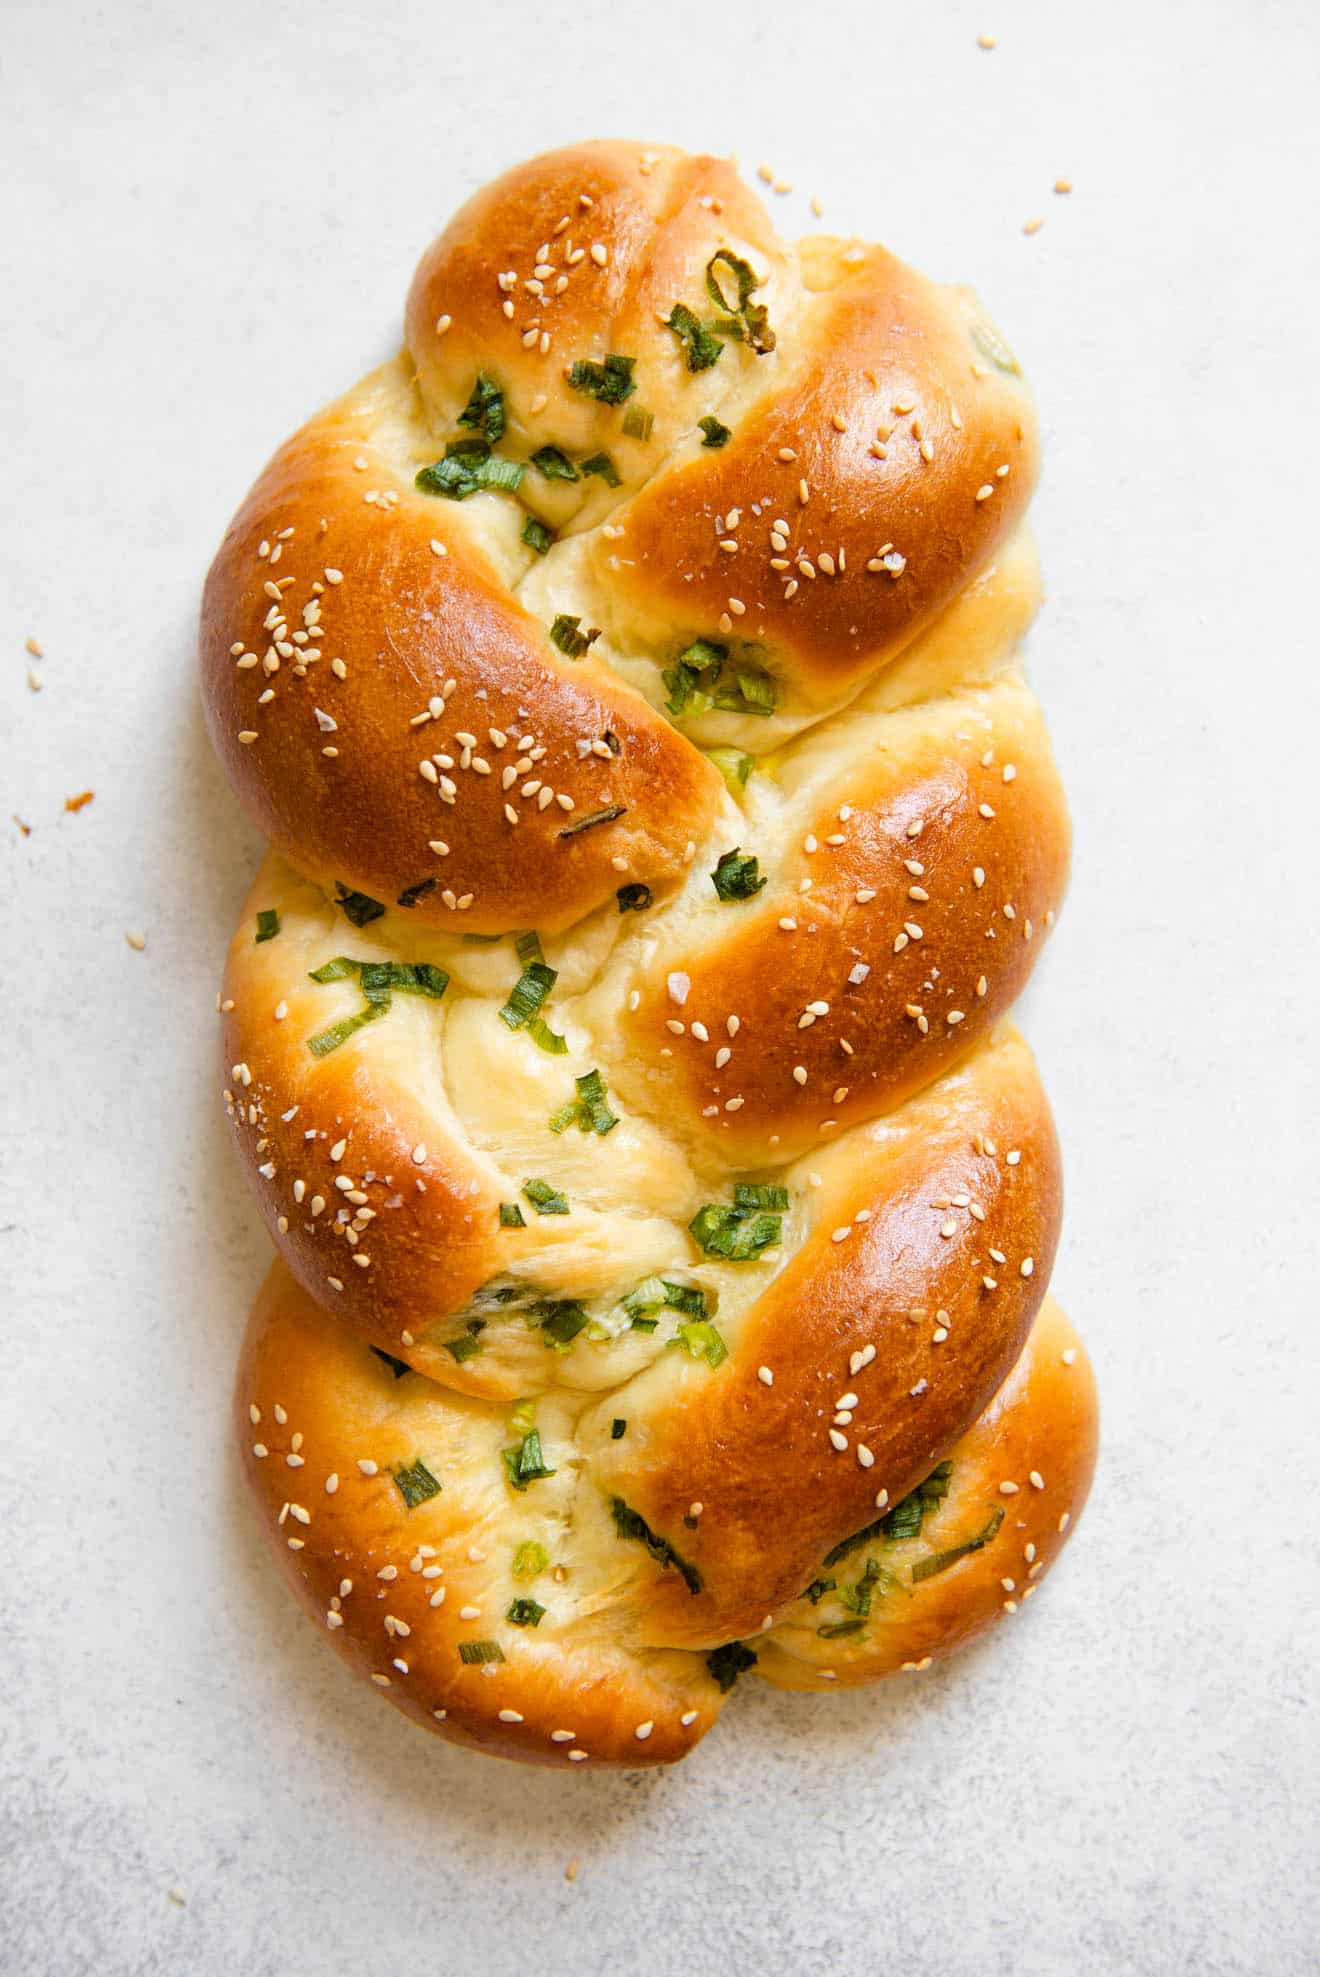
MORE RECIPES WITH BOB’S RED MILL FLOURS
Baked Scallion Bread
Ingredients
Tangzhong
- 20 grams all-purpose flour (2 tablespoons + 1 teaspoon)
- 75 grams water (1/3 cup, 78ml)
Dough
- vegetable or any neutral oil for greasing bowl
- 115 grams whole milk (1/2 cup, 118ml)
- 12 grams granulated sugar (1 tablespoon)
- 4 grams active dry yeast (1 1/4 teaspoons), (see note 1)
- 360 grams all-purpose flour (3 cups), (see note 2)
- 3 grams kosher salt (1 teaspoon)
- 60 grams sweetened condensed milk (3 tablespoons), (see note 3)
- 1 large egg
- 55 grams butter (4 tablespoons), melted
Scallion Filling
- 80 grams scallions, finely sliced (1 cup)
- 1 1/2 tablespoons sesame oil, plus more for spreading on dough
- 1/4 teaspoon kosher salt, plus more for sprinkling on dough
Egg Wash
- 1 large egg
- 1 tablespoon whole milk
Topping
- sesame seeds
- flaked salt, optional
Equipment
- large mixing bowl
- stand mixer
- plastic wrap
- rolling pin
- brush for egg wash
- parchment paper
- large baking sheet, half sheet
Instructions
Make the Tangzhong
- Whisk the flour and water inside a saucepan until the flour dissolves.
- Place the saucepan over medium heat and stir the mixture frequently. In about 30 seconds to a minute, the flour will start to thicken. Don’t walk away during this process as you can quickly burn the tangzhong! Once the runny liquid absorbs into the paste, turn off the heat. See note 4 for microwave tangzhong directions.
- Transfer the tangzhong to a bowl to cool.
Prepare the Dough
- Lightly grease a large mixing bowl with oil. Set it aside.
- Heat the milk in the microwave for about 30 to 40 seconds. Then, add the sugar to the milk. Use a thermometer to check the temperature of the milk. It should be somewhere around 110ºF to 120ºF.
- Add the yeast and stir to hydrate the yeast. Let it sit for 5 to 8 minutes while you prepare the other ingredients. After 5 to 8 minutes, the milk/yeast mixture will foam up.
- In the bowl of a stand mixer, combine the all-purpose flour and salt. Add the condensed milk, egg, melted butter, tangzhong, and foamy milk/yeast mixture.
- Fit the mixer with the dough hook. Mix the dough on low until you don’t see any loose flour on the sides of the bowl. This should take 30 seconds to a minute. Then, increase the speed to medium-low and work the dough for 8 minutes.
- Scrape the dough out of the bowl onto a lightly floured surface and knead a few times. If the dough is feeling tacky, lightly dust your hands with flour.
- Shape the dough into a ball and place inside the greased mixing bowl. Cover the bowl with plastic (or a silicone lid) and let it rise in a warm place for about 1 hour, until the dough doubles in size.
Prepare the Scallions
- About 5 to 10 minutes before you’re ready to shape the loaves, prepare the scallions. In a bowl, mix the sliced scallions with 1 1/2 tablespoons sesame oil, and 1/4 teaspoon kosher salt. Set the bowl aside and let the scallions soften slightly.
Shape the Loaves (Use Photos in Blog Post for Reference)
- Line a baking sheet with parchment paper. Set it aside.
- Once doubled, punch down the dough to release excess air. Turn the dough onto a lightly floured surface. Divide the dough into 2 equal portions, about 365 to 370 grams each.
- Place one half back into the bowl and cover it. Take the other half and divide the dough into 3 equal pieces, about 120 to 125 grams each.
- Take 1 small piece of dough and knead it a few times to get rid of any air pockets. Then, shape the dough into a small oval. Roll out the dough into a long rectangle of about 14 inches by 4 inches. Brush 3/4 teaspoon of sesame oil over the dough. Sprinkle a tiny pinch of kosher salt over the dough.
- Scoop up about 1 tablespoon of the scallions, and spread it alongside the bottom edge of the rolled out dough. Starting with the bottom edge, roll up the dough into a rope. Pinch the ends of the dough rope to seal the openings. Set this dough rope aside.
- Roll out the 2 dough pieces, fill with scallions, and shape into dough ropes.
- Line up the 3 ropes of dough and pinch together the ends on one side. Braid the strands. Once you reach the end of the braid, pinch the ends. Tuck both ends underneath the braided loaf.
- Transfer the loaf to your lined baking sheet. Lay the loaves diagonally on the sheet pan so that they have room to expand when they proof and bake.
- Shape the remaining dough half into a second loaf. (See note 5)
- Loosely cover the loaves with plastic wrap. Let them proof for about 1 hour 30 minutes to 2 hours, until they double in size. (See note 6)
Bake the Loaves
- When the loaves are nearly done proofing, preheat the oven to 350ºF. Position an oven rack to the center position.
- Lightly beat an egg with 1 tablespoon of milk. Set the egg wash aside.
- Carefully peel away the plastic wrap and gently brush the loaves with a thin layer of egg wash. Be careful not to flood the creases with egg wash. Sprinkle toasted sesame seeds and flaked salt (if using) over the loaves. Finally, spread any remaining scallions over the two loaves. I like to add the scallions to the creases of the loaves.
- Bake the bread for 22 to 24 minutes, until the bread is golden brown on top. Let the bread cool on the baking sheet for several minutes before transferring them to a cooling rack. Enjoy while they’re still warm!
- You can store the loaves in a container at room temperature for up to 2 days. See note 7 for freezing directions.
Notes
- If you are using instant yeast, you do not need to activate the yeast by mixing it with warmed milk and sugar. Just mix it directly with the other ingredients for the dough.
- I recommend using a scale for this recipe. If you do not have one, make sure to use a fork to fluff up the flour in the bag or container. Then, use a spoon to scoop flour into the measuring cup, until it is overflowing with flour. DO NOT tap the measuring cup on the counter to try to get more flour into the measuring cup. Sweep the top of the measuring cup with a knife to level the flour.
- If you do not have condensed milk, you can replace it with 2 tablespoons of milk powder and 1 tablespoon sugar.
- Microwave tangzhong directions: Heat the flour and water mixture for 20 seconds on high. Take the bowl out of the microwave, stir everything and check the consistency of the mixture. Continue heating the mixture at 5 to 6 second intervals, stirring in between, until you get a thick paste.
- I like to rinse my scallions before slicing them, which causes a lot of moisture to accumulate at the bottom of the bowl over time. Also, the kosher salt mixed with the scallions will cause the scallions to release some moisture. Try not to scoop up the watery liquid because it can cause the loaves to turn soggy during the second rise.
- Note that proofing time can vary depending on the temperature of the room. When I developed this recipe in the summer, the loaves took 1 hour 30 minutes to proof.
- Freeze the bread in a freezer bag for up to several months. To reheat the bread, bake the frozen loaf at 350ºF for 14 to 16 minutes. You do not need to defrost the bread.
Nutrition
Disclosure: This post was sponsored by Bob’s Red Mill! To learn more about their products and to get more recipe inspiration, follow them on Instagram or Facebook.


Betty says
I cannot wait to make this, it looks amazing! Can I use gluten-free flour?
Lisa Lin says
Hi, Betty. You can certainly give gluten-free flour breads a try. I have not tested this recipe with any gf flour blends, so I’m not sure what the results will be.
Shanese says
This turned out so well! It was my first time making Tangzhong, and it will definitely not be the last. I used Almond milk instead of whole milk and omitted the condensed milk and used 2TBS of sugar.
Thank you for sharing this recipe!
Ceecee says
This looks amazing! I do not have a stand mixer and knead all dough by hand- can you provide any guidance for those of us doing this by hand? Thanks
Chi says
I substituted the condensed milk as recommended with milk powder and sugar (little less liquid) and kneaded by hand. Had to use a scrapper whilst kneading (roughly 30 mins). The dough was still a bit sticky after half hour (my hands were tired by then) but I still got a good rise and the bread was soft!
Mel says
I made these following the recipe exactly and they came out beautifully and so delicious!! The only difference is, I used what looked like over a cup of sliced scallions and it weighed out to only about 50g (vs the 80g in the recipe), but it was plenty. Lovely recipe, thank you!
Christy says
Hi! I was wondering if bread flour would be better to use than all-purpose? This seems super similar to milk bread which I’ve always used bread flour for. Thanks!
Lisa Lin says
Yes, it will work!
Malavika says
Hi Lisa, I tried this recipe with the adjustment to condensed milk since I didn’t have any. And I don’t have a stand mixer so I used a hand held beater with the dough hook attached. However my dough did not rise at all. I let it proof over night and still it rose very little. I still continued the rest of the steps and baked the bread. It was soft but turned out a bit biscuity. Do you think it was a problem with the yeast? Or should I have kneaded it more ?
Lisa Lin says
It might have to do with the yeast! Did the yeast bloom at all when you added it to your milk (assuming you are using active dry yeast).
Courtney says
Hello! Am wondering if I can use a plant based milk instead of the whole milk? We usually dont have milk in our fridge, instead could I use Oat milk?
Lisa Lin says
Yup, it should work. The taste won’t be as rich, but it works.
Dayan Hernandez says
Hi! This looks amazing and can’t wait to try it ! Can I use non-fat milk? Or will this recipe only work with whole milk ?
Thanks !
Lisa Lin says
You can use non-fat milk, but the bread won’t taste as rich.
Lisa Lin says
The bread might also be a little more dry
Annie says
Just made these today and they turned out so well!! My entire house smelled so good when they were baking! I don’t own a stand mixer, so I kneaded it by hand. I was worried that the dough wouldn’t turn out as fluffy as I wanted, but it did!! I just hand kneaded the dough for about 12-15 minutes until it wasn’t as sticky and I added a tiny bit of flour every couple of minutes to help with the stickiness.
Jacquelyn hayes says
Hi, I just made these and they turned out great! What do you traditionally serve this with? I mean, I think they’d go great with just about anything, but curious to hear your thoughts!
Jen Lin says
Some soy milk sounds really good 🙂
Lisa says
I made this and it was delicious when it first came out of the oven but now the next day it’s hard..i have to microwave it to eat it! what did i do wrong?
Lauren says
Is it possible to omit the condensed milk?
Lisa Lin says
You can replace it with 2 tablespoons sugar. The condensed milk is to add milky flavor to the bun.
Renee says
This recipe took care of my craving for both scallion pancakes and scones. Delicious!
Shannon Broome says
Could you put other fillings in the bread? My husband and I love scallion but need to make the 2nd loaf a bit more kid friendly.
Singapore Home says
Really interesting recipe here.
Great job blog post.
Do you have any recipes that for a Paleo diet ?
Anna Z says
So delicious! I have used this recipe several times now and it never fails to impress. Thank you so much for sharing!
michelle says
Can I leave these outside overnight or should I put them in the fridge
Lisa Lin says
You can leave them out overnight!
Jen Lin says
When putting the sesame oil on the dough before wrapping – do you brush the whole rectangle or just the bottom strip?
Lisa Lin says
The entire rectangle! Just lightly with some oil.
Johanna Gallant says
I subbed the yeast for 100g of full hydration sourdough starter, and took out 50g of flour and 50g of milk. I also used 2% milk and put in an extra bit of butter. It was definitely hard to gauge rising times in my cold kitchen, particularly because of the sourdough. The result was still a beautiful, soft savory bread, and I think the sourdough flavor heightened it!
Preeti Ramaraj says
Hello, I absolutely love your recipes! Do you have suggestions of what I can use to replace the 1 large egg in the dough?
Lisa Lin says
Hi, Preeti! Some people have used a flax egg (I think it is 1 tablespoon ground flax with 3 tablespoons water) with success.
Marie says
Hi, can you use bacon and sliced mushrooms in place of the scallions? Thank you!
Mikko says
Hi Lisa,
Couple questions – for the condensed milk substitute (2T milk powder + 1T sugar) – I’m a little confused. Condensed milk is a liquid consistency. However the substitute sounds dry – am I supposed to add liquid to the milk powder and sugar mixture to create a liquid? If so, how much liquid?
Second question, can I use whey instead of whole milk for the dough? I made your paneer recipe and have a lot of whey leftover. Some of the comments indicated that it’s possible to use whey in bread recipes. Your thoughts?
Susanne says
I followed this recipe, but the dough never rose. I used instant yeast – which looks acceptable according to the recipe. Any ideas why it didn’t rise? Thanks!
Lisa Lin says
Hi Susanne, instant often times won’t rise as much as active yeast because you don’t need to warm the milk to activate the yeast. As a result, you dough is going to be at a lower temperature, the yeast activity won’t be quite as active, and the dough won’t rise as rapidly. Did your dough not even puff up at all? There should be some puffing up if the instant yeast is still active.
Kim says
I made this for the first time yesterday. It came out soft and fluffy. This recipe is perfect! I used instant yeast and reduced fat milk. It was delicious! My 2 loaves were gone before they got a chance to cool down. Thank you so much, Lisa!
Lisa Lin says
Awesome! Thanks for letting me know it worked!
Lucy S. says
Thank you for the detailed recipe. I used the sourdough brioche dough from Emilie Raffa’s book as base and followed your recipe to make the filling and braids.
Lisa Lin says
Awesome. Thanks, Lucy!
Vanna says
Someone gave us a bunch of scallions so why not? I’ve never made any sort of decorative bread, so this was a first for me. The recipe and instructions are fool-proof and easy to follow, and yielded two delicious, fluffy, and beautiful loaves. I subbed the condensed milk for 40 mL evaporated milk + a tablespoon of sugar, turned out well. Also since I don’t have a stand mixer, I kneaded the dough by hand for about 8-9 minutes and the dough turned out tender and formed. Baked for 25 minutes on 330F convection and they’re the most perfect loaf babies 🥺
Lisa Lin says
Vanna, THANK YOU for trying this recipe and providing those hand-kneading notes!!
Lisa Lin says
And the convection oven notes, too!
Patee says
This recipe turned out exactly as described and pictured. It was so easy to follow the instructions and bread was absolutely delicious! I am so excited to try other recipes in this blog! Thank you, Lisa!
Lisa Lin says
Thank you, Patee!!
Tiffany says
Hi I was wondering why you call for slightly more flour in this dough recipe (360g) than in your basic milk bread recipe (320g)? Is this just to stand up to the fillings better?
Thanks!
Lara Netting says
This bread was delicious and reminded me of the onion breads I ate while on a trip to Taiwan. Because I am avoiding sugar, I proofed the yeast with no sugar in the milk and used milk rather than condensed milk in the recipe. It worked out beautifully.
Lisa Lin says
Lara, thank you so much for trying this recipe! I’m glad it worked out for you!
Alice White says
Lisa, this is great bread. Everyone loved it and one loaf is already gone before dinner! I do have a question about the scallions. Is there any reason to not scatter the scallions over the rolled-out rectangle? Mine were kind of clumped instead of evenly distributed. Thank you all the details you included…and the photos.
Emily says
Hi Lisa,
I’m hoping I can shape the bread and do the final proof in the fridge overnight, then bake fresh in the morning—do you think that would work or would the scallions exude liquid into the bread dough? Thank you in advance!
Lisa Lin says
Hi Emily! I haven’t tested that yet so I can’t say with 100% certainty if the scallions will cause the dough to turn soggy. I have, however made scallion pancakes that are filled with a ton of scallions and shallots, and refrigerated the coiled dough overnight. The scallions didn’t really add enough moisture to damage the dough. I don’t know if this gives you comfort to do the final rest overnight.
Emily says
Thanks for your response! I ended up doing all the steps a day in advance up until the baking and placed in the fridge overnight to rise. The bread didn’t rise much (I took it out of the fridge while the oven was preheating) but they poofed up beautifully whilst baking.
Perhaps if using super, super fresh scallions it would exude noticeable liquid into the dough, but I think with an extra minute or so of bake time, they would be just fine! Delicious recipe, huge hit.
Lisa Lin says
Emily, thank you so much for this feedback!!!
Ellen Ives says
This looks like a good recipe, challenging but likely worth the effort. I appreciate your detailed instructions. We eat a plant-based diet. I would like to switch to full fat oat milk and use Bob’s Red Mill egg replacer. I wonder if you or others have tried this before and if there are any tips available.
Lisa Lin says
Hi Ellen! I have not used the egg replacer yet, though I have it in my pantry. I think it could work for the bread, but don’t use it as the egg wash for the top. You can just skip the egg wash.
Emily Ramnarine says
This bread is so good!!!! Made exactly as written. Could have used even more scallion flavor, but maybe that would make it too wet. Perfect texture, beautiful flavor, lovely soft dough to work with. Yum!
Lisa Lin says
Thank you, Emily!