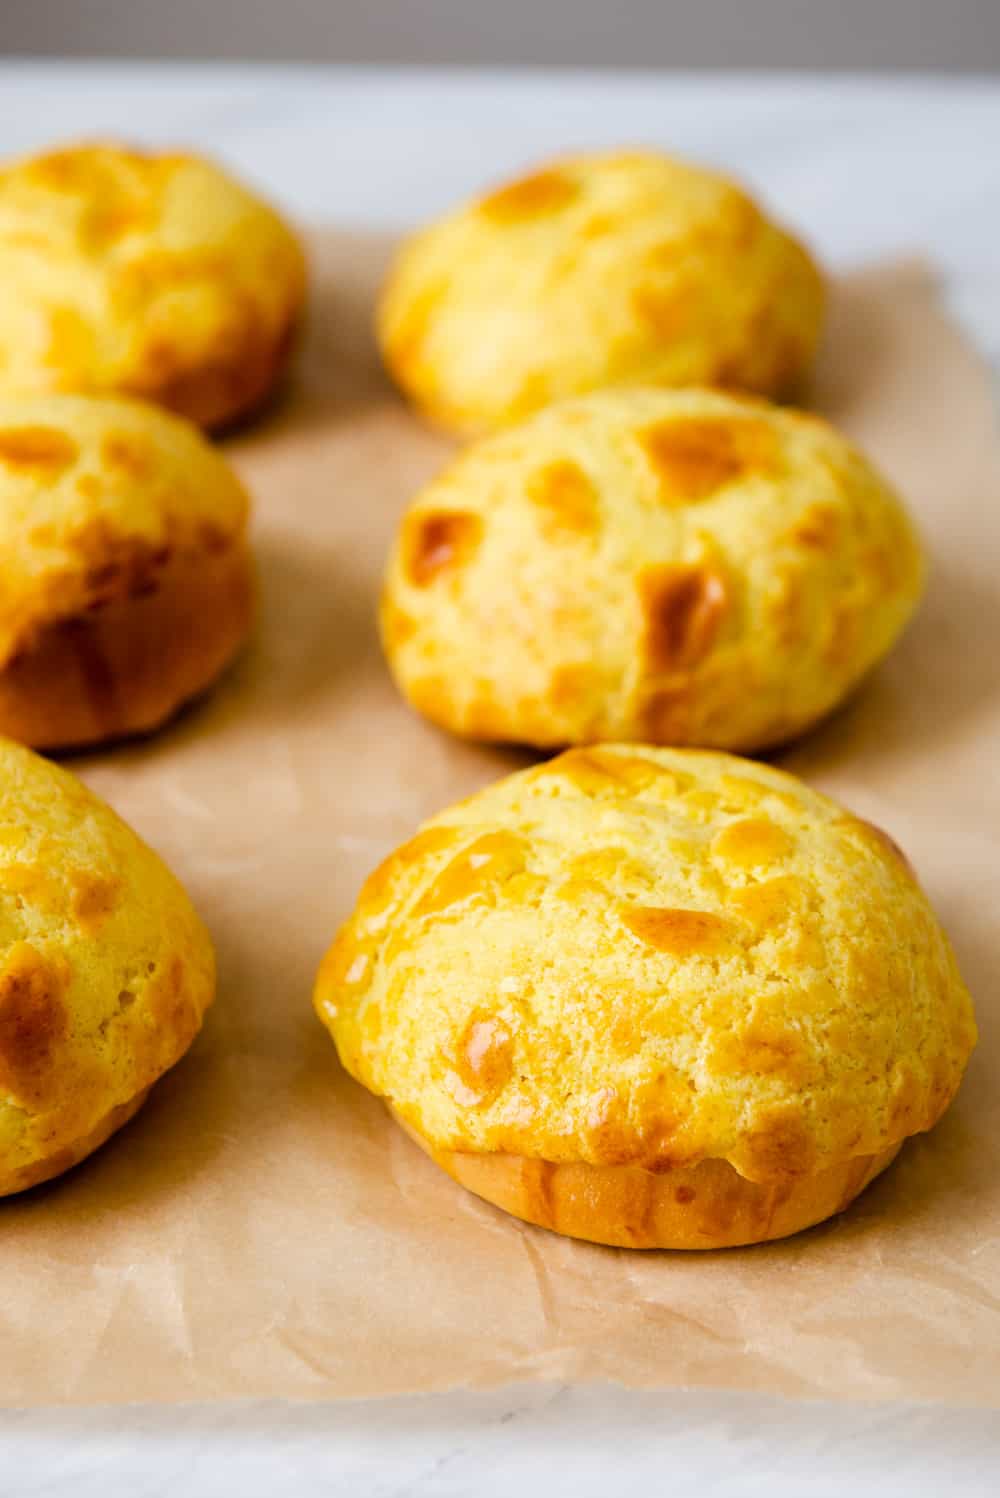
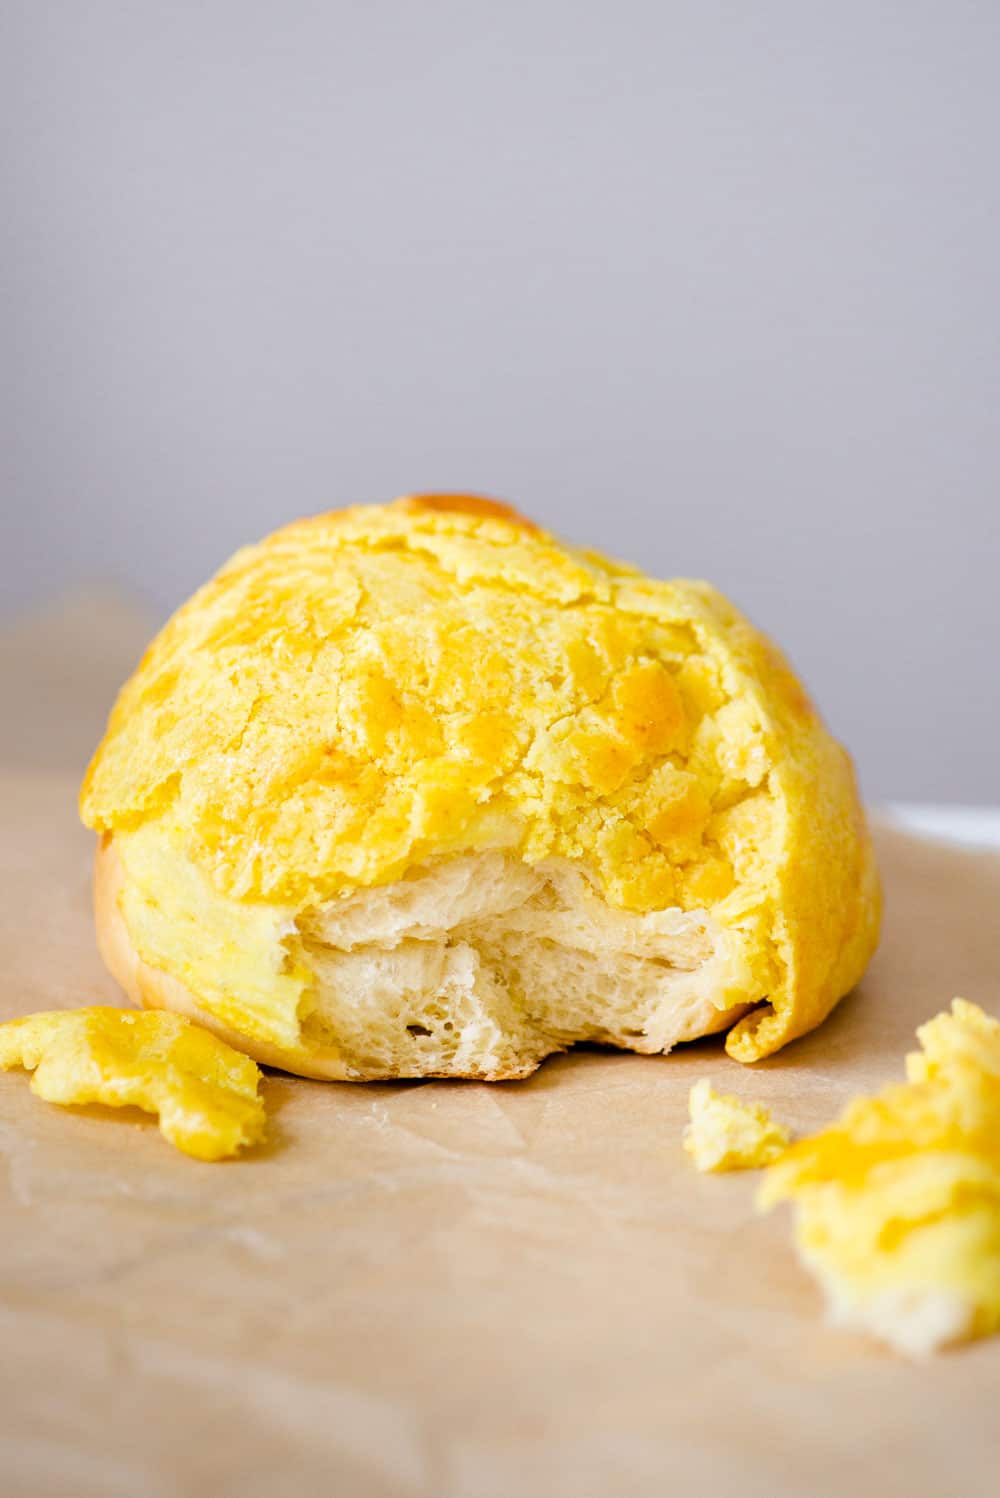
Pineapple buns are classic pastries that you can find in Hong Kong style bakeries. The bun is soft and slightly sweet and it’s topped with a golden crunchy, crumbly crust. This pineapple bun recipe uses ingredients that you can find in any grocery store.
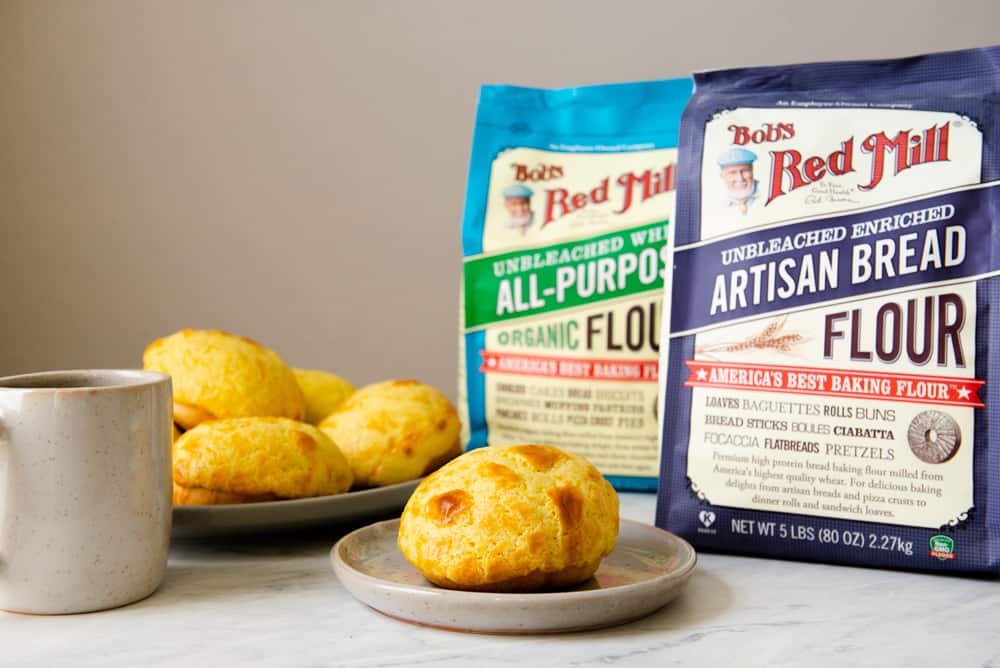
Thank you to Bob’s Red Mill for sponsoring this post!
Pineapple buns (菠蘿包, bolo bao in Cantonese) are one of my favorite pastries from Chinese bakeries. Said to have originated from Shanghai, pineapple buns gained popularity in Hong Kong & Chinatowns throughout the world. Although the pastry does not contain any pineapple, the name comes from the way that the topping looks when it’s baked.
I have been eating pineapple buns since my childhood, and I’m so excited to finally figure out a recipe to make them at home. This recipe uses ingredients that you can easily find in any supermarket. I have tested this recipe probably 10 times and have provided a lot of tips and tricks below that you’ll need to make delicious pineapple buns.
HOW TO MAKE PINEAPPLE BUNS
MAKE THE DOUGH
I wanted the buns to have that characteristic soft texture that I find in pastries from Chinatown bakeries. Therefore, I adapted my milk bread recipe to use as the base for these pineapple buns. One important key to making the bread soft is to add tangzhong into the dough.
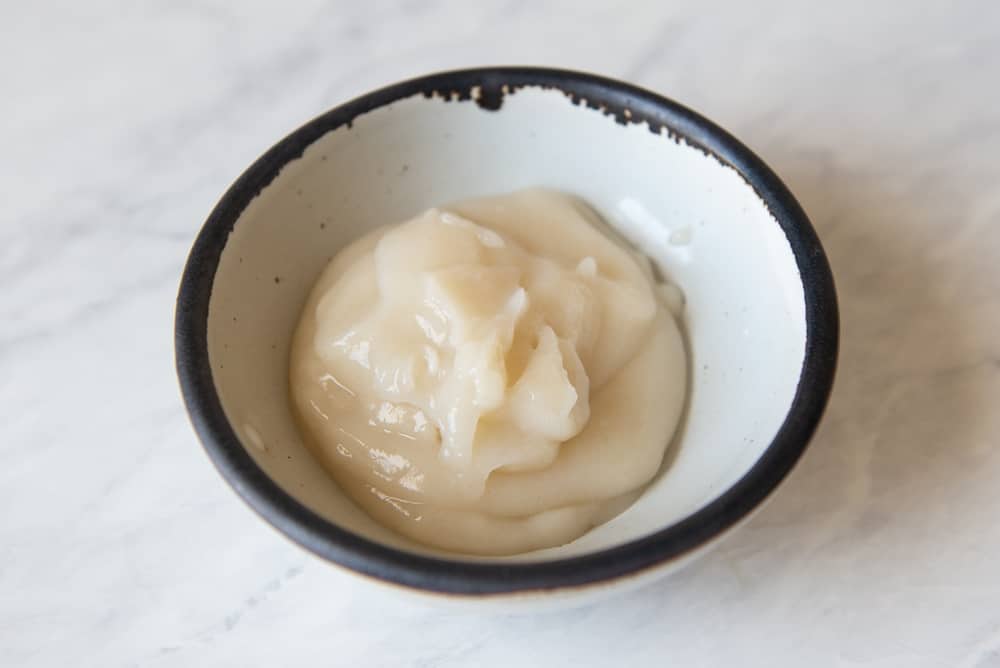
Tangzhong (湯種) is a Chinese technique of heating flour and water into a paste that is then added to the bread dough. This will give the bread a lighter, more feathery texture. To make the tangzhong, mix 2 tablespoons of Bob’s Red Mill Organic All-Purpose Flour with 1/3 cup of water. You can either heat this mixture in the microwave or in a saucepan until it forms a thick paste (see photo above). Once cooled, combine the tangzhong with the other ingredients for the dough.
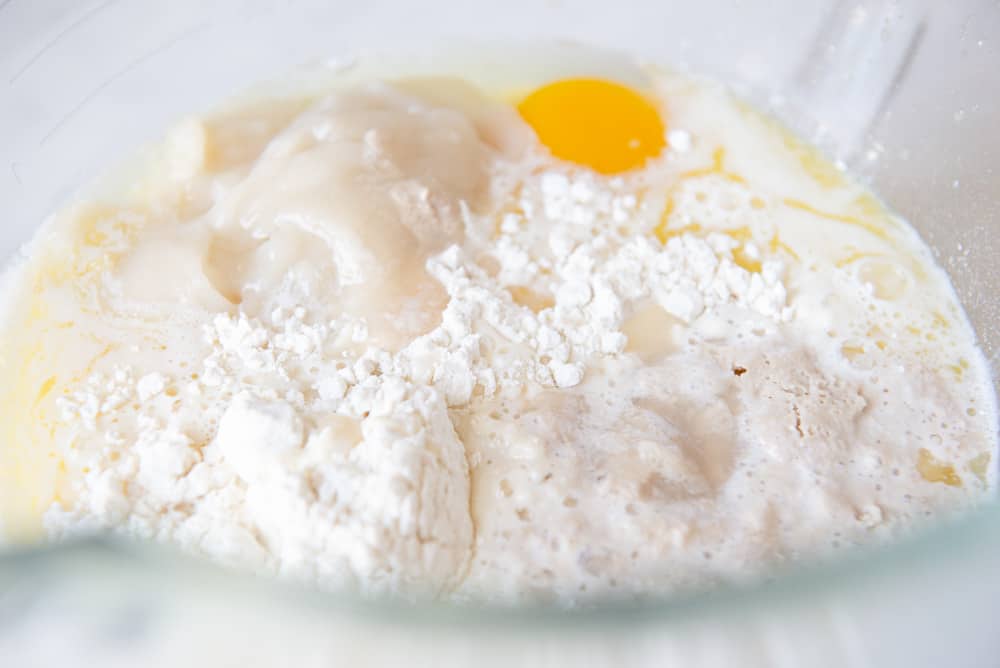
ACTIVATE THE YEAST
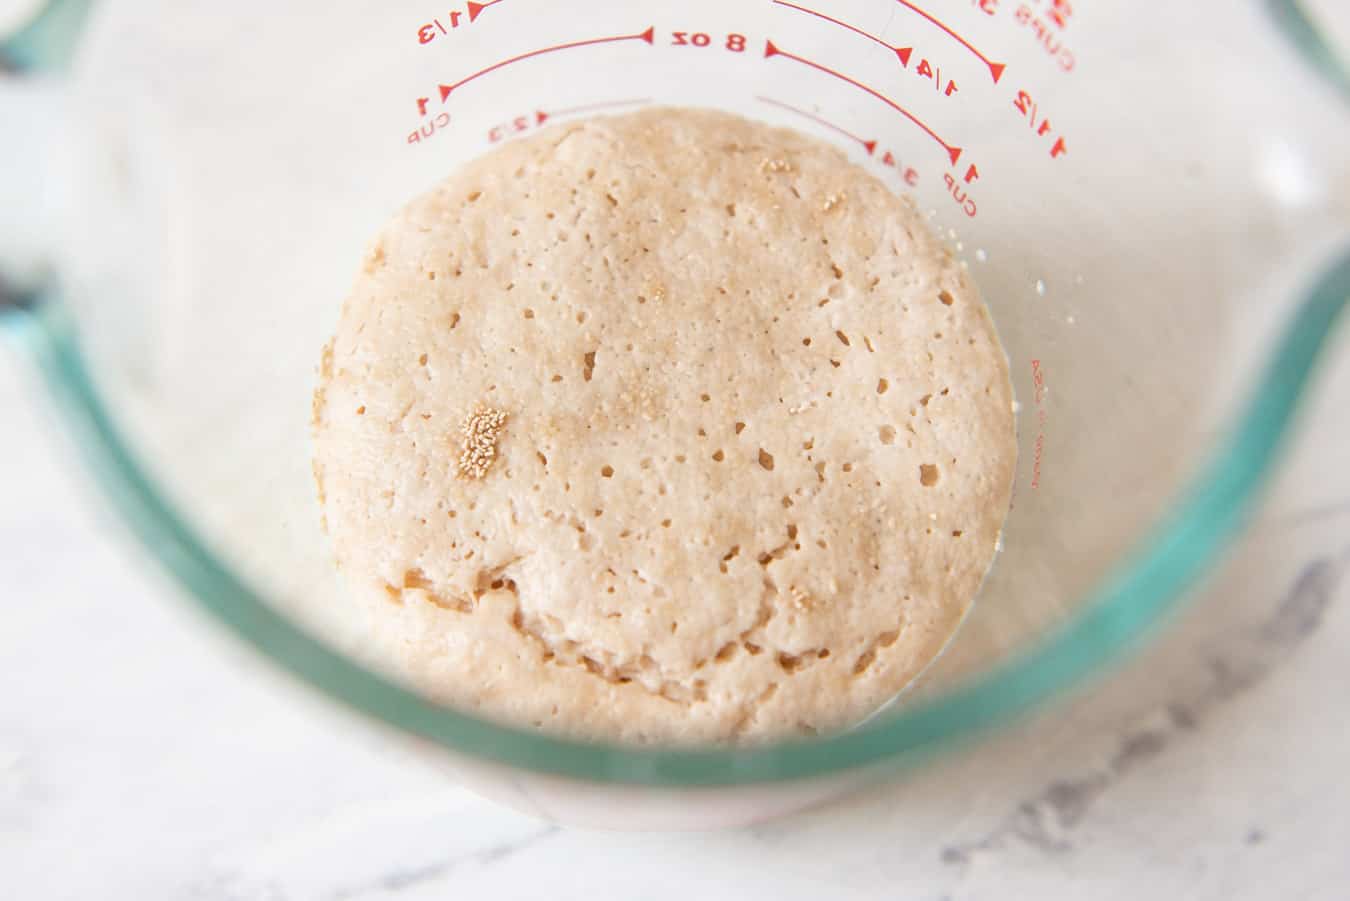
I use active dry yeast to give the bread its lift and a bit of flavor. To activate the yeast, heat up 1/2 cup + 2 tablespoons milk in the microwave on high for 40 to 45 seconds. Then, add 1 1/2 tablespoons of sugar into the heated milk and check the temperature. It should be somewhere around 110ºF to 120ºF. Once you confirm that the milk is at the right temperature, stir in the yeast. You don’t want the milk to be too hot because it can kill the activity in the yeast.
After about 5 to 8 minutes, the yeast should foam up, like you see in the photo above. If the milk still looks flat, it can mean that the yeast is out of date or the milk was too hot.
KNEAD THE DOUGH
While the tangzhong is cooling, and the yeast is activating, gather all the other ingredients for the dough. Unlike my milk bread recipe, I am using Bob’s Red Mill Artisan Bread Flour to give the bun more structure to hold up the topping. I absolutely love Bob’s Red Mill bread flour because it is easy to find and makes great tasting bread. Plus, the dough that I make with the flour is always a dream to work with.
Because of the amount of liquid in this dough, I highly recommend using a stand mixer to mix the dough. Mix the dough on low for 10 minutes in the stand mixer. Although you can crank up the mixing speed, the mixer will shake quite vigorously. The large amount of dough combined with the speed of the mixer will cause the bowl to clatter against the mixer constantly. To make things easier on the mixer, I prefer mixing the dough at a low speed.
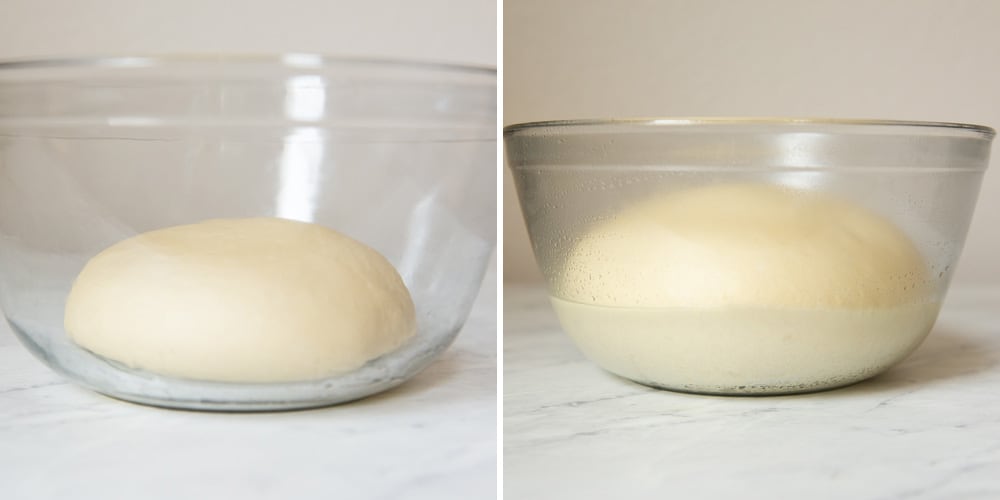
Once you have kneaded the dough for 10 minutes, turn the dough over a work surface and knead it several times by hand. The dough shouldn’t be sticky, so you won’t need to flour the surface. Shape the dough into a ball and place it into a large, lightly greased bowl and cover it with a damp towel, silicone lid, or plastic wrap. Let the dough rise for 1 hour to 1 hour 30 minutes, until the dough doubles in size.
MAKE THE PINEAPPLE BUN TOPPING
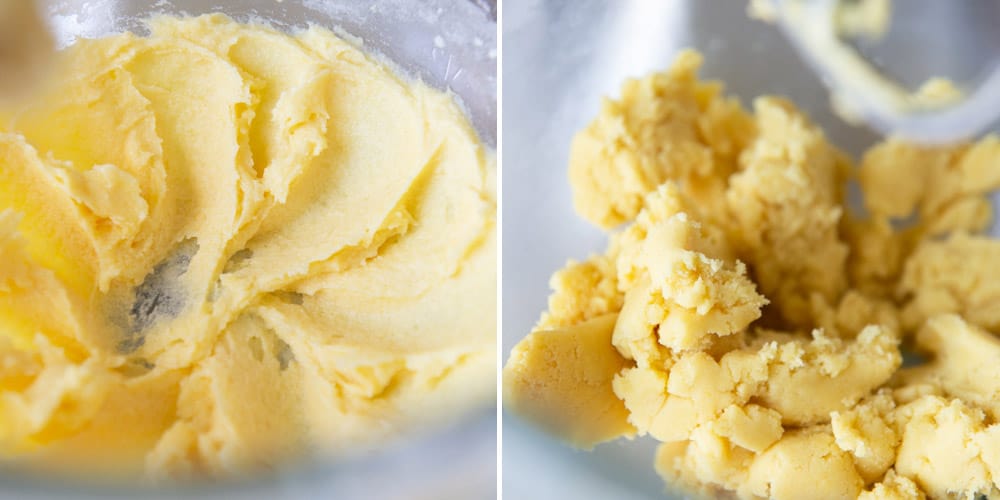
While the bread dough is rising, make the pineapple bun topping. A lot of pineapple bun recipes, will call for lard and custard powder. I wanted to use ingredients that I often keep around the house, so I used butter, vanilla, and turmeric instead. The turmeric gives the topping a beautiful and natural yellow hue.
To make the topping, simply mix all the ingredients in a stand mixer and let the topping sit at room temperature until you are ready to shape the pineapple buns.
SHAPE THE BUNS
I prefer baking 6 pineapple buns at a time on a single baking sheet. I tried baking 12 at a time with 2 baking sheets, but I noticed the bake was very uneven on the buns.
As a result, I started weighing the dough, divided it in half so that I can bake the bread in 2 batches. Put half of the dough in the refrigerator while you shape and proof the first batch of pineapple buns. Putting the dough in the refrigerator the activity of the yeast so that the dough doesn’t overproof. Once the first batch of pineapple buns are in the oven, start on the second batch.
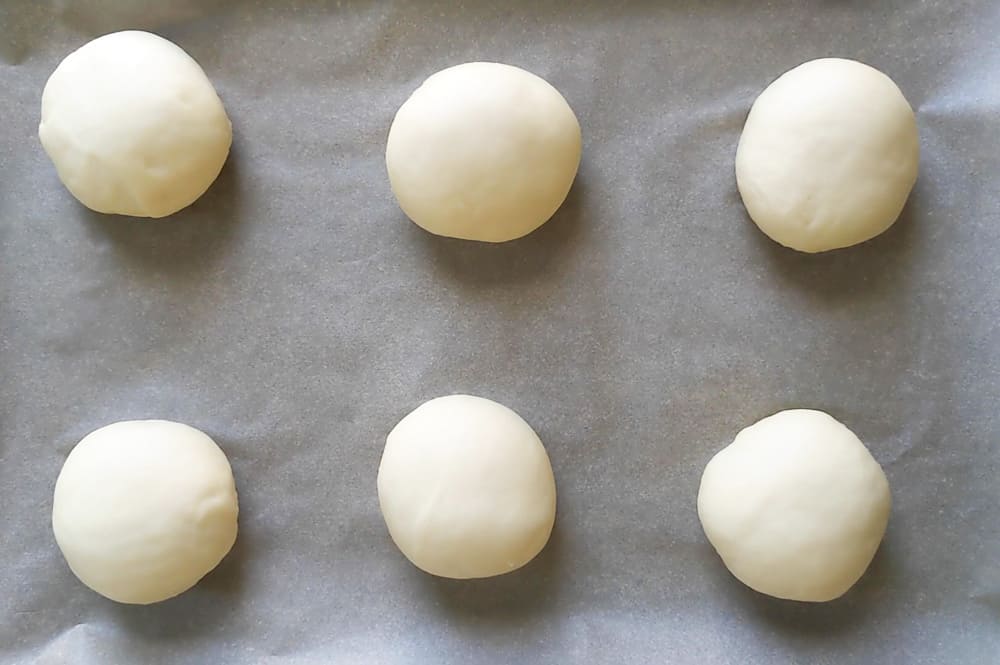
With the dough that you have on the work surface, divide it into 6 equal pieces, roughly 74 to 76 grams each. Knead each piece of dough several times to get rid of any air bubbles. Then, shape them into balls. Place all 6 pieces of dough onto a baking sheet lined with parchment paper. Then, cover the dough with a towel. Let the buns rise again for 30 to 45 minutes, until they expand to 1.5 times its size (they’ll be about 3 inches in diameter).
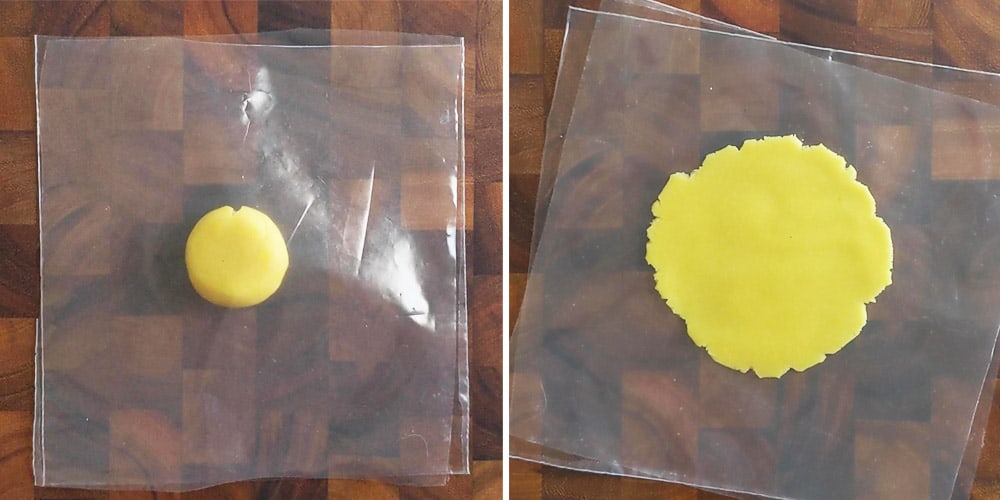
After the second proof, divide the dough for the topping into 12 equal pieces, about 27 to 29 grams each. Then, shape each piece of dough into a small ball. Take one of the balls of dough and roll it out into a circle between 3.5 to 3.75 inches in diameter. I like to roll out the topping between 2 sheets of plastic so that the topping is easy to remove. To get the plastic sheets, I cut up a plastic storage bag. Alternatively, you can use parchment paper, but it tends to crease.
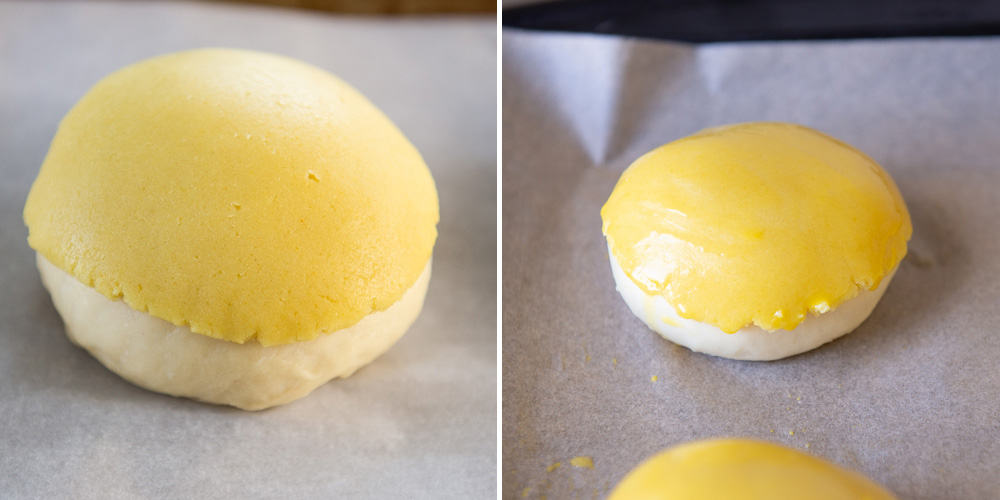
Carefully cover each bun with the topping. Then, brush the tops of the buns with egg wash. The egg wash enhances the look of the crackling effect once the buns are baked.
BAKE
Bake the buns at 375ºF for 14 to 16 minutes. If you want the top to look darker, bake them at 385ºF for 14 to 16 minutes, until they are golden at the top.
CAN YOU PREPARE PINEAPPLE BUNS OVERNIGHT?
Yes! You can proof the dough for the buns and the topping overnight if you want to break up the work. Place the bread dough in a greased bowl and cover with plastic. Next, shape the topping dough into a flat disc before wrapping it in plastic.
On the following day, an hour before you are ready to shape the buns, take out the topping dough and let it sit on your counter. The topping is easier to roll out when it is at room temperature.
You don’t need to let the bread dough reach room temperature before shaping. However, the chilled dough will take longer to rise. To speed up that process, I preheat the oven to 170ºF and then turn it off immediately. Then, I place the shaped buns on a baking sheet and into the warm oven. Let the buns rise for 10 to 12 minutes, until they expand to 1.5 times its size. Take the buns out of the oven, add the topping and egg wash, and bake as usual. Note that the buns are more delicate after this speeded up proofing process, so be careful not to deflate the buns when you add the topping.
MORE RECIPES WITH BOB’S RED MILL FLOURS
How to Make Pineapple Buns (Bolo Bao)
Ingredients
Tangzhong
- 20 grams all-purpose flour (2 tablespoons)
- 75 grams water (1/3 cup)
Dough
- safflower or any neutral oil for greasing bowl
- 145 grams whole milk (1/2 cup + 2 tablespoons)
- 18 grams granulated sugar (1 1/2 tablespoons)
- 7 grams active dry yeast (2 1/4 teaspoons)
- 490 grams bread flour , (see note 1)
- 3 grams kosher salt (1 teaspoon)
- 80 grams sweetened condensed milk (4 tablespoons), (see note 2)
- 1 large egg
- 55 grams butter(4 tablespoons), melted
Topping
- 55 grams butter (4 tablespoons), at room temperature
- 135 grams superfine sugar (2/3 cup), (see note 3)
- 1 teaspoon vanilla extract
- egg yolk
- 1 tablespoon whole milk
- 120 grams all-purpose flour, (see note 4)
- 1/4 teaspoon baking powder
- 1/8 teaspoon turmeric
Egg Wash
- 1 large egg
- 1 tablespoon whole milk
Equipment
- large-sized mixing bowl
- stand mixer
- 2 large baking sheets
- parchment paper
Instructions
Make the Tangzhong
- Whisk the flour and water inside a saucepan until the flour dissolves. (See note 5 for microwave directions.)
- Place the saucepan over medium heat and stir the mixture frequently. In about a minute, the flour will start to thicken. Don’t walk away during this process as you can quickly burn the tangzhong! Once the flour develops into a light paste, turn off the heat.
- Transfer the tangzhong to a bowl to cool. It will thicken as it cools.
Prepare the Dough for Buns
- Grease a large mixing bowl with oil. Set it aside.
- In a microwave-safe bowl, heat the milk for about 40 to 45 seconds. Add the sugar to the milk. Use a thermometer to check the temperature of the milk. It should be around 110ºF to 120ºF. It’s okay if you are just several degrees off.
- Add the yeast and stir to hydrate the yeast. Let it sit for 5 to 8 minutes while you prepare the other ingredients. After 5 to 8 minutes, the milk/yeast mixture will foam up.
- In the bowl of a stand mixer, combine the bread flour, salt, condensed milk, egg, melted butter, tangzhong and the foamy milk/yeast mixture.
- Fit the mixer with the dough hook. Mix the dough on low for 8 minutes (see note 6). If the dough completely spins away from the dough hook after a few minutes, turn off the mixer. Readjust the dough right into the center of the bowl and position the dough hook in the center of the dough. Run the mixer on “stir” for 15 seconds or so before you increase the speed to low.
- After 10 minutes, scrape the dough out of the bowl onto a surface and knead it several times. The dough shouldn’t be sticky, so you do not need to flour the surface.
- Shape the dough into a ball and place inside the greased mixing bowl. Cover the bowl with plastic or silicone mat. Let the dough rise in a warm area for about 1 hour to 1 hour 30 minutes, until the dough doubles in size.
Prepare the Dough for Topping
- Add the butter to the bowl of a stand mixer. Fit the mixer with the flat beater attachment. Cream the butter on medium-low until it is light and fluffy, about 1 to 2 minutes. Add the superfine sugar in two batches. The mixture will look very crumbly at this point, and that’s okay.
- Next, add the egg yolk, milk, and vanilla, and mix on low until just combined.
- In a small bowl, mix the flour, baking powder, and turmeric. Add half of the flour to the bowl with the wet ingredients, and mix on low until the flour is combined. Then, add the remaining flour and mix again. Once all the loose flour has been incorporated, increase the speed to medium-low, and keep mixing until the dough starts to come together into large chunks.
- Scrape the dough out of the bowl onto a surface. Gather it up into one large ball of dough. Transfer this to another bowl and cover it with a towel or silicone mat until the buns are done proofing.
Shape the Buns (Use Photos in Blog Post for Reference)
- Line 2 large baking sheets with parchment paper.
- Once doubled, punch down the dough to release excess air. Turn the dough onto a work surface. Divide the dough into 2 equal portions (450 to 456 grams each). Place 1 portion of dough back into the bowl, cover it, and refrigerate while you shape the first batch of buns.
- Next, divide the remaining dough into 6 equal pieces (74 to 76 grams each). Take one of the pieces of dough and knead it several times to get rid of any air bubbles. Then, shape this dough into a ball and transfer it to the lined baking sheet, seam side down. The dough should be about 2 inches in diameter. Repeat with the remaining 5 pieces of dough.
- Cover the balls of dough with a towel and let them rise in a warm place for 30 to 45 minutes, until they increase to 1.5 times its size (about 3 inches in diameter).
- Preheat the oven to 375ºF. If you want more golden looking pineapple buns, preheat the oven to 385ºF. Position an oven rack to the center position.
Add the Topping and Bake (Use Photos in Blog Post for Reference)
- While the buns are proofing, divide the dough for the topping into 12 pieces (about 27 to 29 grams each). Roll each piece into a ball.
- Take a plastic storage bag, and cut off the zipper. Continue cutting the bag along the edges so that you have 2 large sheets of plastic. You’ll be rolling the topping in between these plastic sheets.
- In a small bowl, prepare the egg wash by whisking an egg yolk with 1 tablespoon of milk.
- After the buns are done proofing, start rolling out the topping.
- Take a ball of the topping dough and place it on the center of a plastic sheet. Lightly flatten the dough out with the palm of your hand. Then, cover the flattened disc with the other sheet of plastic. Roll out the dough until you get a circle that is 3.5 to 3.75 inches wide.
- Peel off the top sheet of plastic, turn the topping onto your hand and carefully peel off the other sheet of plastic.
- Drape the topping over one of the buns. The topping shouldn’t cover the bun completely. The topping can burn if it touches the bottom of the baking sheet. Continue rolling out the topping and draping it over the buns.
- Brush the tops of the buns with egg wash.
- Bake the buns for 14 to 16 minutes, until the tops are lightly golden.
- Once the first batch of buns is in the oven, prepare the second batch of buns and bake.
- Let the buns cool on the baking sheet for several minutes before transferring them to a cooling rack.
- Enjoy the buns while they’re still warm! That’s when they are the tastiest.
Notes
- Measuring flour with measuring cups: I always use a scale for recipes like this, and I recommend that you do too. However, if you don’t have a scale, here’s how you would measure the flour with measuring cups. For the buns, you’ll need 4 cups + 1 tablespoon of bread flour, measured using the spoon-and-sweep method. Take a fork and fluff up the flour in your flour bag. Then, spoon flour into the measuring cup. Using a knife, level off the excess at the top. Do not tap the measuring cup on the counter to fit more flour. For the 1 tablespoon of flour, you can dip the tablespoon measure directly into the bag flour.
- Sweetened Condensed Milk: I use it to give the dough a sweet, milky flavor. You can substitute it with 2 tablespoons instant milk powder and 3 tablespoons of sugar. If you don’t have either sweetened condensed milk or milk powder, just use 3 tablespoons of sugar instead.
- Superfine Sugar is merely more finely ground granulated sugar. I am using it for this recipe because it dissolves easier and it gives the topping a nice crunch. Some brands label this as “ultrafine sugar.” If you can’t find any, you can blend regular granulated sugar in a food processor until the sugar is more finely ground. While you can use powdered sugar, the topping won’t be as crunchy. Furthermore, the powdered sugar topping goes completely soft the next day, whereas the superfine sugar topping retains a lot of its crunch.
- You need 1 cup of flour, using the spoon-and-sweep measuring method.
- Place the bowl into the microwave, and heat the flour and water mixture for 20 seconds on high. Take the bowl out of the microwave, stir everything and check the consistency of the mixture. Continue heating the mixture at 5 to 6 second intervals, stirring in between, until you get a thick paste.
- Because of the large amount of dough in the bowl, the mixer will shake pretty violently if you try to mix the dough at a higher speed. For the sake of preserving the longevity of my stand mixer, I opted to mix the dough at a lower speed.
Nutrition
Disclosure: This post was sponsored by Bob’s Red Mill! To learn more about their products and to get more recipe inspiration, follow them on Instagram or Facebook.


Noelle Johnson says
It may seem daunting but once you make the dough the hard part is waiting. The instructions are clear and the buns come out fantastic!
Lisa Lin says
Noelle, thank you so much for making the pineapple buns! They looked great!
Joanna Coquinco says
I don’t have a stand mixer… Can I use a hand held mixer to mix the dough instead?
Lisa Lin says
Hi, Joanna. You can, but the kneading time will take a LOT longer because of all the wet ingredients in the dough. I believe there are a few others who have commented that they have kneaded this by hand. One feedback that I got, however, is that the texture of the bun is not as soft when kneaded by hand.
Jp says
Hand held mixer won’t work for bread dough. You could do it by hand though.
J says
Hi! If I use instant yeast do I need to bloom it? Or can I add it directly to the rest of the ingredients?
Lisa Lin says
You do not need to bloom instant yeast! Just add it in with the flour.
Amanda Tsui says
hi
this is my go to recipe since quarantine happened. i have been using butter but I was wondering if I could replace the butter with margarine? even for the topping?
Paula says
Hi there! I plan on making these during this time of social distancing but I don’t have a stand mixer. Not having made a lot of bread in my days, can you suggest how long I should knead this by hand? (Sorry if this is a silly question!)
Lisa Lin says
Hi Paula! You’ll likely need to knead this for at least 5 to 10 more minutes, not necessarily because the dough doesn’t have enough gluten activity, but because it will take forever for the dough to not be sticky. There’s a lot of moisture in here, so it likely will take a while to get the dough to be a smooth round ball. And just be patient!
Jackie says
Hi, for the topping is it baking soda or baking powder? The ingredient list says soda but the instructions say powder. Thanks!
Kat says
I am not the author, but I used baking powder based on what I saw on other recipes! It worked well!
JP says
Where did you even see baking soda? It said baking powder in both ingredients and instructions.
Joyce says
Loved this recipe and have made the buns twice already! I split the dough into 18 portions instead of 12 and thy turned out perfect. I baked them for 10 minutes instead! I also reduced the sugar in the topping from 135g to 100g!
Do give this recipe a try if you love buns! The ingredients are easily accessible 🙂
Lisa Lin says
Joyce, thank you so much for making these pineapple buns and for leaving your notes about the adjustments you made. I’m so glad you enjoyed it!
Rachel says
How many egg yolk do you use for the topping?
Lisa Lin says
In the recipe, I specify 1 whole egg (so the whites and yolk of an egg).
Joyce says
Loved this recipe and have made the buns twice already! I split the dough into 18 portions instead of 12 and thy turned out perfect. I baked them for 10 minutes instead! I also reduced the sugar in the topping from 135g to 100g!
Do give this recipe a try if you love buns! The ingredients are easily accessible 🙂
Lisa Lin says
Joyce, thank you so much for trying this! Thank you for your notes about the modifications you made, too!
Yeeny says
I’ve already baked a lot of pineapple buns before, but I have to admit that this recipe is the best one. I followed it accurately and they turned out perfect! They were even soft and crunchy (topping) on the second day. I highly recommend this recipe 🙂
Lisa Lin says
Yeeny, thank you so much for trying this recipe!! So glad you enjoyed it!
Paula says
Absolutely loved these! The recipe is so detailed & easy to follow which I appreciate since I’m not the best baker. Will definitely make again 🙂
Lisa Lin says
Paula, thank you so much for trying this recipe! Glad the detailed directions were helpful!
Linda says
If I use instant yeast, do I use the same amount as the active dry yeast in your recipe?
Lisa Lin says
Hi Linda, yes, you can replace with the same amount of instant yeast. And I used unsalted butter.
Claudia says
Hi Lisa,
If I am using instant yeast instead of the active dry yeast, how would I go about with this recipe?
Cause instant yeast do not need to be proofed. Newbie baker and I just love your feed 🙂
Lisa Lin says
Hi Claudia, I’m so sorry that.I just saw this! If you are using instant yeast, you can skip mixing the section about activating the yeast with warm milk. You can add just mix the yeast with the flour and mix everything together. However, I believe you still need to wait for the dough to rise, like I specified in the recipe.
Stephanie says
Hi, I made these today and they were fantastic! I’ve tried other similar bread bases, but yours is the best. Great job with this recipe! Thank you so much for sharing.
Lisa Lin says
Stephanie, thank you so much for trying this recipe! So glad that you enjoyed it!
Louise says
Hi. Any alternative for turmeric powder? I want to try making this as this is a favorite in our home amongst other bao’s from chinatown. Thanks in advance!
Lisa Lin says
Hi, Louise. The turmeric is there for color, so if you want to leave it out, that’s fine too! The topping won’t look yellow, but it will still taste great. Also, there is something called custard powder, which is a lot more difficult to find.
Emily says
I just made this recipe for the first time last night and it turned out soooo yummy! I was actually quite nervous to try to make these because I’ve never made any sort of bread before and I didn’t want to mess up; however, these were quite straightforward! Making the dough for both the buns and topping were super simple and most of the time is spent waiting for the dough to rise. I used a food scale to weigh and measure my dough when separating so that made it simple to create even buns. Overall, I’m really happy with how they turned out! They were soft, slightly sweet inside wish a yummy crumbly, crunchy topping. I’ll definitely make them again!
Lisa Lin says
Emily, thank you so much for trying this recipe!! I’m so glad this worked well for you!
jenny says
So I made these (delicious)!! But the bottoms of my buns were burnt. Would you happen to know why?
Lisa Lin says
Hi, Jenny! It could be that your oven is hotter than mine. Check on them 5 minutes earlier next time, and see what they look like. If they look ready, take them out.
Mir says
Just made these yesterday for a lunar new year dinner tonight, and was very nervous because said dinner will be authentic and I did not want to mess up this important item with my lack of expertise. But the directions were easy to follow and they came out great. Thank you!
Lauren says
Can I use all purpose flour for this?
Cynthia says
Intimidating at first but found that it was really easy! These tasted just the way I remember, eating them fresh out of the oven at the bakeries in NYC. Will make these many more times to come!
Lisa Lin says
Oh my gosh, what a compliment, Cynthia! Thanks for trying the recipe!
Sara says
Who doesn’t love fresh out of the oven pineapple buns? I never thought it was something I was capable of making…until now. Made this with all purpose flour (I don’t have any bread flour) and a coconut filling (adapted from woksoflife cocktail bun) and it came out delicious on the first try! My 2 year old and my 58 year old picky Chinese father both approve! I can’t wait to make this for the rest of my family! Thank you, Lisa!
Lisa Lin says
I love that you added cocktail bun filling to this. Thank you so much for making the recipe, Sara!!
Jade says
Wow! I made these during social isolation since I was looking for a bit of a baking challenge to kill time. It brings back so many childhood memories! I didn’t have condensed milk so I boiled down coconut milk and sugar and the coconut added such a nice note to the bread. Loved this recipe and I will definitely be making it again!
Lisa Lin says
Jade, thank you so much for trying the pineapple buns recipe! I love that you reduced coconut milk and sugar as a substitute. I need to try that myself!
j says
Can I skip the turmeric?
Lisa Lin says
You can, but the tops will not look as yellow.
Christina Bowser says
Recipe was long but it will be easy to make again. Came out perfect. Subbed the sugar and milk powder because I didn’t want to open up a can of scm. Buns were fragrant and the topping was crunchy and crumbly. I would say it looks intimidating but try it and you will find it delicious enough to make again and it gets easier. Thanks!!!
Lisa Lin says
Christina, thank you so much for trying the recipe and for your note about the substitutions you made!
Jenny says
First time making pineapple buns and it turned out wonderful! Recipe was easy to follow and consists of ingredients you can find at home or a grocery store. Flour is flying off the shelves these days, so I used AP flour rather than bread flour and it was still successful! The bun is soft and the topping is sweet and crunchy. I ate it warm with some butter in between and it was delicious.
Lisa Lin says
Jenny, thank you so much for trying out this recipe!! I’m so glad you were able to make it work with all-purpose flour. Eating the buns with butter sounds delicious!
MC says
Hi – I made this and came out great! thanks for sharing the recipe. one question I had was when mixing the dough with the dough hook, did you have to scrape the dough off the mixing bowl? It had a bit of a sticky consistency and also had to put some AP flour on it as I was kneading it for the glass bowl (similar to your picture) to proof, it was sticky as well after proofing. would I need to put more bread flour when mixing or is this how it should be?
Lisa Lin says
Hi, MC! Thanks for trying the recipe! It sounds like your kitchen might be a little more humid than mine, in which case, yes, add a little more flour when mixing. My dough wasn’t very sticky at all.
Jacelyn says
I am a beginner baker, thought I wouldn’t be able to pull off something like this.. Thank you for the recipe, was much easier than I expected
I don’t have a kitchen aid mixer, initially used a hand held power mixer to mix the ingredients then hand knead. It’s a lot easier when you break them in smaller portions and knead one by one.
I did half recipe (6 buns)
Substituted bread flour with All Purpose Flour
2% milk
My dough initially was more runny, wasnt sure if it were my measurements or Bc not using kitchen aid mixer, so I did have to add a bit more flour than instructed..
turned out Fantastic! If you want a bit of golden crust, broil it for 45sec to 1 min at the end!
Lisa Lin says
Hi Jacelyn, thank you so much for leaving your notes about halving the recipe!!
J says
Hi! Did you cut the kneading/proving time in half when you made six buns?
Nathan says
My kids and I just made these and love everything about them. Thank you!
Wondering if it would be possible to freeze some buns before baking (before egg wash) and then bake from frozen so we can always have some on hand. Do you have any thoughts or suggestions about that?
Lisa Lin says
Hi, Nathan. I’m not sure if these will bake well from frozen. All I know is that I tried steaming raw bao before and the texture was not right when I tried to steam them. Not sure how those principles translate to baked buns.
Charlene says
Hello! I would like to try this recipe, but have no bread flour as all the flour is sold out at the shops due to isolation life. Do you have any suggestions for adjusting the recipe using all purpose white flour? Eg. Will I need to add more yeast for a fluffier texture?
Lisa Lin says
Hi, Charlene! Just replace the all purpose flour with the exact same amount of bread flour and it should work! No need to add more yeast.
Kelly says
Hi! So if i use instant yeast instead i wouldn’t need to use any milk? Thank you !
Lisa Lin says
Hi Kelly, you still need the milk and all the other ingredients. You just don’t need to warm the milk, add the yeast and wait for it to bloom.
Bev says
Thank you for this delicious recipe, Lisa! I just made it today, and it turned out wonderful. Really great work with your crust! It is a delight and gives the bao the joy of the crunch. Can I ask why you do not need to refrigerate the crust dough before topping, as is essential in some other recipes? I really enjoyed making this recipe… thank you again for sharing!
Lisa Lin says
Hi, Bev! I found that the crust was easier for me to roll out when it is at room temperature. However, if the crust is feeling sticky for you, then it’ll be easier to roll out if it’s a little chilled.
Stephanie G says
Easy to follow! I loved the yellow color that the turmeric gave the topping. I didn’t want to look for or buy superfine sugar so I used regular granulated sugar and ground it up using my mortar and pestle – worked great! I found that it tasted even better after cooling down a bit, or reheated the next day.
Lisa Lin says
Stephanie, thank you so much for trying the recipe! Thanks for adding your note about how you adapted granulated sugar for the recipe!
Grace says
Wow, just made this and it’s a huge hit. I live in Hong Kong, where I can get pineapple bun anywhere, but this is so much nicer than the ones I usually get. Lovely crunchy topping on soft bread. Hubby said it reminds him of his childhood bakery. It takes quite a while to make but is so worth it.
Lisa Lin says
Grace, thank you SO MUCH for making this recipe! I’m so glad the pineapple buns brought you so many memories!
christina bowser says
In the picture instructions you have 3/4 c. of milk to be warmed but in the recipe instructions you have 1/2 c. of milk plus 2 Tbs.
Lisa Lin says
Hi, Christina. Thanks for catching that! The recipe instructions is the correct amount. I have edited the post to reflect that.
Orla says
Made these today, they worked great. I only had AP flour and it was fine. I also did not grind regular sugar (too lazy) and they still are fab. Thank you
Lisa Lin says
Thank you, Orla! Thanks for your notes about using all-purpose flour and regular granulated sugar too!
Lia says
Hi! Since we’re avoiding making nonessential grocery trips, I unfortunately only have soy milk instead of whole milk… can that be substituted 1 to 1?
Bea says
Hi I was wondering if there is an alternative for the egg wash on top? We have an egg allergy in our home but love these buns!
Lisa Lin says
Hi Bea, you can brush it with some milk. It won’t brown as much, but it’s at least something!
Ann says
Hi,
I don’t have times but have custard powder. How much custard powder should I use in place of turmeric?
Thank you.
Rovina says
Hey. My daughter has an egg allergy too. What alternatives did you use in the bun. Mines didnt turn out right. Thanks
Lisa Lin says
Hi Lia, yes, you can use soy milk instead! The flavor will be a little different, but it works!
Josephine says
With the Stay at Home Order, thought I try to make my childhood favorite bun. This is almost compatible to what I had when I used to live in Hong Kong. I tried other recipe last week and did not turn out good.
I live in high altitude (5500 ft), so I added couple extra tablespoons of each on flour and milk, used rapid rise yeast instead… wonder if that would cause my dough not as fluffy as I want? If my dough could be just a bit more fluffy, that would be perfect! Baking in high altitude is a bit challenging.
Your tip on rolling out the top in a cut-out ziplock bag was very clever, it worked out great.
Thank you for this great recipe!
Carolyn says
Just made this and was blown away! Honestly tasted better than the fresh ones from Chinatown. Didn’t make any recipe subs/changes and it turned out perfectly! Thanks so much for sharing this wonderful, delicious and clear recipe!
Brenda says
Thanks for such a wonderful recipe! I had been meaning to try making pineapple buns at home for years, but never found the perfect recipe with pantry staple ingredients until now. The bun was a dream, and the topping really brought me back to my childhood memory of eating “boluobao” from the Chinatown bakery. (These buns were actually better!) I omitted the condensed milk because I realized I would not really have a use for the leftovers, and instead, substituted it with 3 tbsp of granulated sugar. The only thing I would change for next time is decreasing the amount of sugar, as I found the topping to be a tad too sweet for my liking (just my personal preference). Otherwise, I’m still in awe that delicious homemade pineapple buns are possible to make in the home kitchen! Love love love!
Katrien says
Made these today! BIG HIT at home with the biggest and most impactful compliments coming from my dad who used to own a Chinese bakery! I didn’t have condensed milk (made the necessary substitutions thanks to the notes), and only had AP flour on hand. The perfect harmony of fluffy bread and crunchy topping. Can’t wait to have this for breakfast tomorrow with a nice slab of butter… 😋 Thanks Lisa for posting this recipe and making it SO SO SO easy to follow. I’ll definitely be making these again!
May says
Hi there! This recipe is awesome! Thanks for posting this! Just a question – when making the topping it didn’t thicken/crumble into dough like texture. It was more soften/wet … did I do something wrong? Maybe my butter was a bit too warm?
Millie says
The buns came out soft and chewy which is prob due to the tangzhong! Never heard of it but it makes a difference! The crust was super crunchy and sweet. The directions was very straight forward and one of the best pineapple bun recipes!
Sherlen says
Hi there! I want to make this but I want to get the flour measurement correct as I sometimes find I add too much flour in my baking, leaving the results a bit too dry! Your recipe says 3 1/4 cups / 490g of bread flour, but 3 1/4 cups of bread flour is actually only 412g. (Standard cup of flour weighs 127g, so I multiplied it by 3.25). Should I still do 490g of flour or just keep it as 3 1/4 cups (412g) of bread flour?
Thanks!!!
Lisa Lin says
Hi Sherlen! For all my recipes, if I list the weight of the flour first, go with that measurement. It’s so much easier to weigh the ingredients to be exact. Also, I went and weighed my flours several times, and each time, I got 1 cup of flour to be 140g. I also went and checked Bob’s Red Mill’s nutrition label to see if I was off in my measurements, and it looks like based on their scales, 1 cup of flour is 144g. Anyway, go with my weighted measurements first.
Murrie says
Hello! My family loves pineapple buns. I was wondering if I could use this recipe to make a custard filled one. I’ve seen others that are steamed, but my family’s favorite is the Nai Wong Bolo Bao. Have you tried these with custard inside? If so, any tips or suggestions? Thank you in advance!
Jewelz says
I’ve used a egg custard recipe I’ve found and worked well with this recipe. I added about 1-2 tbsp of egg custard filling and it was perfect! I did not like how the bread turned out with the other one. The combination with this bread recipe was a huge hit!
Viv Wong says
Hi Lisa,
I don’t have a thermometer, is there any other way in knowing that the milk is cool enough to add the yeast in?
Thanks
Lisa Lin says
Hi, Viv! Dip your finger into the milk. It should feel lukewarm. Definitely not so hot that you need to take your finger out immediately. Also, if the milk is too hot, the yeast won’t foam up.
Charlene says
Hi Lisa,
Thank you so much for your recipe, I just made this today and the buns are delicious! The topping was crunchy, not too sweet, and it cracked perfectly. The bun had a lovely flavour.
The only thing that I’d love your help with is how to improve the texture of my buns. They turned out a little dense and chewy, not quite like other milk buns I’ve made before. I hand kneaded the dough for 15min, and proofed it for 1.5 hours until the dough doubled. I proofed it the second time for about 40min, and kneaded each bun ball a few times to rid the air as per your instructions. Do you think it’s because I accidentally soaked my instant yeast instead of skipping that step because I wasn’t using dry active yeast? So maybe there weren’t enough gas bubbles in my dough?
Any advice would be greatly appreciated.
Thanks,
Charlene.
Lisa Lin says
Hi, Charlene! Did you knead the dough by hand? In my recipe, I kneaded the dough in the mixer for 10 minutes. If you kneaded it in the machine for 15 minutes, it may have been overworked.
Lisa Lin says
Regardless, thank you for making the recipe!!
Charlene says
Hi Lisa, I hand kneaded the dough for about 15min. Do you think I overworked it? It felt nice and elastic when I was finished. Is there a way to recognise when dough is overkneaded?
Lisa Lin says
Unfortunately, I don’t think there is an easy way to tell if the dough is overworked before baking. I was just worried that you kneaded it in the machine for 15 minutes! I’ve never accidentally soaked instant yeast before, so I’m not 100% sure if that really caused the issue. I wish I had a better answer!
Sharon Dobrovinsky says
I was looking for a decent recipe since I first visited HK few year back. This one is the best I found! Really great. I enjoyed them very much. Thank you for that!
Lisa Lin says
Thanks for making these, Sharon!
Lilian says
I’m giving this review 5 stars because I truly believe in it, but something went a little wrong with mine. The topping is fabulous and sooo good… but my bread is kind of doughy. how can I make it more fluffier? Is it that I kneaded it too much or too little?
Lisa Lin says
Did you knead the dough by hand our with a stand mixer!
Cindy says
This recipe is awesome! My first time making it and it turned out sooo good! My first success with baked goods using yeast too! So happy~ thank you for the awesome recipe! Quick question, can I freeze them? If so, how do I reheat them afterwards? Thanks
Lisa Lin says
Hi, Cindy! I’m not 100% sure about the freezing, but I don’t see why not. I just wonder if the center will be as soft when it’s reheated. If you do end up freezing them, I would reheat them in the oven (at 350F) for about 8 to 10 minutes.
Cindy says
How do you preserve yours and for how long before consuming up? Thanks
Lisa Lin says
I have been storing them at room temperature for a few days and then reheating them in the oven. For longer periods of time, you can refrigerate them and reheat. I’m not sure how the texture will be if you freeze and reheat the buns.
anna says
Not sure why I’d been hesitant about making bolo bao before but this recipe made it so approachable I just had to try it. I didn’t have to make any adjustments aside from using granulated sugar instead of superfine and also just added the suggested amount of sugar instead of condensed milk.
The buns were a big hit with my household and with my neighbors. I showed a picture to my mom and even she said they looked good and you know how Asian moms can be with compliments! I’ve linked my Instagram post with the results. Next time I’ll definitely try baking at 385ºF instead of 375ºF as I thought they were on the paler side for my liking. I ended up keeping them in the oven a little longer than suggested to get the golden color but ended up with a pretty dry and crunchy topping. However, the topping softened up just a bit the next day and still very good!
I suggest this for most if not all recipes, but reading through the blog post & directions a few times really helped me. Thanks again Lisa & will definitely be making more of these very soon.
Lisa Lin says
Haha, we all know how Asian moms are with compliments!
dana says
It was approved by my Asian mom as well hahaha
It was my third time ever making bread and they turned out great! Your recipe super easy to follow and super tasty, thank you!
Lisa Lin says
That is awesome! An Asian mom’s approval is the highest compliment!
Garling says
I made them this weekend, and they turned out great! I was happy to be able to bake something that I could only have when I was in HK (which is every few years). I followed your recipe on blog and Instagram to make sure I don’t mess every step!
I loved the taste and texture of the buns. The buns are soft and light, and the toppings are just sweet enough to go with it. My family loved it too. I even had it as a 菠蘿油 (the bun with a slab of butter in between)!
Audrey Lung says
Love the recipe, Lisa! Thank you for making it so easy to follow! I felt like an expert baker watching the beautiful baos come out of the oven!
Do you have a recipe for the Mexican bao topping that they sell at Chinese bakeries? My dad loves it and I presume that I can just lay that topping on this Bao recipe rather than the bolo topping.
Thanks again!
Linda says
Do you use salted butter or unsalted?
dana says
I am looking for a cha siu bao recipe atm – do you think it would work to use the dough from this recipe and use it to wrap the cha siu filling?
Lisa Lin says
I think so, Dana!
Tina says
Love the recipe! It took a while to make but well worth it. The only thing was the bottom was a bit burnt so will have to check on them earlier. Still tasted amazing! I’m going to try making them again this weekend. Can I use 2% instead of whole milk?
Lisa Lin says
Hi, Tina! It could be that your oven is slightly hotter than mine. Check the buns 5 minutes earlier next time and see what they look like on the bottoms. If they are golden, they should be ready to come out.
J says
If we are using instant yeast, do we have to put the ingredients on different sides of the bowl? What do you suggest? I heard putting the tangzhong, sugar and/or salt in direct contact with the yeast will deactivate it.
Lisa Lin says
In all honestly, I’m not 100% sure about this because I haven’t tested the recipe using instant yeast. I have heard that the yeast shouldn’t come in contact with salt before.
J says
Do we have to put the ingredients on different sides of the bowl? What do you suggest? I heard putting the tangzhong, sugar and/or salt in direct contact with the yeast will deactivate it (if using instant yeast).
Jennie says
Thanks for posting this recipe, so clear and easy to follow. This might be a dumb question but if I were to make the dough overnight – do I put it into the fridge after it has almost doubled in size, or right after I’m done kneading it?
Lisa Lin says
Hi, Jennie! Not a dumb question at all! Put it in the fridge right after you knead it!
SJ says
I have looked at a lot of recipes for pineapple buns but yours looks the easiest. So I would love to give it a try. My quick question is: if I’m too lazy to bloom the active dry yeast and use instant instead, would I use the same amount of yeast?
Thanks!!
Lisa Lin says
Yes, SJ. The amount should be the same!
Hannah says
Hi Lisa,
Just made this recipe half an hour ago and the trays are already empty! This recipe was really easy to follow (even for first time bread bakers like me)!
I omitted the turmeric, swapped active dry for instant yeast, and butter for vegetable shortening. Definitely left my pineapple tops paler than I’d hope, but taste wise, still great!
They ended up a little smaller than I’d expected (avg of 3 1/2 – 4 in diameter). Not sure if this was something to do with the kneading or proofing. Perhaps because I used my hand to knead rather than machine? Or need to proof longer?
Lisa Lin says
Hi, Hannah! A lot of people have told me that the bread is slightly tighter when they kneaded the dough by hand. I’m not entirely sure why, so I might need to test it by hand once to figure out what exactly is going on. Thanks for trying the recipe!
Alison says
I live in HK and I gotta tell you these are the real thing!! Super tasty and the texture is amazing! Thanks so much Lisa for the absolutely perfect recipe.
samantha says
im so excited to try this as i LOVE pineapple buns and my 8 year old ! my dough is currently in the proofing stage. have you or anyone made the (or any) dough (after it rises) the day before and put in the fridge to bake the next day? if so, after i take the dough out of the fridge, do i need to let it sit to room temperature or can i hand knead, separate into buns and place in the oven? ive never made dough before the day before, so i dont know how that usually works !
thanks! cant wait to post an update!
samantha says
OhMyGoodnessssss !! THIS IS AN AMAZINGLY DELISH RECIPE !!! thank you for sharing, the bread was perfect and the crunchy topping ! #Drool! to make my dough, i put everything in the bread machine and used instant yeast (placed in last and in top of dry ingredients) and did the dough option. it helped so much because i have arthritis in my hands and kneading dough by hand is not good for me.
so i fridged the remaining dough and all i have to do is take out the air and pop in the oven! thank you again!!
Nancy says
Delicious and easy to follow recipe. Couldn’t ask for more. Thank you!
Kelly says
The topping was diabetes-sweet and too crisp/cookie-like for a traditional bolo bao! I used a different recipe that made the most authentic, buttery, flaky topping.
Denise says
Hi Lisa! I just made this last night and it was amazing! Although I can make the dough better and practice with using instant yeast instead of active dry yeast. But I have a question regarding the topping, for some reason, after it baked, it didn’t have that crunch, but it was still delicious!
Evelyn says
Pretty labour intensive but the instructions were very clear and the buns turned out awesome – better than most store bought I think. Definitely use the weighted measurements if you have a scale – I didn’t really compare them to metric except I did notice that for one of the measurements for flour, it said 120g of flour and supposedly that equals 3/4 cup (it was way more than 3/4c). Anyway, great recipe! Thank you to Lisa!
Connie says
This recipe looks amazing!! However, I do not own a stand mixer. Is there any way I could make this just with my hands? What adjustments would be needed?
Chi says
This recipe is a winner in my household and friends!! The bread is so fluffy and soft!! Just like from an actual bakery! I reduced the amount of condensed milk slightly to my sweetness liking and it’s perfect 👌🏻 Wish I could post a pic of my buns! I’m so proud of it hahaha
Joyce says
Hi! This looks like a great recipe and I can’t wait to try it! As a question, would it be okay to make the dough and refrigerate it until the next morning to shape and bake? And if so, should I put the dough in the fridge after proofing or before?
Lisa Lin says
Hi, Joyce. You can put the dough in the fridge overnight before the first proofing. Hope this helps!
Kelly says
Hi Lisa Lin,
Can I also proof and shape the buns with the crust on top, the night before baking them so they are ready to be baked the next morning?
Lisa Lin says
I’m not sure because you need to roll out the topping, and it will will be much larger than the ball of dough. I’m not sure what the topping will look like once the dough has risen. Does that make sense?
Jenny says
Hi, if I forgot to add the tangzhong to the buns, will this affect the result of my bread?
Lisa Lin says
Hi, Jenny. The bao won’t be as soft if you don’t add the tangzhong.
Ge says
Hi Lisa. I’m waiting for the 1st proofing of the buns. Question. should the dough come out smooth after 10min on the stand mixer then knead by hand for another 10min? Mine wasnt smooth at all and it was a bit hard and dry. I had to wet my hands. why is it?
Ge says
Hi Lisa. I’m just did the recipe and it tastes so good. However my toppings didnt come out at nice as yours. 1. they weren’t yellow.. 2. too brown. 3. It didnt show the cracks like yours.
How do I improve the color and the cracks on the topping? it tastes so good though
Thank you!😊
Vicky says
I made this a couple weeks ago and it is by far the nicest thing I have probably ever baked! It was a bit labour intensive, but worth it. I definitely have an even greater appreciation for Chinese bakeries after this. The recipe was clearly written and pretty straightforward to follow. I used a scale to measure everything and it seemed to be consistent. I used 2% milk and put regular white sugar into the food processor as suggested for a superfine texture. I split the recipe into 18 smaller buns, and also made some char siu filling to go inside too. Baked them at 375 for 16 minutes and they were beautiful! I’d heat them up for about 15-20 seconds in the microwave before eating the day after and they were so good! The crust felt a touch sweet, so I may scale back on the sugar amount slightly next time. They turned out SO good though otherwise, I couldn’t bear to share them with anyone else 🙂 I’ll definitely make this again to share with others next time around. Thanks Lisa for the great recipe to get us through this quarantine!
Bridget says
This recipe is amazing! I’ve been following Lisa for years on Instagram and finally found the time to make these pineapple buns. The buns were delicious and taste just like the ones I grew up eating! The recipe was easy to follow, and the ingredient substitutions were very helpful. I love this recipe because all of the ingredients are already in your pantry. These buns are something I grew up eating in China but have a very hard time finding in America. I’m looking forward to making more of her recipes, especially as Lisa has wonderful and easy recipes for things that are often storebought or ordered at restaurants for most Chinese people. She really makes flavors and dishes accessible and easy. Thank you for a great recipe so I can now share pineapple buns with my friends and my family!
dw says
AMAZING RECIPE! Using a stand alone mixer definitely helps! I was amazed out out successful this turned out! Super soft bread and perfect crust topping. Never imagined I would have been able to make this myself at HOME! I thought a dozen buns would be too many but my family/friends devours this so quick!
& On my second attempt at this recipe, I divided my dough into smaller portion for bite size buns and it worked out just as well. Also amazing with some butter filling ! Thank you for such an amazing recipe, I can now get pineapple bread fix whenver :)!
dw says
Such an amazing recipe for one of my favorite bread! Made my first bread attempt so successful! Never imagined I’d be able to make this MYSELF and at HOME! I thought 12 buns would be too many but my family devoured it so quickly! & Since the first attempt went so well, on my second attempt i divided the dough into smaller portion for bite size bun and it worked out super well ! The buns are also great with some butter filling! The bread is SUPER SOFT and the topping was perfect! Loved it! Thanks for such an amazing recipe, now i can get my pineapple bun fix anytime.
Emily says
I made these today and they come out really nice! I don’t own a stand mixer so I used my hands to knead and kind of mix the ingredients together for the bread dough and I think it came out perfectly fine doing so. I only kneaded for about 5-6 mins. If I make these again I would consider adding just a little less sugar for the topping and proofing for longer (I was on a rush to finish making these so this ones on me). But otherwise, great recipe 🙂
Amanda says
The topping was amazing but like some other reviews here, I found the bread too doughy. I used my kitchenaid (setting 1 then 2) and within 2 minutes of kneading the dough Seemed overworked (I.e. totally failed the window pane test cause it kept tearing). Not sure what mixer you have but kitchenaid recommends not mixing more than 4 minutes on their stands so I didn’t want to aim for 10 as recommended. Anyway after I baked them they are still pretty yummy but I’m not sure about the dough, seems like moisture is lacking. I have baked tang Hong breads before so I know the dough shouldn’t be this tough… Or maybe it’s just me?
Charmaine says
This recipe was easy to follow and the results speak for themselves. The dough is very fluffy and the cookie topping ends up very light and crispy which I love. I found the special notes on the recipe very helpful for shortcuts and tips on how to simply make superfine sugar in a blender – it works! Will definitely be making this again and again.
Jessica says
These were so much easier to make than I thought they would be, and they turned out perfectly! I followed the instructions to the T and it did not let me down. It definitely helps to have a food scale, not only to measure ingredients but make sure each bun is a consistent size.
Jessica says
Oh—and I also scored the tops to give them more of a pineapple bun look!
Star says
My topping didn’t crack and was not crunchy at all.. Could the reason be because i reduced the sugar to 80g ? 🙁
Star says
Oh and the topping dough was very soft and sticky, it didn’t come out crumbly at all.. What could have possibly gone wrong? 😞
Lisa Lin says
Yes. The sugar makes the topping crunchy.
ShukYi says
I tried these gorgeous buns and they were wonderful !
I would like to bake these in the morning for my mum. So I wondered if I could make the dough the day before , keep it in the fridge overnight and bake it first thing in the morning. Do you think this would work?
Thanks for the fantastic recipe.
Lisa Lin says
Yes, you can! If you read the section above the recipe card labeled, “Can you prepare pineapple buns overnight,” you’ll find all the details.
Lucy says
can I use a bread machine for the dough?
Christine says
Just made this today…was pleasantly surprised on how good it turned out! Wasn’t too hard and the recipe was easy to follow. Is it ok to keep them in the fridge or freezer after it’s baked and will it last for a few days? I seemed to have a lot of topping to cover all of the 12 buns and so I was wondering is it best to half the topping recipe? Thanks so much!
Alvina says
This recipe is so simple to make! If you follow all the instructions and read the notes from Lisa, you’ll have the freshest and most tasty homemade pineapple buns!
The first time I made this, the top didn’t have the “cracked” effect. But the second time around, I whipped the butter until fluffy, and then stopped mixing the flour once everything was incorporated, the topping should be a little crumbly. Gave it a little extra egg wash to get the color I wanted. Happy baking!
Christine says
One more question…I only have 1% milk around and I used that instead of whole milk. Does this make a big difference in the taste?
Lisa Lin says
I don’t think the buns will taste as rich with 1% milk, but it works.
Kim says
Fantastic directions and detailed. Turned out great! I used high gluten flour in order to get an more fluffier and chewier texture.
Carolen L Alfonso says
Hello Lisa, and thanks for the awesome recipe. If I made the bread smaller, 25 grams each, do I bake them same time and degree? Thanks.
Lisa Lin says
I’d do the same temperature but less time. Watch them carefully to see when they look like they’re browning.
Evelyn says
I made these buns in a youtube video (https://www.youtube.com/watch?v=teDiyzqm3jQ) and they turned out so delicious! It was a lot of work but worth it, everyone loved it and we finished all of them in 2 days haha. Thanks so much for sharing this recipe!
Pascale Co says
I can’t believe I just made pineapple bread!! Thank you Lisa for your detailed recipe and tips. I didn’t have condensed milk so I did use the 3 T sugar substitution. The end result was amazing and so yummy warm out of the oven!!
Jacque says
I made this recipe following the measurement by weight. I think your gram measurements are off. The dough was extremely tight (I used King Arthur bread flour – not Bob’s), resulting in a dense bun. Consider revising the measurements. Thanks!
Dian Tsang says
Hi Lisa!
After read your recipe,i am eager to make a bun by tomorrow ^^. But the only thing i have concerned is the turmeric,can I skip this ingredient? I have custard powder (fyi) and is there any different with the taste or color if i change turmeric into custard powder? If i can change with custard powder,how many gr for this?
Also,I like the bun look more golden brown (more sexier 😀 ) do i need adjust the temperature oven?
Thanks a lot,and so sorry to asked you lot of question. I am newbie in kitchens life. Waiting for your reply 😊
LB says
Wow, these buns turned out AMAZING! Thanks so much for the detailed instructions. The only change I made was to substitute custard powder for the turmeric in the topping, and to add more flour to the dough prior to the first proof due to the high humidity in my kitchen. Anyway they turned out great, so pillowy soft on the inside and deliciously crunchy and sweet on the topping. I will definitely make these again.
carolina says
Hi Lisa, I made these buns and they turned out amazing, however I’m wondering how can I make them fluffier? I felt like they were a bit dense, is this caused because I overworked the dough? Do you have any tips on how to make them fluffier?
Thanks!
Lisa Lin says
Hi, Carolina, a few people have said the same thing. I think there’s two things. I have decreased the kneading time to 8 minutes. I think 10 minutes might be a little long. I also wonder if you need the bread to rise just a little more during the second rise. I hope those tips help!
Kimberly says
Unfortunately these did not work out for me. I opted to hand knead after using my bread whisk to incorporate the ingredients. The dough wouldn’t come together after 10 minutes of kneading; it was incredibly dry, difficult to knead, and would crumble and fall apart even after gradually adding 5 tablespoons of water. I ended up trashing the project out of frustration.
I want to revisit this recipe and try it again some time as I’m interested in using tangzhong. Maybe next time!
Anh Silver says
Hi LIsa,
I have access to custard powder and would like to know how to incorporate it into the topping. I also wonder where the pineapple is in this recipe or could it be added? Thanks.
Lisa Lin says
There isn’t actually any pineapple in pineapple buns. Like I say in the beginning of the post, the bun is supposed to look like a pineapple, but it doesn’t actually contain any in it. I would probably use 2 teaspoons of the custard powder. You can omit the vanilla and turmeric.
Jessica says
Hey can you use an air fryer? Would it change the texture?
Lisa Lin says
No, you can’t use an air fryer for baking.
jamie says
hi! my kids and i love your recipes, i tried making this recipe a few weeks ago and we all loved it, i plan on making it again tomorrow for my son’s birthday. he loves turtles so i decided id make them turtle shaped. is it alright for me to dye the topping green while making it? also sorry for posting it twice, haha.
Yvonne says
Hi Lisa,
Wow, this recipe is delicious. Thank you for making the instructions so easy to follow especially for a novice baker like me! Love that all the ingredients are easy to find.
Lisa Lin says
Thanks, Yvonne!
Stephanie says
Do you use salted or unsalted butter for this recipe? Thanks for such a great recipe, I can’t wait to try it tomorrow!
Lisa Lin says
unsalted! I usually use unsalted butter for my recipes.
Gabrielle says
Hi, this recipe looks delicious. I was just wondering if I could use cake flour instead of AP flour in the tangzhong. Unfortunately we don’t get AP flour here in South Africa. Thanks 😊
Lisa Lin says
If you have more bread flour, just use bread flour for the tangzhong!
Evelyn says
Hi! I’ve followed your recipe before and it’s always turned out amazing! But this time around the measurements seem off. My dough was a lot tougher and more difficult to work with. Was the recipe measurements altered?
Lisa Lin says
Hi Evelyn! No, I haven’t changed the amounts to this recipe. That’s really odd. I’m going to remake this soon and I’ll see what’s going on. One question for you: how are you measuring the flour for the recipe?
Jessica says
Amazing recipe thank you Lisa ! These buns took longer for me to make but maybe b/c I was scared to underproof but turned out I overproofed but it’s still soft and very good and not too sweet! I didn’t have a stand mixer asides from a electric hand mixer so I did everything by hand. Scared they would fail but turned out just like the Asian bakeries ! Will make again with some different flavors !
Jessica Siao says
I do have to say my dough was pretty sticky So I had to use a little more flour to dust both doughs ,all in all turned out still wonderful!
Sue says
Thank you for the detailed recipe. It was perfect. I didn’t have the turmeric for the yellow top but the taste was like from a bakery. Thank you so much!
Lisa Lin says
Thank you for trying the recipe, Sue!
Carman says
Thank you for an excellent recipe! I have used this recipe several times and it turns out beautiful and delicious every time! The bun itself has a nice flavour. I’m baking another batch in the oven as I’m typing this!
Winnie says
I haven’t tried the bread part of this recipe because I have a milk bread recipe I generally use, but wow – the topping for these pineapple buns came out amazing. I chose to use this recipe over others because it doesn’t require custard powder or milk powder. Thank you!! Will have to try the full recipe next time.
Janet says
Made these once following the recipe and although a little lopsided, these turned out great!
Then modified them per below recommendation – used 100g sugar in the topping rather than the recommended 130g and they turned out a little greasy and didn’t hold as well as they did originally. Will stick to the original recipe next time.
Thanks for posting!
Lisa Lin says
Glad you enjoyed these, Janet!
Kat says
I love bolo bao! This is my first time making it but for some reason it turned out dense. Do you know why this could be? My dough was very tough and not sticky even though I used a food scale. Do you think I should add more milk?
Thank you so much!!!!!
Lisa Lin says
Hi Kat! Can you explain how you kneaded the dough? I would love to see what the issue was! It could be that the dough wasn’t hydrated enough.
Amanda says
Super detailed recipe and mine turned out so good even at the 1st try! Will recommend u to try !
Lisa Lin says
Thank you, Amanda!
LisA says
Hi. I’m excited to try this recipe. I loved these as a child.
Can the unbaked dough be frozen for later use? If so should I shape, prove and then freeze?
Thank you.
Also do you have a recipe for the finger rolls with the custard filling?? I loved those too!
Lisa Lin says
I don’t think the raw dough will freeze well, but I’ve also never tried it before. People have told me they freeze the baked pineapple buns and warm it up before serving.
Lisa Lin says
Hi Lisa, just another update. I tried freezing a similar milk bread dough yesterday for a recipe and it does work. Essentially, after you shape the buns, you can freeze them. Then, you’d let them defrost (overnight in the fridge) or on the counter and wait for them to rise. I did notice, however, that the crumb of the rolls I made were slightly tighter after I baked them from frozen.
Laimen says
Amazing recipe. Delicious Bolo Bao!
Lisa Lin says
Thank you, Laimen!
Bloxorz says
This dish is excellent! It is extremely for me to have a great breakfast. It looks both beautiful and delicious
Tabetha says
My buns came out pretty dense, more like dinner rolls than pineapple buns. Any idea why? I made sure my yeast was active and followed the directions exactly, using weights. Delicious though, and the topping is amazing!
Lisa Lin says
Hi Tabetha, I need to spend some time with this recipe again because I seem to get readers who say this recipe works very well and some say it’s denser. Stay tuned!
Perry says
Hi. Every time I go to Chinatown in Los Angeles, I’m sure to get bolo bao buns. My favorite have something called “milk powder filling” or dry milk powder filling.
Any thoughts on a recipe for the dry milk powder filling?
Thanks for your time and a great recipe
Lisa Lin says
Hi Perry, I haven’t really heard of milk powder filling before, so I’m not sure where to even begin. I’m more familiar with red bean, coconut, custard, or a smooth (almost like condensed milk custard) kind of fillings.
Sue says
It was easier to make than I thought. The buns turned out great! I’ll never have to buy them again. Thank you for the recipe!
Lisa Lin says
Thanks for trying the recipe, Sue!!
Leafy says
Is the topping supposed to be very crunchy? Mine were pretty crispy and I was wanting them more on the soft side 😞
Lisa Lin says
I wouldn’t say it should be overly crunchy, but it’s also not completely soft either. It could be the sugar. If you use a finer sugar, the topping will be softer.
Chan says
I have made milk buns before but have been wanting to try this since there aren’t any near where I live. This recipe was easy to follow and everything turned out so well! The bao is the perfect consistency and just sweet enough. The only thing I might change next time is a little bit less sugar in the topping. Thank you for sharing!
Angela says
Will the turmeric leave a strong taste or smell?
Lisa Lin says
In my opinion, it doesn’t because the vanilla masks it a lot
connections says
Pineapple buns, also known as Bolo Bao, are a popular sweet bread with a slightly crispy and crumbly topping resembling a pineapple’s texture.
Rosario G says
When I lived in NY I would always stop by my local Asian bakery as a teen and buy these and now as an adult I still enjoy them but the closest Asian bakery is in the city (Philly) which is about an hour away and I happened to be in the city a few days ago and purchased 2 for $1.50 each and I ate them and craved some more a few days later so I decided to give this recipe a try today and they are to die for!!! I could eat all 12 in one day that’s how good they are. I had to borrow a friends stand mixer as I don’t have one so next time I make these I’ll have to try mixing it by hand and kneeding the dough or invest in a cheap stand mixer because kitchenAid mixers are not cheap lol.
Bella says
I’m not sure what I did wrong, but my dough is extremely dry and it’s in crumbles. Kneading it is impossible.
Mama K says
My son chose these buns as the food to accompany his school report on Hong Kong, and he’s glad that he did! They were delicious!! I’m looking forward to making another batch of these soon for our family to enjoy (instead of feeding them to 50+ people today after his oral presentation).
Lisa Lin says
Hi Mama K. Thank you so much for making these! I’m so glad you all enjoyed them!
Lisa says
I love the detail of this recipe! Super helpful, especially along with the photos. I kneaded it all by hand right after getting home from doing upper body at the gym, so my shoulders were screaming at me lol. I’ll definitely be baking these again!
Laura says
So good! Easy to follow along, with the great instructions and tips!
Lisa Lin says
Thank you, Laura!!
A.Y. says
Thanks for this, Mama Lin.
Wondering if you have an option to make the red bean filling?
Wasian says
Do you have a recipe for the custard filling that some have?
Norah says
Hi! I was going to make this but ran out of milk. Do you think the flavor would change if I subsituted the milk with water? Or if I used a mix of water and condensed milk?
Lisa Lin says
Hi Norah, the buns definitely won’t be as rich if you used water instead of milk. I’m not sure if a mix of water and condensed milk will work. Sorry about that!
MP3 QUACK says
I loved this recipe! The step-by-step instructions made it so easy to follow. The pineapple buns turned out perfectly golden and delicious. Can’t wait to try them with some butter next time! Thanks, Lisa!
Svenja says
Although I first intimidated by the recipe my craving for pineapple buns was bigger. And oh boy. Am I happy I dared to make them. I followed the recipe and measurements precisely and I was grateful that every little step was documented. Amazing results and much simpler do to than it looks. The hardest part is the waiting while the dough is proofing.
Lisa Lin says
Svenja, THANK YOU for making these pineapple buns!! So glad you enjoyed them!
Jon R says
I made this today and impressed my wife and friends. Followed this recipe exactly and turned out amazing! Will be mak8ng again soon and focusing on making them look better.
Lisa Lin says
Jon, thank you so much for trying this recipe!! I’m so glad you all enjoyed it!
iplmatcheslive says
I’ve already baked a lot of pineapple buns before, but I have to admit that this recipe is the best one. I followed it accurately and they turned out perfect! They were even soft and crunchy (topping) on the second day. I highly recommend this recipe 🙂
orissaguide says
Hi! If I use instant yeast do I need to bloom it? Or can I add it directly to the rest of the ingredients?
Lisa Lin says
Hi, you can just add it directly to the ingrediets!
Jenny says
Everything came out perfect. Quick question, why did my bread come out denser than I thought it’d be? Did I over knead it or didn’t proof it long enough?
Lisa Lin says
Hi Jenny, I think it has to do with proofing. I notice that when I make this recipe in colder months, it takes way longer to rise. I am also working on updating this recipe!
55 club says
I love this recipe! The step-by-step instructions made it so easy to follow. I can’t wait to try making pineapple buns at home. They sound delicious and perfect for afternoon tea. Thanks, Lisa!
BDg Games says
This recipe looks fantastic! I love how you’ve included both the traditional technique and a healthier twist. Can’t wait to try making these pineapple buns at home—thank you for the clear instructions and mouthwatering photos!
MP4 JUICE says
I tried making these pineapple buns following your recipe, and they turned out delicious! The crunchy topping with the soft fluffy bun is just perfect. Thanks for sharing such clear instructions! Can’t wait to make them again!
Will says
Funny thing my buns comes out as Roti O not pineapple bun hahaha
E Claude says
Just like the bolo baos in asian supermarkets. The buns need to be rested for a few hours for the crust and bottom to soften; it’s crunchy out of the oven.
Athena P says
Hi Lisa! I’ve made this recipe multiple times to perfection. Thank you! Anyway, I’d like to try doing the overnight proof in the fridge but I have never done it before. Would you be able to confirm if it is putting the bread dough before the first proof into the fridge to let it rise overnight? And then when ready, shape the buns, preheat oven 170F, turn off, and do the second proof in the warm oven for 10-12min?
Also, does the amount of yeast need to change for this method? Thanks!
Lisa Lin says
Hi, Athena! Thank you so much for making this recipe! I should preface by saying I have never done the proof overnight for this specific recipe, but yes, you can do the first proof in the fridge, and the yeast amount should be the same. For the second proof shortcut: did you want to proof the buns BEFORE putting on the pineapple topping? if you do the shortcut proofing method with the pineapple topping, I would worry that the topping would melt and slide off the bun in the preheated oven. Does that make sense?
vh says
Made these for my husband’s class for LNY and they were a huge hit. Appreciated the clear and detailed instructions + photos.
Lisa Lin says
Thank you SO MUCH for trying this! Glad everyone enjoyed it. By the way, as someone who used the photos, were they helpful in the blog post, or should they be moved into the recipe card? I’m always wondering what’s more helpful for readers. Thanks!
vh says
I find them more helpful as is in the blog post because you often accompany helpful details like why you chose common pantry ingredients vs lard or custard or why you mix at low speed whereas the instructions should remain clear, concise, and easy to read quickly/see each step as it can be rely on timing I feel like. Hope that makes sense!
Lisa Lin says
I appreciate this feedback! Thank you!!
T says
I recommend that the instructions be changed so that the butter is added in last after the dough has been formed. Putting in the butter early inhibits the dough from forming a proper gluten structure, resulting in a dense dough. Trust me, I made that mistake once.
big Win says
I just made these pineapple buns and they turned out amazing! Your step-by-step instructions were super helpful, and the glaze on top added the perfect touch of sweetness. Can’t wait to share them with my family! Thank you, Lisa!
X says
I loved this recipe! The steps were easy to follow, and my pineapple buns turned out perfectly golden and delicious. The hint of sweetness in the topping was just right. Thanks for sharing such a wonderful treat! Can’t wait to serve these to my family! 🍍🥯
Lilian says
I make bread all the time and balo bao are my favorite buns ever! Will make again real soon. Easy to follow and I absolutely loved how quick it took me to knead the dough by hand. I don’t have a stand mix whatsoever so I was preparing myself to knead for a long time but it only took 5-10 minutes. Although I did knead for a couple more minutes because I was so shocked at how quick my dough came together, and just wanted to be sure. Smelled so good out the oven, and was super fluffy! Thank you so much, my family enjoyed it