When I started blogging, I could barely taking a good photo on my phone, let alone a fancy camera. But I knew early on that if I wanted people to take notice of my blog, I would need to improve my food photography dramatically. Over the course of a year, I have poured over many posts, books, and videos about how to improve my photography.
If you’re looking to expand on your food photography skills, here’s a quick run-down of what I use for my own photos and a list of good photography resources.
Camera & Lens
The photos from the first posts on this blog were taken with my iPhone. I got by, but I wanted brighter, crisper images and be able to control the focal point of the photos.
I spent the first few months of blogging learning more about exposure and food composition on my iPhone before upgrading to a digital single-lens reflex (DSLR) camera. (Yay!) Starting in April 2014, I shot photos with a Nikon D3200 camera, which I am VERY happy with. For the first two months, I used the kit lens, but it wasn’t ideal for the low-light setting in my apartment.
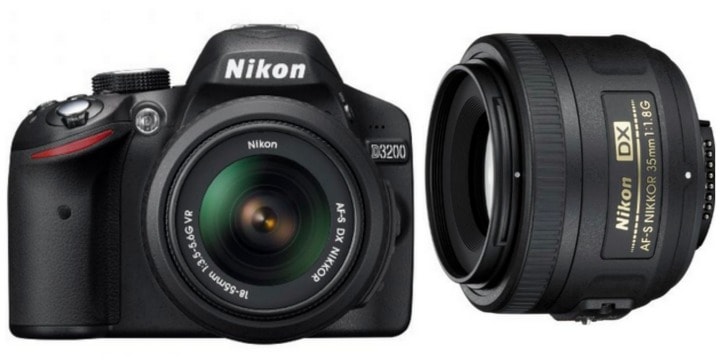
Since in May 2014, I have been shooting with this Nikon 35mm f/1.8 lens, and I’m very happy with how crisp my photos turn out. I can’t zoom with the 35mm lens, so I need to move around and sometimes get up close and personal with my food to get a good shot. It took time to get familiar with using the lens, but it was the best investment I’ve made.
Camera Accessories
In addition to having a good camera, you might also consider getting these:
Lens Protection Filter
My camera lens is my bread-winner, so I want to make sure that it stays in good shape. I use this lens protector prevent the lens from scratches, food splatters, or any accidents.
Camera Wireless Remote
To get those action shots on my blog, I usually use my remote control to take the picture. That way, I don’t have to stand behind the camera to take the photo.
Tripod
For the most part, the lighting in my apartment sucks. As a result, I need to take my photos with a slower shutter speed to get more light into my photos. But slower shutter speed also means that I need to hold the camera verrrry still while taking my photo, or else the photos will turn out blurry. It can be quite a pickle sometimes.
I use a this tripod to keep my camera still while I take photos. It’s been a life saver. I also use the tripod to help me take action shots.
Free Tips for Beginners
There are many great resources out in the interwebs that provide great tips on improving your food photography. Here are some quick posts that I’ve found very useful:
Food Photography Tips for Food Bloggers (Cookie + Kate)
Photography 101 (Broma Bakery)
Beginner’s Guide to Food Photography (Serious Eats)
A No BS Guide to Food Photography (The Healthy Maven)
Photography Tips (Food Bloggers Central)
Additional Paid Resources

Food Photography School (Minimalist Baker): Dana’s Food Photography School are for people who prefer visuals over books. There are a ton of videos on there that teach you the basics of photography and how to style and edit your photos. I pin photos from Dana’s blog ALL. THE. TIME. I joined her photography school so that I can learn how to how create beautiful images like she does on Minimalist Baker. I’m definitely not there yet, but I have learned a great number of tips so far. If you’re not ready to pay for the service yet, check out her free tutorials.
Finally, I work on my food photography by studying what other people do. I’m always on Foodgawker or Tastespotting to look for attention-grabbing photos, and I keep a food photography board on Pinterest inspiration. I also subscribe to a ton of food magazines and draw all over them to make notes on what I like about a particular shot and how I can recreate that look.


