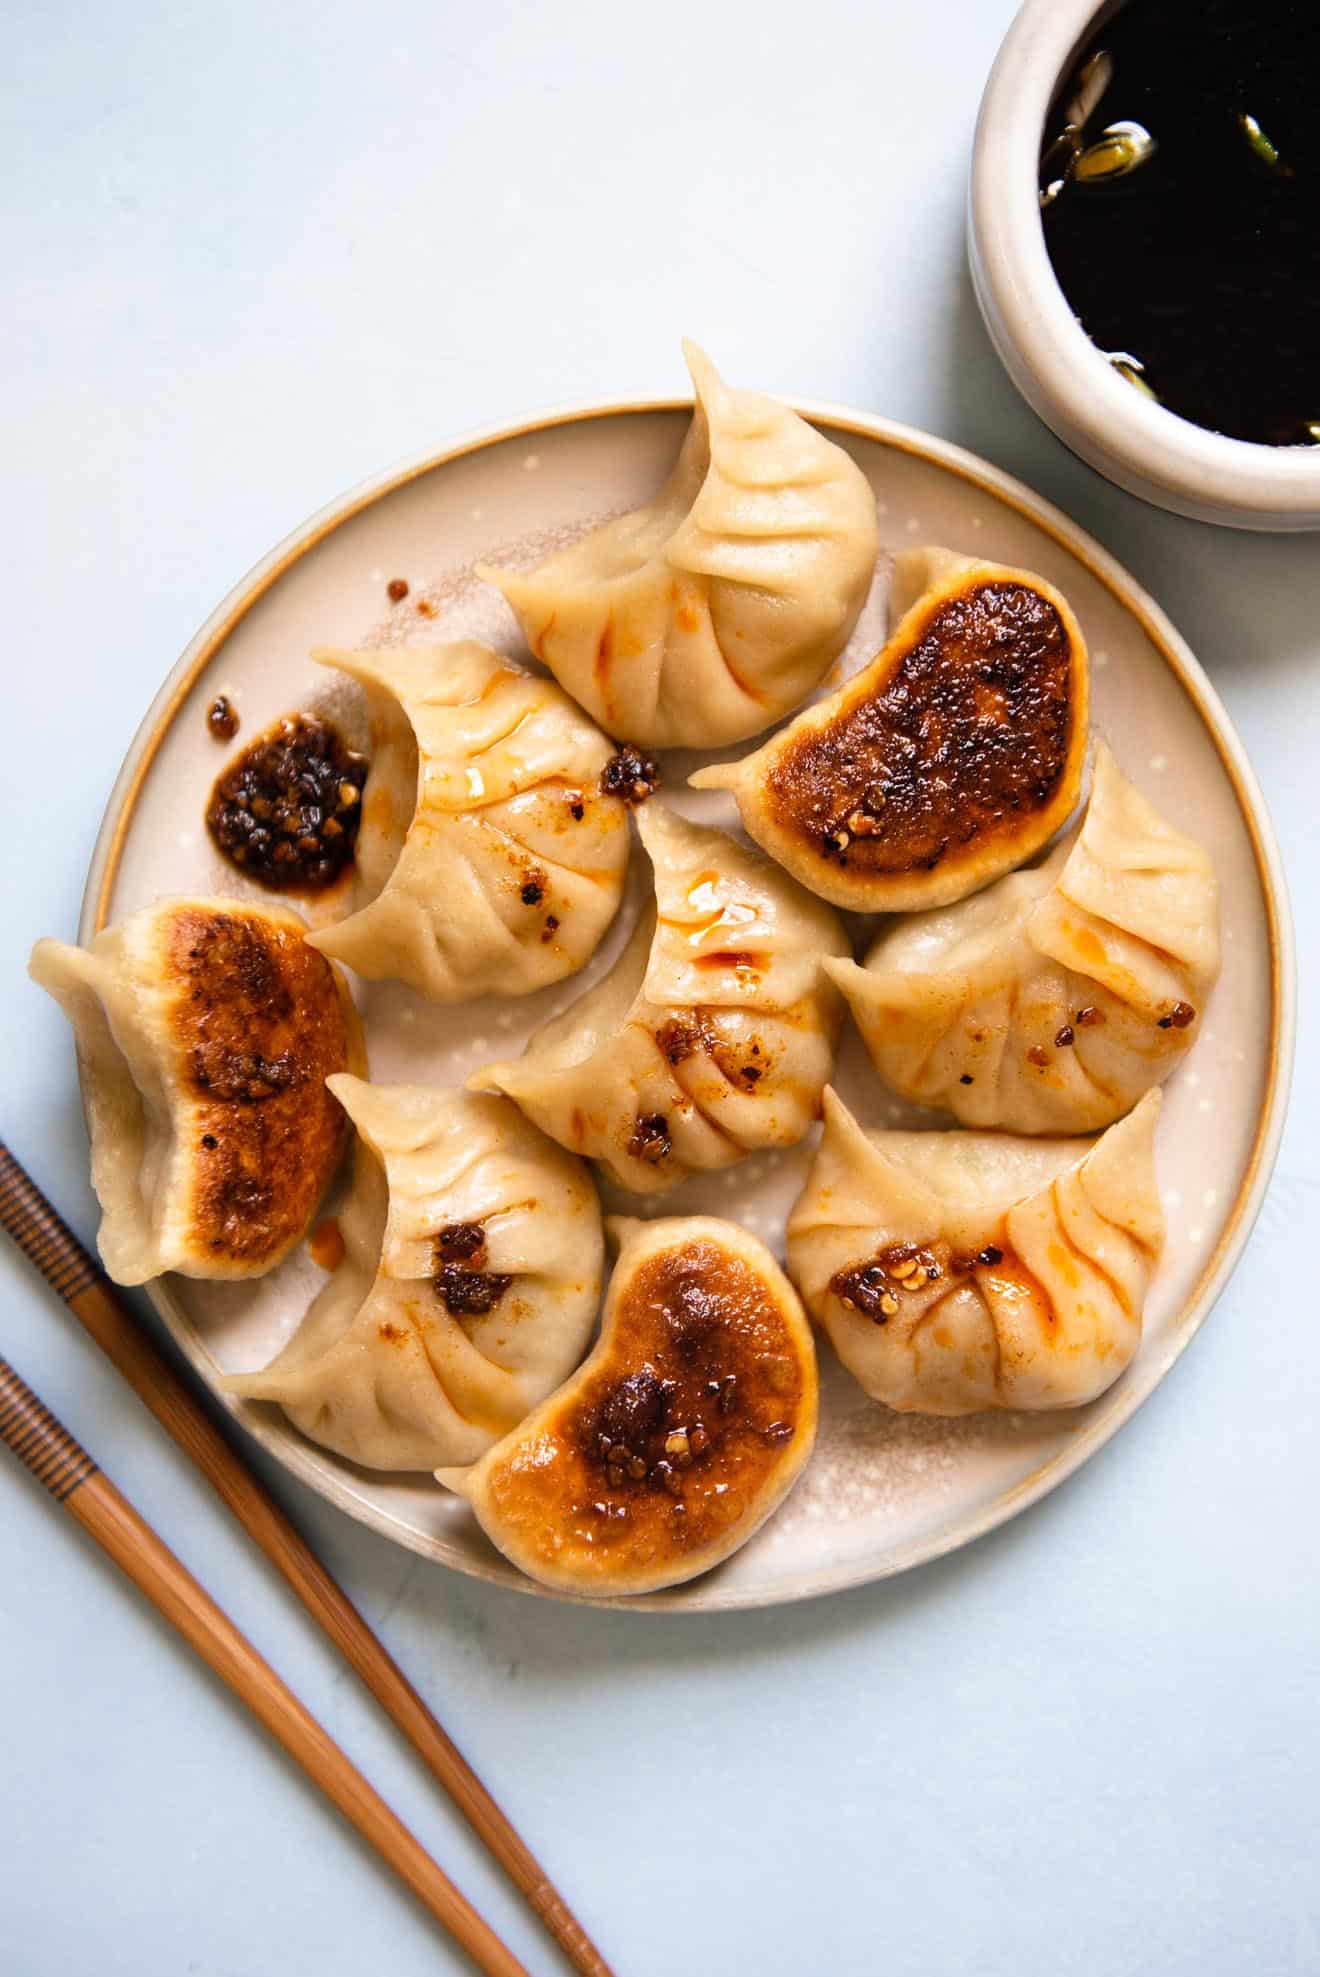
There are so many varieties of dumplings in Chinese cuisine, each requiring a different type of dumpling wrapper. The most common types of dumplings you see at Chinese restaurants, such as wontons, potstickers, and shumai (or siu mai), are made with wheat-based wrappers.
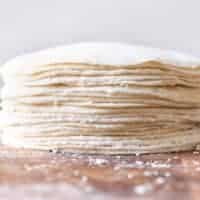
More often than not, Mama Lin and I make dumplings with store-bought dumpling wrappers because it saves a lot of time. That said, I also like using fresh wrappers because they are better for making certain types of dumpling pleats. In addition, homemade dumpling skins have a softer, chewier texture when they’re cooked. That’s why it is well worth the effort to make the wrappers from scratch.

TIPS ON HOW TO MAKE DUMPLING WRAPPERS
WEIGHING THE FLOUR
If Mama Lin were in the kitchen, she would just throw flour and water into a bowl and adjust the amount of each ingredient based on feel. However, I like to be more precise and weigh the ingredients. For this dumpling wrappers recipe, you’ll need 320 grams of all-purpose flour.
I don’t like using measuring cups because I always end up with different amounts of flour each time. If you don’t have a scale, use the spoon-and-sweep method to measure out 2 2/3 cups of flour. You’ll also need 3/4 cup of very warm water.
TEMPERATURE OF WATER
For the water, I prefer the temperature to be somewhere between 110ºF to 130ºF—not boiling hot, not too cold. Dough made with room temperature water shrinks back too easily when I roll it out. On the other extreme, dough made with just boiled water has barely any elasticity left. It doesn’t feel right when I roll it out, and I don’t like the mouthfeel of the dough when it’s cooked.
Dumpling dough that is made with warm water strikes the perfect balance. The dough is pliable and supple, and it still has a considerable amount of elasticity.
To heat the water, I usually microwave the water in a jar on high for 45 seconds. Then, I use a thermometer to check the temperature. If it’s not hot enough, I’ll continue to microwave the water at 10-second intervals. Another method is to run very hot water in the kitchen faucet and measure 3/4 cup of water from there. Finally, you can also mix cold water and a bit of hot boiling water together.
Note that the humidity in the air may affect the amount of water you need. If you find the dough too dry, add another tablespoon of water and knead the dough (room temperature water is fine). If it is too wet, add another tablespoon of flour.
ROLLING OUT THE DOUGH
To ensure that the dumplings are uniform in size, I usually weigh each piece of dough before rolling it out. Aim for 9 to 10 grams per piece if you want dumplings with a thinner skin. For potstickers, I like the dough to be between 12 to 13 grams per piece for medium-sized dumplings. For larger potstickers, you may want the dough to be between 14 to 16 grams. If you are making vegetarian potstickers, where the filling is very loose, I recommend making the wrappers larger.
All of this is a matter of personal preference, so experiment with using wrappers of different sizes.
I like using a smaller tapered 11-inch rolling pin for the job. Unfortunately, the one I purchased is not longer available on Amazon. however, this one is a good alternative. You can roll out the dough in two ways. First, you can roll it out like pie crust: hold onto both ends of the rolling pin and roll over the dough forwards and backwards. Then, rotate it 90 degrees and repeat. Continue rolling and rotating until the dough is about 3 1/4 inches to 3 1/2 inches in diameter.
The other way of rolling is the traditional method, but it is more difficult to master. Essentially, you only use the right hand to roll out the dough while the left hand is constantly rotating the dough. The rolling pin stays in the right hand never lifts off from the dough surface. The wrapper is rolled out in a continuous motion.
HOW TO REFRIGERATE DUMPLING WRAPPERS
The wrappers are best when they are used the day they’re made. However, if you must refrigerate them, make sure to brush the wrappers with starch, like potato or tapioca starch. The starch prevents the wrappers from sticking together. All-purpose flour won’t work as the flour will just get absorbed into the dough. As a result, all the wrappers will stick together the next day.
Spoon about 1/2 teaspoon of potato starch over a wrapper and brush it over the entire surface with your fingers. Make sure everything gets covered with starch. Then, stack another wrapper on top and brush it with potato starch. Continue stacking and brushing the wrappers with starch until you’ve stacked all the wrappers.
Wrap the dumpling wrappers pretty tightly in plastic wrap. Then, place everything in an airtight bag or container to refrigerate. You must wrap the dumpling wrappers with a layer of plastic wrap first.
I once made the mistake of placing the wrappers directly into a zip top bag without the additional plastic wrap. The next day, condensation developed inside the bag, causing all the wrappers to stick together.
Refrigerated dumpling skins should be used within 48 hours. The dough starts to turn gray when the dumpling skins are refrigerated for longer.
HOW TO FREEZE DUMPLING WRAPPERS
You can freeze the wrappers once they have been wrapped in a layer of plastic and sealed inside a freezer bag. Let the wrappers defrost on your counter and then use them as usual.
Because the wrappers are covered in starch, you will need to use water to help seal the dumplings together.
DUMPLING WRAPPERS VS DUMPLING SKINS
Often times, you’ll see some recipes refer to the dough for the dumplings as “dumpling wrappers” or “dumpling skins.” They both refer to the same thing. Dumpling skins is more of a literal translation of the Chinese phrase “餃子皮.” In my posts, I tend to use these phrases interchangeably.
DUMPLING RECIPES
- Pork & Cabbage Potstickers
- Vegetable Potstickers (vegan)
- Chicken Potstickers
- Red Curry Tofu Dumplings (vegan)
- Yellow Curry Wonton Soup (vegan)
Dumpling Wrappers Recipe
Ingredients
- 320 grams all-purpose flour, 2 1/4 cups using dip-and-sweep method; 2 2/3 using spoon-and sweep method (see note 1)
- 175 grams (3/4 cup/175ml) very warm water (anywhere between 110ºF to 130ºF) , (see note 2)
Instructions
- Pour all the flour and water into a mixing bowl. Use chopsticks or a wooden spoon to stir everything together. Mix until all the water is absorbed and shaggy pieces of dough start to form.
- Then, use your hands to gather the dough together. As you do this, dig into the dough with your fingers in a claw-like motion. This helps to distribute the moisture inside the dough. (See note 3 for stand mixer instructions.)
- Take the dough out of the bowl and knead it on a surface for 2 to 3 minutes. The dough is slightly tacky, but not sticky. You shouldn’t need to flour the surface. If you find the dough is sticky, dust the surface with a little bit of flour and knead the flour into the dough.
- After several minutes of kneading, you should get a pretty smooth ball of dough. There may be some crags and dimples on the surface, but that’s okay. Place the dough into the bowl again, and cover the bowl with a damp towel or a silicone lid.
- Let the dough rest. If you are pressed for time, you can start rolling out the dough into wrappers after about 20 minutes. However, I prefer a longer resting period of at least 45 minutes. The dough feels more supple when it rests longer, making the wrappers easier to roll out. (See note 4)
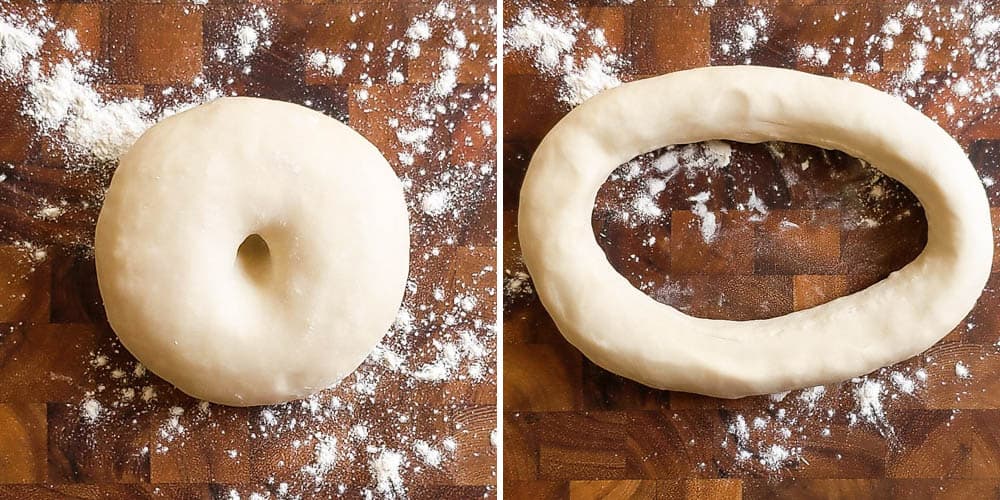
- Take the dough out of the bowl and knead it a few times. Make a hole in the center of the dough with your finger. Then use your fingers to stretch out that hole in the center. Keep stretching out the dough and rotating it until you get a large ring. (See video below for reference.)
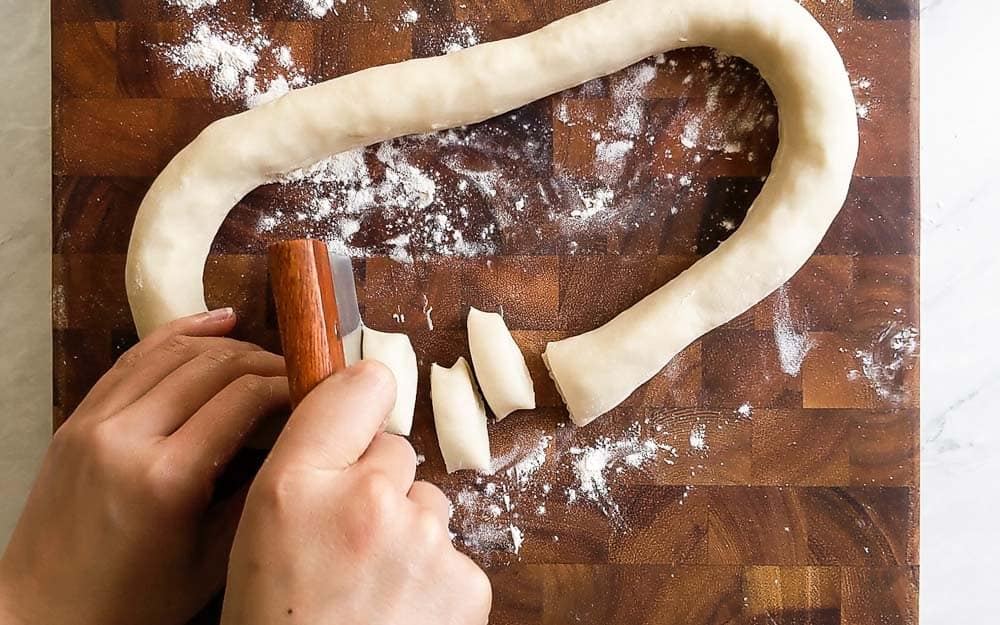
- Cut the dough with a sharp knife or a bench scraper. You should now have a thick dough rope. Keep rolling out the rope until it is about 1 1/2 inches in diameter.
- Now, cut out 5 small pieces of dough, each weighing about 12 to 13 grams. This is about 1 tablespoon of dough. If you want larger dumplings, each piece of dough should be 14 to 16 grams. The dough dries out easily so put the dough rope back into the bowl and cover it again.
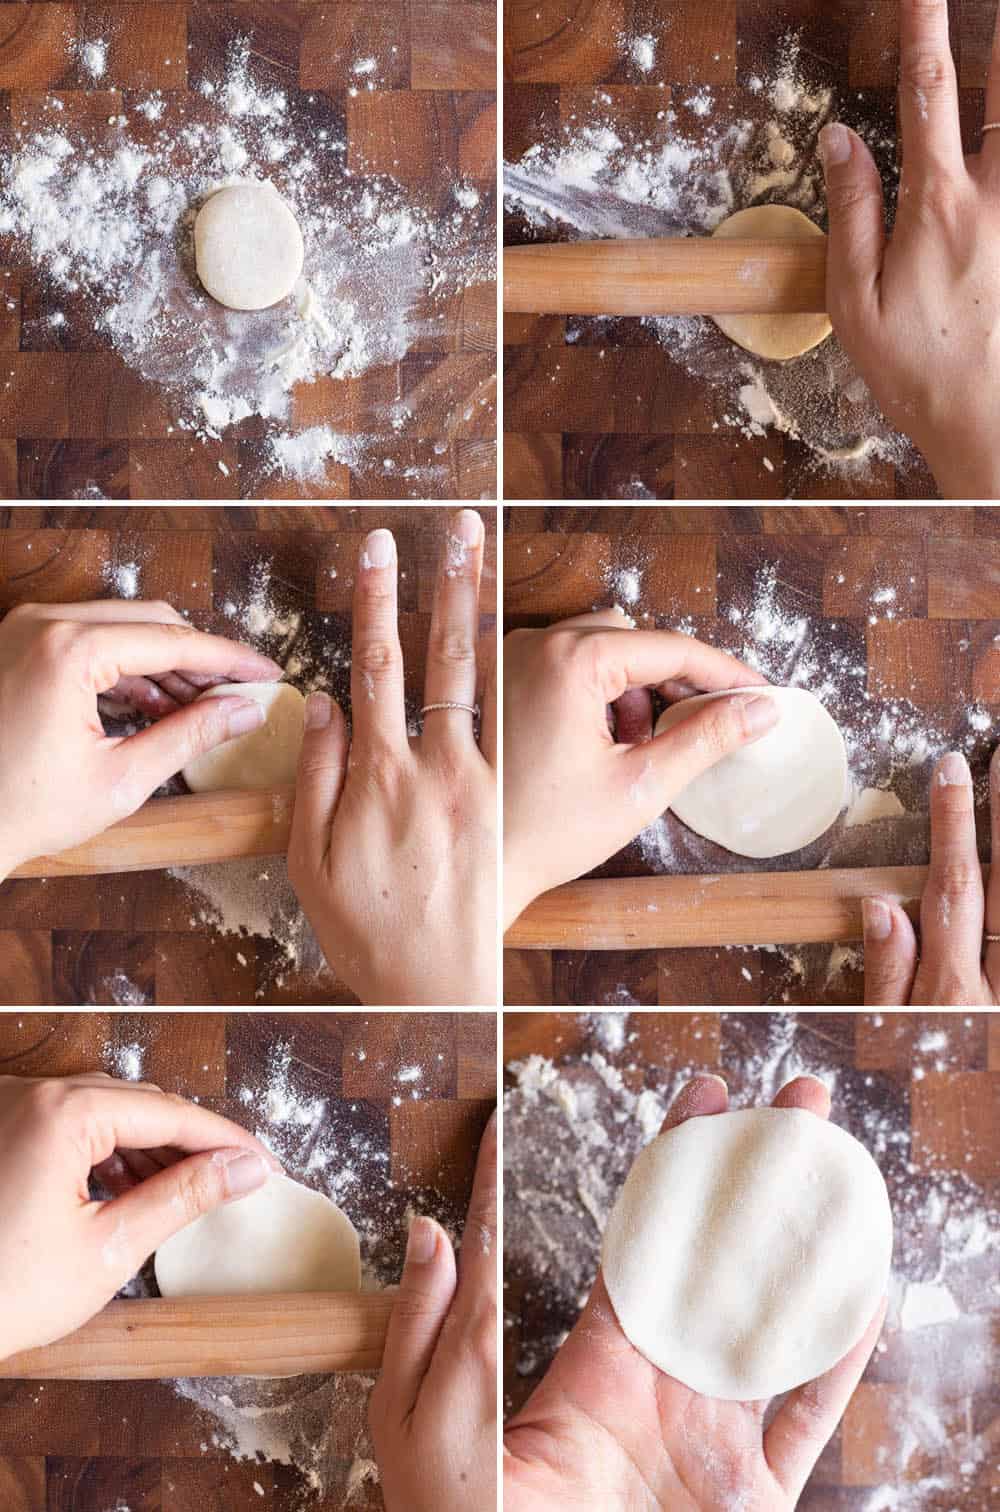
- Take each piece of dough and roll it into a ball. Using the fleshy part of your palm, flatten each ball of dough into a disc, about 1 1/2 inches in diameter. Lightly dust each disc with flour.
- Take your rolling pin into your right hand and roll it over the entire surface of the disc and then roll it off. Your rolling pin never leaves the surface. Use your left hand to rotate the disc 90 degrees and roll over the entire surface again. Repeat this two more times until you have rolled out the dough for two revolutions. If the disc is sticking to the rolling pin, brush it with some flour.
- The third time around the wrapper, you will only roll over the wrapper halfway before rotating it. This ensures that the center is slightly thicker than the edges so the filling is doesn’t break through the wrapper easily. Do this for 1 to 2 revolutions around the wrapper.
- For the final revolution, you will only roll over the edges of the dough (about 1/2 inch into the wrapper). The wrapper should be somewhere between 3 1/4 to 3 1/2 inches in diameter. If you are making larger wrappers, the wrapper should roll out to about 3 3/4 inches in diameter.
- Brush some flour over the wrapper, set it aside, and cover it with a dry towel. Roll out the 4 remaining discs. Once you’ve rolled out 5 wrappers completely, use it to make dumplings.
- The dumpling wrappers form a crust easily. If you are working by yourself, you don’t want to roll out more than 5 dumpling wrappers at a time.
- If you want to store the wrappers for later use, roll out the dough. Brush potato starch (or tapioca starch) over all the wrappers before stacking them up. Tightly wrap the stack of wrappers with plastic wrap. Then, transfer them into an air-tight container. You can refrigerate these for up to 2 days or freeze them for up to a month, as long as no freezer burn develops around the wrappers.
Video
Notes
- The dip-and-sweep method is where you fluff up the flour and dip the measuring cup directly into the flour. The spoon-and-sweep method is where you fluff up the flour, spoon flour into the measuring cup, and level off the top. You can read more about both methods of measuring flour here.
- You can microwave the water on high for 45 seconds and check to see if it has reached the appropriate temperature. If the water is not hot enough, continue microwaving at 10-second intervals. Alternatively, you can mix hot boiling water with cold water.
- Stand mixer directions: Add the flour and water to the bowl and mix on low speed with the dough hook attachment. Once all the water has been incorporated into the flour, increase the speed to medium-low. Continue mixing for about 2 minutes, until a dough forms and all the loose flour has been gathered into the dough. Turn off the stand mixer and transfer the dough onto a surface. Knead it by hand a few times, then shape into a ball. Place the dough ball back into the mixing bowl and cover it with a damp towel or a silicone lid.
- In my original recipe, I rested the dough twice. For the first rise, you let the dough rest for 15 minutes. Then, you knead the dough several times before letting it rest again for at least 30 minutes. I have simplified the recipe so that you only need to rest the dough once. I found that the dough made with a single resting period to be similar to the double resting method.
- If you don’t have time to roll out all the dough into wrappers, you can refrigerate the dough overnight. However, it is very difficult to roll out the dough when it is still cold. Let the dough sit on the counter and reach room temperature before rolling it out.
Nutrition


Yen says
Hi Lisa,
Thank you so much for this recipe!
I tried it and my dumpling wrappers turned out perfectly.
Your detailed instructions made it so simple for me to make them.
I measured out the flour and had my water at the exact temperature you specified and my dough was smooth and elastic. I was so happy with my first attempt at making dumpling wrappers from scratch. I will bookmark this page and continue to use it in the future.
Thank you again!
Yen
Yen says
Hi Lisa,
Thank you so much for this recipe!
I tried it and my dumpling wrappers turned out perfectly.
Your detailed instructions made it easy for me to make them.
I measured out the flour and had my water at the exact temperature you specified and my dough was smooth and elastic. I was so happy with my first attempt at making dumpling wrappers from scratch. I will bookmark this page and continue to use it in the future.
Thank you again!
Yen
@klararisbergcooks says
I followed this recipe for the skins and they turned out perfectly! Will defo do it again over and over. Brilliant how-to guide as well.
Lisa Lin says
Thank you, Klara for using my recipe to make the dumpling wrappers! I’m so glad it worked well for you!
Mentari says
I hv not tried this but I’ll wait for the mood to kick in.
Brilliant recipe and instructions, I’m saving this.
Thank youuu
Tracy says
Gonna be trying this next week!
Will gluten free flour work?
Lisa Lin says
Hi, Tracy! I’m so sorry, I just saw this message! I have used pre-made gluten-free flours on this recipe and the texture is a little off. Check out my friend’s dumpling wrapper recipe here: https://www.snixykitchen.com/gluten-free-dumpling-wrappers/
Sylvia says
Thank you for this recipe! I live in Poland and Asian/oriental food stores are not that common so it’s very hard to get good store bought wrappers. This recipe solves my problem! It takes a bit of time to prepare the dough but it’s nothing too complicated. I did everything exactly as in the recipe and it came out fantastic. The dough was a bit soft so my pleating wasn’t as nice as I wanted it to be but I blame it on lack of practice! 🙂
This recipe is definitely going into my ‘favourites’ folder.
Oh and I loved that you write everything in grams – the flour and water, and then you specify how many grams should each wrapper have – it made the process much much easier.
Thank you!
Lisa Lin says
Sylvia, thank you so much for trying out this recipe! I’m glad you found the details in the recipe helpful!
Amy Mees says
This was a very easy dough to make. The step by step instruction are so helpful. We had some problems with them sticking but I will use more tapioca flour btw them next time. I’m looking forward to making these again and practicing my rolling and pleating. I love making things from scratch so I really enjoyed this.
Lisa Lin says
Amy, thank you so much for trying out this recipe!
Cynthia says
Oh boy! I have been wanting to try making dumpling for years! Can I use rice flour instead of white flour? I have issues with gluten. If not rice, is there another kind I could use? Making my grocery list. Thank you so much!
Lisa Lin says
You can, but it will be an entirely different dumpling type. I recommend using my friend’s recipe here: https://www.snixykitchen.com/gluten-free-dumpling-wrappers/ That is great for potstickers!
Leslie Bennett says
Thank you Lisa! The recipe was so easy and actually fun. My pleating skills could use some serious help but they were still delicious. We made with your chicken potsticker recipe and my husband literally drooled over how good they were. We even had as leftovers the next day and just as delicious. Thank you!!
Lisa Lin says
Leslie, thank you so much for trying out this dumpling wrapper and the chicken potstickers recipe!! Glad you and your husband enjoyed it!
Kellyn says
This was my first time making dumplings. I followed the exact recipe and they turned out great. The rolling out was a little tedious but once I got the hang of the correct size and folding, it went a bit faster. I’m looking forward to making them again!.
Lisa Lin says
Kellyn, thanks for trying out this dumpling wrapper recipe!! I’m so glad it worked for you!
Anna Savoie says
I love this recipe. It’s my go to dumpling skin recipe and it works so well. If you’re new to dumplings bear in mind the going will be slow and you’ll need lots and lots of practice. Thankfully even ugly dumplings taste delicious!
Lisa Lin says
Anna, I’m so glad that you tried making your own wrappers from scratch!!
Meghan Bull says
SO much better than store bought wrappers and so much more fulfilling to make them yourself! Store bought is great too don’t get me wrong but these really elevate the dish. We’ve done the taste test with both and my family and I agree that the homemade wrappers are the best. They don’t take a lot of time to do at all. I need to improve my ability to roll them out into a good circle but thankfully I love the recipes and will be making them over and over again so I can practice! I’ve already ordered my new rolling pin! Thank you Lisa!!!
Lisa Lin says
Meghan, thank you so much for using this recipe to make your dumplings!!
Jessica says
First time I’ve made wonton wrappers and they turned out great – perfect dough to use, and tasted delicious fried & steamed. If you want to try homemade wrappers or can’t find them in store, this is definitely the one to use
Lisa Lin says
Jessica, I’m so glad this recipe turned out well for you!
Judy Vallas says
Every single recipe of yours is something I want to eat *right now*!!!
Is there any reason I couldn’t roll out a handful of the dough, then cut out the circles (apart from wasting some of the dough that’s between the cutouts)?
Lisa Lin says
You can definitely roll out the dough into one large sheet and use cookie cutters to cut out the shapes. You can use the scraps to roll out another large sheet of dough. I just roll them out one by one because that’s how they’re traditionally made.
Jana Pellissier says
These turned out really great! Thank you for such an easy and lovely recipe
Al says
Hi there,
If using a stand-mixer, should you still do the mixing once, let rest for 15 min, mix again, and then rest for 30 minutes before rolling out the dough?
Thank you!
Lisa Lin says
Hi, Al! I don’t think the first resting time will be necessary with the stand mixer.
Nichole says
I always make my own wrappers because the effort is well worth the reward. The recipe I’d always used before called for boiling water, but as stated in this post, I think using warm water instead did create a much nicer texture. The only issue I had was when I rolled out my wrappers and stacked them, I dusted with starch in between each, but apparently not enough because they all stuck together and I could not get them apart. I ended up having to re-roll half of them. But that is my own fault and not a flaw of the recipe. Just be sure to REALLY starch in-between, or do as I did with the second half of my batch and roll out 2-3 at a time and fill immediately. My own mistakes aside, this recipe and technique is very good and I will use it from now on.
Jordan says
I made these the other day and they turned out so well! I just need to practice my pleating and I’ll be good to go 🙂
Kelly says
Dear Lisa,
I was a bit desperate this morning when I realised that the store-bought dumplings sheets I had and wanted to use today, somehow went bad. Couldn’t find a decent recipe in French and I came across your recipe which saved my day! The dumplings came out great thanks to all of the information you gave, much better than what it would have been with the sheets I had. I am really thankful you took the time to share your recipe, details make the difference between an okay dish and a delicious one. I will do it again and share it with my friends! Merci beaucoup! All the best from Paris
Mary says
Hi. I don’t have APF, is wheat flour ok? Thank you.
Lisa Lin says
Hi, Mary. I think you can, but because wheat flour is a little different, you may need to either add a little more flour or water to get the dough to be right consistency. Follow the directions as written. As you knead the dough, if it’s feeling very sticky, add more flour. If it is still very dry after 4 or 5 minutes of kneading, add a splash of water.
Sandy says
Thank you so much Lisa for sharing such a detailed post with making homemade wrappers! First time ever attempting homemade dumpling wrappers and they turned out way better than I thought. Although my dumpling were not as round as I would liked, I know its going to take me multiple attempts to get better at it! My parents really enjoyed the dumpling wrappers (which I was quite surprised since they are quite the particular bunch). I appreciate how easy it was to navigate the directions as I was making the wrapper. Thank you again for sharing your recipe and steps! This will definitely be my go-to for future homemade dumpling wrappers!
Emily says
This recipe was so detailed and easy to follow. I’ve never made any type of dumpling before and it came out perfectly and so delicious, Thank you!
Michelle says
Making this today, what are your thoughts on adding salt? I found that some recipes have it and some don’t.
Lisa Lin says
I typically don’t add salt because traditionally, they’re not made with salt. Plus, my dough filling are usually quite well seasoned, so I don’t bother adding salt to the dough. You certainly can if you want to though!
GoatGuy says
In bread-and-dough makers terms, this is a 55% hydration recipe. The term ‘hydration’ is always relative to the total amount of flour(s) in the concoction. For example, above…
175 g H₂O × 100 ÷ 320 g all-purpose flour = 54.6… = 55%
This then becomes the easy way to remember the recipe, without needing to remember the particular masses of the components. We use it in bread making, pastry hooking and most every other dough-based ‘professional’ culinary tradition. Ah, the joys of the Culinary Sciences.
However, say you need a bunch of wrappers, and you are running out of all purpose flour! Ouch… You measure out 235 grams of flour.
235 × 55% = 129, call it 130 grams of water
Ta, da.
The emphasis on warm water is a must, for workability of the dough. I used 130°F, and it was also good.
Lastly, to those hoping to use non-gluten based flours, you’ll be pretty disappointed without some protein or gluey binder. Pasta doughs (and this is one) require some gummy binder to hold together in sheets. The way of the pasta, it turns out.
Oh… postscript: if you don’t have tapioca flour for the slip while rolling these lil’ devils out, you can always substitute a 2-to–1 mixture of cornstarch and pastry flour. Works like a charm. Old Szechuan trick, I learned from one of the most talented Szechuan chefs I ever had the pleasure of being a neighbor to.
Vitto says
Thank you so much Goatguy!
I was just wondering what I could substitute the tapioca starch with and this comment came in handy
ps. I appreciate the facts about the ratios of water to flour, it’s a trick I’ll definitely make use of 🙂
Thanks again!
SUE KAUFUTI says
I love this recipe, so precise.My family enjoyed it very much,thanks to you.Will definitely be making it again
Sara says
I made this recipie and everything was going amazing until I filled and folded them. For some reason after I finished folding all the dumplings the bottoms ended up sticking to the plate. I couldn’t get them off to cook without them breaking apart. Despite that I still managed to cook them in a steamer half open like an open dumpling and they tasted pretty good. Any ideas on what went wrong, so next time I’ll know what to watch out for.
A says
Just dust your plate with cornstarch next time before laying down your dumplings. The humidity in the air and from the tiny warmth of the dumpling creates a moisture where the dumplings stick. Sorry if that’s confusing. But cornstarch should do the trick.
Cici says
Hi Lisa,
Your recipes are really well explained, I love it!
I was wondering if the dumpling wrappers could eventually be made with rice flour? Would it work out ? Thank you !!!
June says
This dough was really easy to work. I made your pork and cabbage filling as well. It was delicious and a big hit! All three grandkids really liked it and were quite disappointed when the last one was gone. I had leftover filling, so it looks like I will make more wrappers tomorrow! Side note: I am not good at making the pleats! Luckily I enlisted my daughter who caught on quite easily. This recipe is a keeper! Thank you so much!!
Connie says
Hello Lisa!
This is incredibly detailed! Thanks so much for sharing!
Can I use cornstarch for putting between each wrapper?
Lisa Lin says
Yes!
Aida says
This dough recipe was so good although I made 2 batches of it. And for the filling I used green onions, kimchi, half a yellow onion and cabbage. It made up to 50-60 dumplings and we I also made some mandu soup out of it. It was really good, the dough was very easy to work with and even my 할머니 (Korean grandma) the master of dumpling said it was amazing. I really recommend it.
– Thank you
Lisa Lin says
Aida, thank you so much!! I’m so glad your grandmother approved!!!!!!
KFukuda says
Cant wait to try this my child has been asking to make their own! Its hard to find organic wrappers and I’ve been hesitant to try making wrappers till watching your video.
Thank you!
Melanie Franceschi says
I am so excited to make these. !!! Although, I will admit I am scared if that is a cooking adjective. I bought a bamboo basket steamer but have only used it once. Any hints to pass along to ease my fear of them not turning out.?
Annie says
Great recipe thank you. Which part of Asia are you from? Will try the recipe out, thanks!
Lisa Lin says
I was born in the US, so I’m American. My family was originally from China.
Kamalini says
Fabulous recipe!
Lisa Lin says
Thank you, Kamalini!
Isa says
Hi Lisa, I wanted to do this recipe because of the dumpling wrappers specifically. However I always face the same problem, maybe you can help me on this one:
What happens is that I use the exact measure of flour and water that u mention, and i leave the dough for about 45 minutes. But as I start kneading it, after 3 minutes it becomes too …”dense”, i think. The dough becomes too springy. I cut it into balls and then roll them into circles but in less than a minute the circles are no longer spread out enough for the filling, they contract into smaller circles and aren´t elastic enough. Is it that i need to knead it for longer? Is it the humidity maybe? I want to be able to cut the pieces, roll the little balls into circles and the circles to remain nice and flat.
Thanks in advance!
Lisa Lin says
Hi Isa, after the dough rests, are you kneading it again for 3 minutes? You don’t need to knead the dough too much the second time. Another way to make them less springy is to use even hotter water. It relaxes the dough even more so it’ll have less spring. Let me know if these tips help, and keep me posted!
Wendy Smith says
Lisa, your dumpling wrappers were a revelation. I’ve tried many commercial frozen potstickers and have always thought they were pretty meh, so I wasn’t expecting much when I tried your recipe. I cheated and used a dumpling press so thy look more like pierogis than potstickers, but they were wonderful! I was surprised and delighted at the wonderful crispness of the fried surface which contrasted beautifully with the tender chewiness of the unfried surfaces. Your precise instructions and great photos and video were so helpful. Thank you so much!
Arlene says
Can I still use wonton wrappers after they turn gray?
Lisa Lin says
It’s usually a sign that they’re going bad, so I’d toss it.
Tristan Crownover says
I wish every recipe on the internet had a great video tutorial like yours! Super easy to follow along.
Lisa Lin says
Thanks, Tristan!!
Ruby Fernandez says
Hi lisa I am one of your avid han i really want to know about dumpling also the filling i hope I can get it of how to make the wrap since i am new about this my niece want to learn and she is eagerly on business about dumpling I am very greatful to see the video you look very beautiful thank you maan have a great day. …….ruby
Angela says
Best dumpling dough I’ve ever made. Thank you for sharing. It is so easy to make with a KA mixer, and several batches all turned out consistently great !
Lisa Lin says
Thank you, Angela!!
Ivone A Pitta says
Your recipes are very detailed, which helps to achieve a more authentic result, however not compared to the actual result you might have. However, achieving a close result is good enough for me. Thank you for sharing your family’s recipes.
Emily says
Hi! Thanks for the recipe. I’m excited to try it!
Can I use spelt flour instead of all purpose?
Lisa Lin says
Spelt flour tends to be a little stickier, so you may need to adjust the amount of flour you use.
Jenna says
Hi Lisa!
Thank you for the great recipe. Do you think it would still work well if I substituted the regular flour with my favorite gluten free AP flour blend? Maybe using boiling water instead of warm water? I saw that you have a gluten free glass dumplings recipe but I would like to fry the dumplings and thought the glass dough might be too fragile.
Lisa Lin says
I might experiment with it by making a half batch instead, does that make sense? Because different blends contain different ingredients.
vicky mcclure says
LOVE your site!
Lisa Lin says
Thank you!
Frederika says
Hi there! Do you think I can use a pasta machine and cookie cutter? I want to make a bunch and freeze them.
Michelle says
I use a pasta roller to make them. It works perfectly.
J. HSU says
Hi Lisa, This looks right up my alley. I have tried several different methods at high altitude without luck. We are at about 7500 ft… super dry air and the dough barely gets supple enough. Any trial and error with an egg or perhaps specific high gluten flour that might help?
Lisa Lin says
Hi! Unfortunately, I don’t have much experience with high-altitude cooking! Here’s my immediate thoughts: what if you add some more water to the dough, knead for a few minutes, cover the dough for 15 minutes, and then knead it again. Then, you let it rest for 45 minutes. My instinct seems to be to add moisture to the dough versus protein, mostly because that’s what I’m more familiar with. I can see the additional protein helping though. I’m sorry, I don’t really have a better answer than this! I’ll definitely keep this in mind and ask around!
Lisa Lin says
Oh, I just thought of one more thing! Try using hot boiling water to make the dough! Usually, the hot temperature of the water makes the dough more supple. So, I would stick to the same amount of water I have in the recipe, but just try making the dough with hot boiling water. Then add more water, as necessary.
Linda says
Idk what i did wrong but this dough was so tough
Lisa Lin says
Could be that you’re cooking at higher altitude or your kitchen environment is drier. Just add more water, or try using boiling hot water.
ann leroux says
Hello, your recipe said gluten free? Store bought?
Glo says
Do you think you could roll the dough out thin enough with a pasta roller?
Lisa Lin says
Yes, I have rolled out the dough with a pasta roller before and then used a 3.5″ cookie cutter to cut out the shapes.
Vanessa Huaman says
I would like to have recipes and instructions how to use or methods of making Chinese food and sauces.
Elizabeth says
I’ve never made my own dumpling wrappers, but this recipe we super easy to follow and delicious! I have a bad track record of making bad dough, but this one turned out great. Great recipe!
Tammy says
I have a new dumpling press. Never attempted to make dumplings or used my new press. Your recipe and directions are very clear. We don’t use grams in the US, but I will for this recipe. I think with my Kitchen aid stand mixer and the dumpling press, and my crock pot to cook pork slow then shred, that I’ll no problems making large batches to freeze and cook later. Question: does your recipe also go good for sweets like apple or other fruit dumplings?
Lisa Lin says
Hi Tammy, thanks for trying my recipe! My hesitation about using this wrapper for fruit fillings is that there isn’t any fat in the dough. If you plan to deep fry the dumplings, it might be okay to use these dumpling wrappers.
Brian says
Can you recommend a Dumpling Press that has a press for shaping the dough, and a another that creates the folded filled dumpling.
Thank You
Lisa Lin says
For flattening the dough, you should try a metal tortilla press. Unfortunately, I don’t have any recs for folding dumplings as I’ve never tried using those before.
Anna says
Hi, I was wondering if I could roll out the dough and use a round biscuit cutter instead of making them individually. Thanks!
Lisa Lin says
Yes, but use a 3.5-inch cookie cutter.
Jacky says
Hi Lisa!
Thanks for the wonderful guide.
I was wondering if self-raising flour was also okay for making dumpling wrappers?
Cheers
Jacky
Lisa Lin says
If that’s all you have, then give it a try. I have never used self-rising flour with this though, always plain flour.
Georgette says
You explained and demonstrated the process very well
Lisa Lin says
Thanks, Georgette!
Grace says
This recipe is wonderful and so easy! Thanks so much!
Lisa Lin says
Thanks, Grace!
Denise says
Hi Lisa! Tried this recipe and dumplings came out lovely. For future reference, which scale do you recommend to be able to measure by weight? Thank you!
Lisa Lin says
Hi, Denise! Thanks for making the recipe!! I generally use the Escali Arti digital scale. This is my Amazon affiliate link, if you are interested! https://amzn.to/3Jdd1Ca
Denise says
That’s actually one that I saved on my Amazon account! Thank you Lisa.
Arlene says
Hi Miss Lisa Lin! Thank you for this recipe. I have made many yummy dumplings. Nice dough. I cheat and roll it out with my pasta machine to save time. No sticking.
Lisa Lin says
Thanks for using this recipe, Arlene!
Sam Garcia says
Hi Lisa,
I love this recipe so much! I was wondering if I could keep the dough overnight before use?
Thanks!
Lisa Lin says
Yes! Just put it in a container and refrigerate overnight. Try to use within the next day!
Moreno says
Hi there!
Many thanks for the interesting recipe!
Just a question: I agree to use grams instead of cups (also because, in Europe we rarely use cups), but why not weight the water as well ? In that case I must make complicate calculations to reach the right amount of water.
Stay well 🤗
Lisa Lin says
Hi Moreno, I do weigh the water in this recipe, so I’m not sure what you are referring to.
Marilyn Smith says
Really easy recipe! Tasted fantastic
Maria says
That rolling technique is wonderful! I actually rolled rounds instead of amoebas!
Lisa Lin says
Thanks, Maria!
Belinda says
Oh my lordy! After reading all that and how complicated it sounds,I’ll buy the frozen ones
Mihaela says
Hi! I’m Mihaela from Romania. I am in love with Asian food, and I am very happy that I found your vlog 🤗 I can’t wait to try this recipe. Unfortunately here in my country it’s not easy tu buy all the ingredients. Can I use cornstarch instead of potato/tapioca starch?
Melanie says
Hi! I’m excited to try this recipe but I’m planning on making a LOT of dumpling and I was wondering if there’s anything i should watch out for if I’m doubling the recipe?
Thank you 🙂
Lisa Lin says
When doubling the recipe, don’t dump all the water in at once. Maybe save about 1/4 cup and add that very gradually. Sometimes, when doubling recipes like this, the amount of water might be a little off. You may end up using all the water, but it’s better to add cradually.
Barbara Warrick says
This is my first time making dumplings. I streamed them but the dough is really tough. What can I do different?
Lisa Lin says
Hi Barbara, I’ve steamed these before and I didn’t find the wrappers too tough. What you can try is making the dough with hotter water before using it to make the dumplings.
Sarah says
Hi Lisa,
I can’t wait to use this recipe, what cooking time would be recommended when I have filled the dumplings (of my ingredient choice)? I don’t want to do it for too long or too short, is it like 5 minutes?
Lisa Lin says
It really depends on how you’re cooking the dumplings. If you’re boiling them, 5 minutes should be about right. A good clue is if the dumplings are floating at the time, they’re generally done.
Moroo says
I have made them using your methods. Thanks for increasing my knowledge
Milo says
Your awesome tha KS so much
Roszain says
I have wanted to try making my own dumplings for so long, after coming across this recipe I decided to take the plunge. They came out amazing the first few where ugly it took some practice getting the pleating right but after awhile they just flowed. dough is easy to work with. I made crab and cream cheese, pork and cabbage and ground beef and peppers and they were so yummy! I had to make a second batch of dough as I had too much filling but they have frozen well.
Dewey says
I’m going to try a manual pasta machine to roll the dough!
Lisa Lin says
That works! Just use cookie cutters to cut out the shapes.
Devoria Simmons says
Thank you great recipe
btw win says
I love how detailed your instructions are, Lisa! I’ve always been intimidated by making my own dumpling wrappers, but your post makes it seem approachable. Can’t wait to try this out for my next dumpling night! Thank you!
Robert Santee says
Hi Lisa I would like to know can I steam the home made dough?also can I use wheat flour for the wrappers?thank you Robert.
Lisa Lin says
Hi Robert, you can use wheat flour, but you may need to use less/more water. Just make sure you have extra water and flour on the side in case you need to adjust those amounts. Yes, you can use the dough to make steamed dumplings. I’ve done that before.
DG Club Login says
I loved this post, Lisa! Your step-by-step instructions made making dumpling wrappers so much easier than I expected. Can’t wait to try it out with my family. Thanks for sharing your tips!
InShot Pro Apk says
I loved this tutorial, Lisa! Your instructions were super clear and the photos really helped. I can’t wait to try making my own dumpling wrappers this weekend! Thank you for sharing your expertise!
jalwa lottery says
This is such a helpful guide, Lisa! I’ve always been intimidated by the idea of making my own dumpling wrappers, but your step-by-step instructions make it feel so achievable. Can’t wait to try it out and impress my family at our next dinner! Thanks for sharing your expertise!
OK Win Login says
I just tried your dumpling wrapper recipe, and they turned out amazing! The dough was so easy to work with, and they held up perfectly during cooking. Thanks for the clear instructions and tips! I can’t wait to fill them with my favorite ingredients.
Daman Games says
Loved your step-by-step guide, Lisa! I’ve always been intimidated by making my own dumpling wrappers, but your tips make it seem so achievable. Can’t wait to try it out this weekend!
bdg game win says
I absolutely loved your post, Lisa! The step-by-step instructions made it so easy to follow, and my dumpling wrappers turned out perfect. Can’t wait to try out some different fillings next. Thanks for sharing your tips!
Cassandra Alys Walker says
Hi there – do you have a link for what kind of wrappers you buy? And where? I tried making them from the other link, but it’s been 5 hours, it’s past midnight, I have to re do every single one (from all 3 batches I made) because they’ve stuck together, and I’m about to just throw away everything and never look back. It smells heavenly, but I just cant get it to work and I’m exhausted.
Lisa Lin says
Hi Cassandra, the one that I use for potstickers is by New Hong Kong Noodle Co, which I’ve really only found in Northern California. My best advice is to just use whatever you can find that are about 3.5 inches wide in diameter.
MINIBLOX says
I loved this post, Lisa! Your step-by-step instructions made it so easy to follow, and the tips on rolling techniques were super helpful. I can’t wait to try making my own dumpling wrappers at home. Thanks for sharing your expertise!
Jeremiah says
What are the key differences between the dip-and-sweep method and the spoon-and-sweep method for measuring flour, and how might each method affect the final outcome of a recipe?
Lisa Lin says
Hi Jeremiah, check out this post I wrote where I discuss this in detail! https://healthynibblesandbits.com/how-to-measure-flour/
bs Win says
This post was so helpful, Lisa! I’ve always struggled with making my own dumpling wrappers, but your step-by-step guide made it so much easier. Can’t wait to try this out for my next family dinner. Thank you!
gta 5 mobile app says
I tried your dumpling wrapper recipe and it turned out amazing! The tips on kneading made all the difference. Can’t wait to fill them with my favorite ingredients. Thanks, Lisa!
K says
Lisa, I have been making dumplings for over 20 years. They are delicious, but are always ugly and mishapen. I can’t tell you how many tutorials I’ve read or watched, but I could never roll out a round wrapper. Your directions in the video were great. Just a couple of changes (pinching and forming like a dinner roll, and applying more pressure rolling in than rolling out) and now my dumplings look as good as they taste! Thank you!
Lisa Lin says
K, I’m so glad these tutorials helped!
Nidia Robles says
Your tutorial was easy to follow. Thank you for sharing.
Lisa Lin says
Thanks, Nidia!
biliwin login says
Thank you for this detailed guide, Lisa! I’ve always struggled with homemade dumpling wrappers, but your tips and step-by-step instructions make it seem so manageable. Can’t wait to try this out at my next family dinner!
92 jeeto login says
Thanks for this detailed guide, Lisa! I’ve always struggled with making my own dumpling wrappers, but your tips are super helpful. Can’t wait to try them out this weekend!
tc lottery says
This post was super helpful, Lisa! I’ve always been intimidated by making my own dumpling wrappers, but your step-by-step instructions made it feel so much more doable. Can’t wait to try this out and impress my friends!
Redz Hub Script Fisch says
Thank you for sharing this recipe.
dabang game says
I just tried making the dumpling wrappers from your post, and they turned out amazing! The step-by-step instructions were so easy to follow. Can’t wait to fill them with my favorite ingredients. Thank you for sharing such a fantastic recipe!
Sharon says
Came out perfect! Thank you!
Lisa Lin says
Thanks for making this, Sharon!
Shannon Campbell says
Thank you Lisa for your wonderful, easy-to-use recipe. I have always wanted to know how to make the wrappers but I’m never sure of myself! Your recipe has made me feel like I can cook anything in a wrapper.
Lisa Lin says
Thank you, Shannon!
Adam Kesingland says
Hello Lisa Lin
My name is Adam her in the NW of the UK. I was making dumpling wrappers and potstickers for my friends of Chinese heritage. I played around with the “bakers percentage” hydration to get to 55% water to flour, which is exactly you use. I bake lots of bread so the hydration always seems low to me. I should have found your video sooner! Kung hei fat choi from Manchester.
Love Adam x
Lisa Lin says
Hi Adam, thank you so much for leaving a comment! I’m so glad the video was helpful!
xuper apk says
Lisa, your step-by-step guide to making dumpling wrappers is fantastic! I love the tip about resting the dough, it really makes a difference in texture. Can’t wait to try this out for my next dumpling night!