The first time I ever made potstickers on my own was during college. I wasn’t 100% sure what I was doing. However, growing up, I watched Mama Lin make potstickers by mixing ground pork with cabbage, ginger, scallions, and various seasonings. So, I fashioned a recipe from those snippets of childhood memories. I can’t even recall how that batch of potstickers tasted—they were completely unremarkable.
Since my college days, I worked hard to perfect my dumpling-making skills. After all my trials and mistakes, I have many tips to share about how to make potstickers.
WHAT ARE POTSTICKERS?
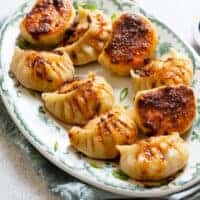
Potstickers are a type of pan-fried dumpling. The word “potstickers” is a literal translation of the Chinese term 鍋貼 (guotie), “guo” meaning “pot” and “tie” meaning “to stick.” (Note: “guotie” is the Mandarin pronunciation; “wo teep” is the Cantonese pronunciation.) During the cooking process, the dumplings stick slightly to the pan, creating a nice crispy texture on the bottom of the dumpling. You might also find potstickers labeled as 煎餃 (jianjiao), which means “pan-fried dumpling.”
Most commonly, potstickers are filled with pork and cabbage. You can find my pork and cabbage potsticker recipe here. There aren’t many good vegetarian potsticker recipes out there, so I thought I’d develop one with cabbage, carrots, and garlic chives. These dumplings taste so good! Feel free to modify the filling to your liking.
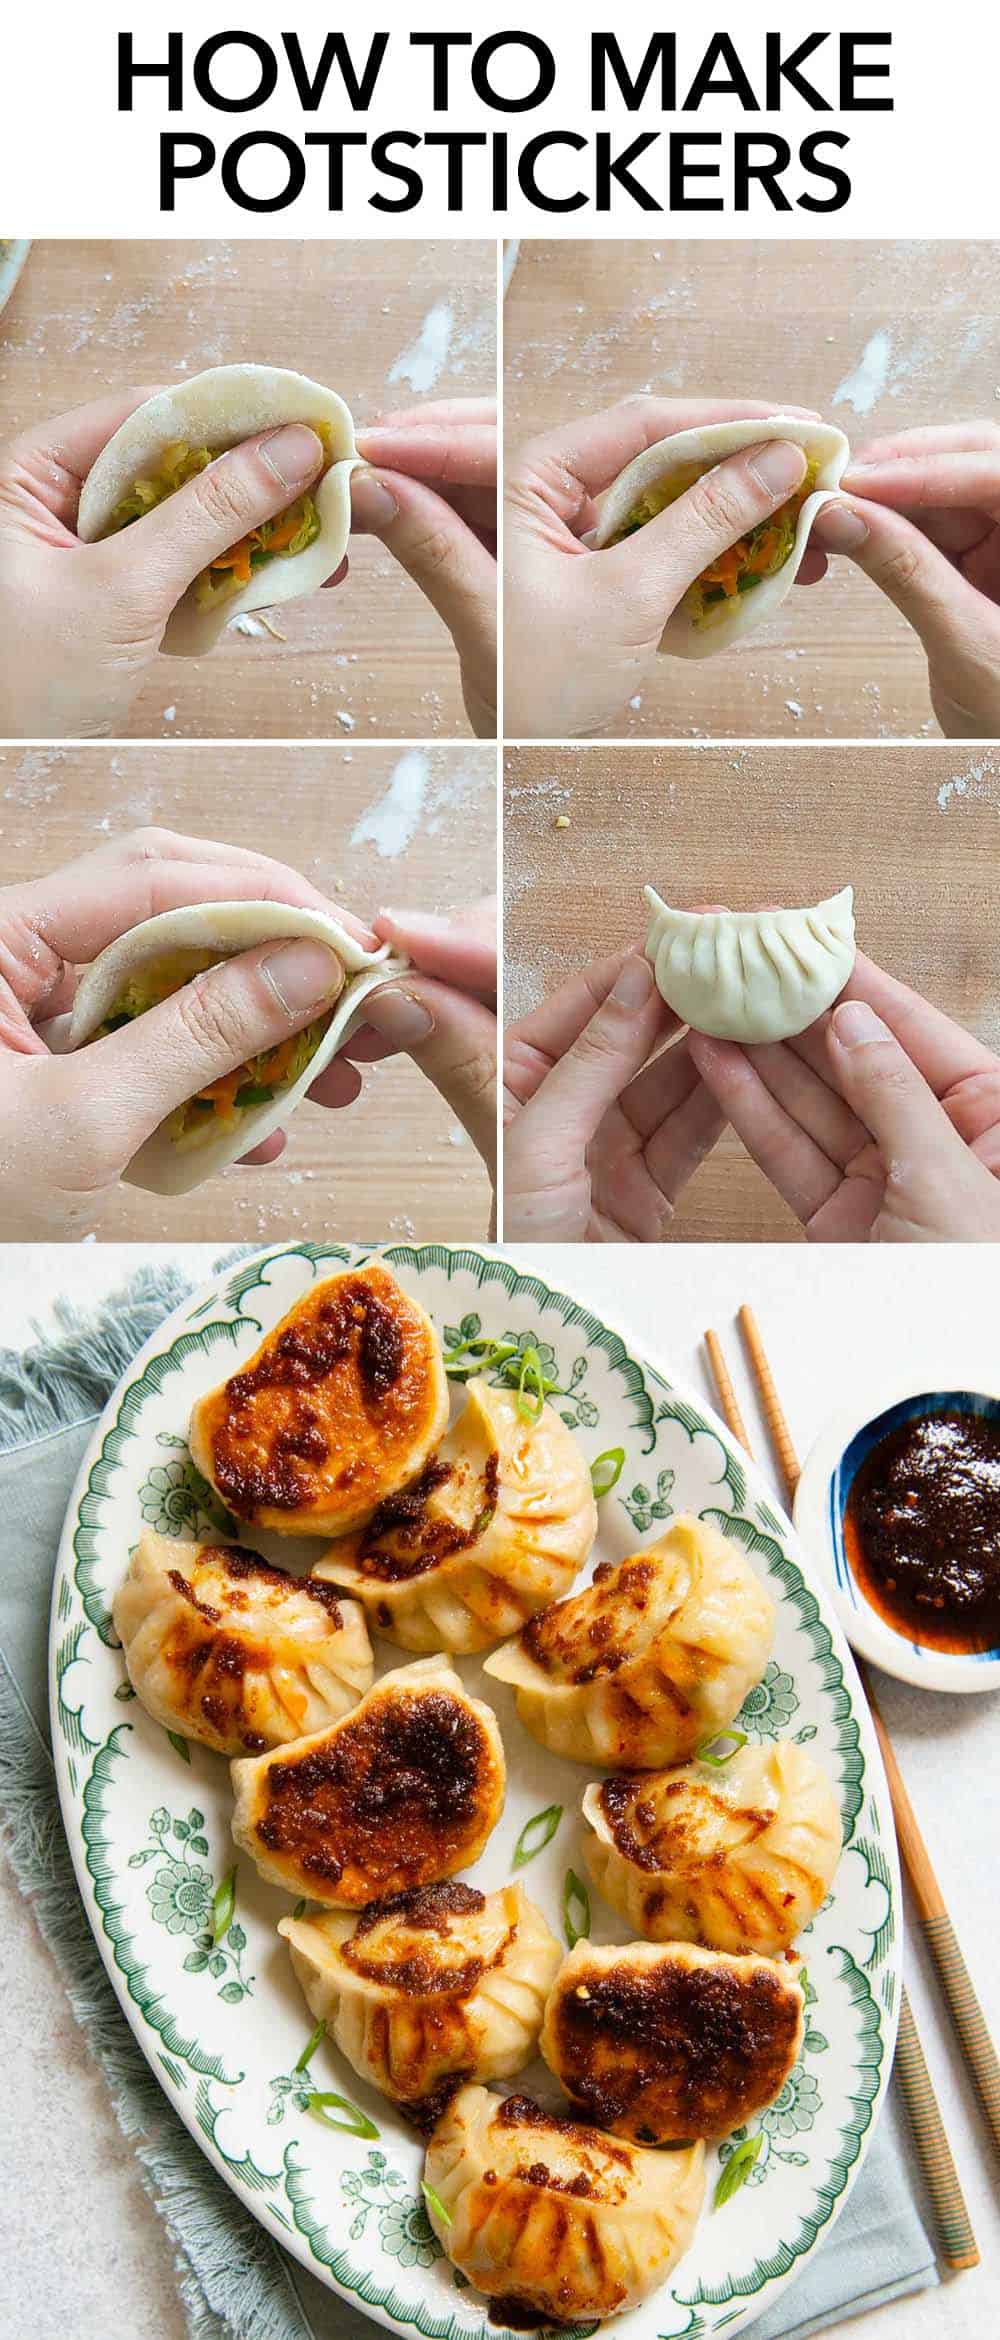
HOW TO MAKE POTSTICKERS
DUMPLING WRAPPERS/SKINS
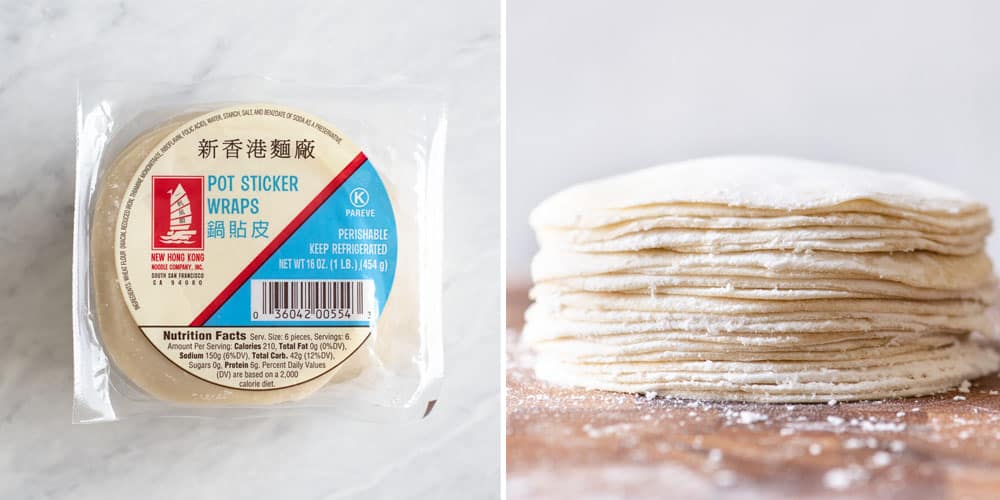
Many people tend to buy dumpling wrappers from Asian grocers for convenience. However, you can be easily overwhelmed by all the choices of dumpling skins at the Asian supermarket. There are circular dumpling wrappers, square-shaped wrappers, wrappers made with egg, and wrappers with varying thicknesses.
In general, I like using thicker wrappers for potstickers, like the ones from New Hong Kong Noodle Company, which you see in the photo above, left. These thicker wrappers can withstand heat better during the cooking process, so your dumplings won’t burst open. You can also use “gyoza wrappers” to make potstickers. However, note that they are usually thinner, so you won’t need to cook the dumplings as long. If you are following the recipe below, reduce the cooking time by 1 minute.
You can usually find dumpling wrappers in the refrigerated sections of Asian supermarkets. Oftentimes, they’re located near the tofu section. When buying wrappers, inspect to make sure that you’re able to see the individual dumpling skins. In other words, you don’t want to buy a package where the individual wrappers are clumped or smashed together into a solid block. They tend to be difficult to separate and you’ll likely stretch them out as you pull them apart.
You can also make fresh dumpling wrappers! My dumpling wrapper recipe is great for making potstickers. The tutorial includes extensive tips on how to make dumpling wrapper dough and how to roll out individual wrappers, so be sure to check it out!
If you use store-bought wrappers, you’ll need to wet the edges of the wrappers with water in order for them to seal properly. In general, freshly made wrappers do not require additional water to seal.
DUMPLING FILLING
Pork and cabbage is probably the most popular filling for potstickers. If you don’t eat pork, you can try my chicken potsticker recipe here.
Below, I have outlined a mixed vegetable potsticker recipe, which features cabbage, carrots, shallots, and garlic chives. If you want another vegan option, try my tofu and kimchi dumplings.
PLEATING POTSTICKERS
There are many ways to pleat potstickers. The video below shows you a basic potsticker pleating method. If you are a beginner, make wider pleats until you are familiar with how you should hold the dumpling during the pleating process. Once you’ve mastered the wider pleats, you can start making narrower ones.
For more ways to pleat dumplings, check out the posts below:
- Pork & Cabbage Potstickers (inverted “v” shape)
- Tofu & Kimchi Dumplings (fan shape)
- Red Curry Tofu Dumplings (braid)
One thing to note is that the edges of dumpling wrappers tend to dry out easily. If you are making dumplings on your own, cover the wrappers with a dry cloth as you work.
COOKING POTSTICKERS
Because the potstickers stick to the pan as they cook, you want to make sure to use the right pan for frying them. Many recipes I’ve seen online suggest using nonstick pans, but I prefer cooking them in a well-seasoned cast iron skillet. I have found that potstickers blister more in a cast iron pan, yielding dumplings with crispier bottoms.
Regardless of whether you use a cast-iron or nonstick skillet, make sure that the skillet has a fitted lid. Typically, you cook potstickers through a combination cooking technique that pan fries and steams the dumplings simultaneously. You’ll need to cover the skillet with a lid to make sure that the dumplings steam properly.
DIPPING SAUCES
I love eating potstickers with dipping sauces. Here are some of my favorite sauces to serve with dumplings:
HOW TO FREEZE POTSTICKERS
If you want to cook the potstickers at a later time, freeze them. DO NOT refrigerate raw potstickers. The moisture from the filling will seep into the wrappers, causing the dumplings to turn soggy and lose their shapes.
To freeze potstickers, line them on a large baking sheet or several large plates. Once the dumplings are firm, take the dumplings off the baking sheet or dish and store them in a freezer bag. To prevent frozen dumplings from being stuck onto the baking sheet or plates, line the baking sheets with parchment paper before placing the dumplings on top.
For more information on how to freeze dumplings and how to cook frozen dumplings, check out my post here.
How to Make Potstickers
Ingredients
Potstickers
- 35 potsticker wrappers, at least 3.5” diameter
- 1 1/2 tablespoons safflower or vegetable oil, plus more for frying dumplings
- 2/3 cup chopped shallots
- 2 tablespoons minced ginger
- 2 tablespoons minced garlic
- 4 cups thinly sliced green or savoy cabbage, see note 1
- 1 1/2 teaspoons kosher salt
- 2 carrots, grated (about 1 1/2 cups)
- 1 cup chopped Chinese chives or garlic chives, see note 2
- 1/4 teaspoon five-spice powder, optional
- 1 teaspoon sesame oil, optional
Equipment
- wok or large sauté pan
- large bowl
- small bowl
- a large baking sheet or several large plates
- dry tea towels
- large 12” cast-iron or nonstick skillet with lid
Instructions
Prepare Vegetable Filling
- Heat 1 1/2 tablespoons of oil in a wok or large sauté pan over medium-high heat. Add the shallots and cook for about 1 minute. Next, add the ginger and garlic and stir for 30 seconds to 1 minute, until fragrant. Add the cabbage and salt and cook for about 2 minutes, stirring frequently. Next, add the carrots and cook for a minute.
- Turn off the heat. Mix in the garlic chives, five-spice powder, and sesame oil, if using.
- Transfer the filling to a large bowl to cool for at least 20 minutes.
Prepare Dumpling-Making Station
- If you are using store-bought wrappers, fill a small bowl with water for wrapping the dumplings.
- Grab a baking sheet for the finished dumplings and a towel to cover the dumplings to prevent them from drying out.
- Get a spoon for scooping the dumpling filling.
Pleat Potstickers
- (For store-bought wrappers) Dip the edges of the wrapper into water, about 1/2 inch deep. Circle the wrapper around to moisten the perimeter of the wrapper.
- Lay the wrapper on your left hand. Add about 1 to 1 1/2 tablespoons of vegetable filling. If this is your first time making dumplings, start with less filling so that the dumpling is easier to manage as you pleat.
- Using your right hand, pinch the wrapper together on the right side.
- Then, using your index fingers, create a pleat with the side of the wrapper that is facing away from you. Seal the pleat by flattening it over to the right. Repeat until the entire dumpling is pleated and sealed.
- Transfer the dumpling to a baking sheet or plate. Cover the dumpling with a dry towel to prevent the edges from drying out. Continue making dumplings until all the filling or wrappers are gone.
Cook the Potstickers
- Heat a 12” cast-iron skillet or nonstick pan with 2 tablespoons of oil over medium-high heat. When the pan is hot, line the potstickers in the pan, flat side down. Let the potstickers fry for about 2 minutes, until they start to turn golden on the bottom.
- Have the lid of your skillet ready for the next step. Pour 1/4 cup of water into the pan. The oil will splatter immediately, so use the lid as a shield. Cover the pan with the lid.
- Reduce the heat to medium and cook for about 6 minutes, until the bottom of the dumplings are a deep golden brown. Oftentimes, the heat doesn’t distribute evenly across the pan, which results in some dumplings being less browned than others. You can pan fry the dumplings with pale bottoms for an extra minute or two, uncovered.
- Transfer the finished dumplings to a plate. Add more oil to the skillet and cook the remaining potstickers.
- Serve the potstickers with my sweet chili sauce.
Freeze Remaining Dumplings
- Place all the dumplings on a lined baking sheet or several large plates. Make sure the dumplings are not touching each other. Freeze the potstickers until firm and store them in a freezer bag.
- When you’re ready to cook, just add the frozen potstickers directly to the pan—there is no need to defrost them. The dumplings will take several minutes before they start browning. Then, pour water into the pan, like you would fresh dumplings. Cover the pan and cook the dumplings for 6 to 8 minutes over medium heat, until the bottoms are golden brown.
Video
Notes
- I usually slice the cabbage into 1/2-inch strips before slicing them thinly. The dumplings will be easier to pleat and seal if the cabbage pieces are smaller.
- You can substitute the garlic chives with 1/2 cup sliced scallions.
- Leftover wrappers: If you have any leftover store-bought dumpling wrappers, you can wrap them with plastic and refrigerate them for up to a week. You can also freeze them. Alternatively, you can make crispy crackers with the wrappers. Cut the wrappers into 1-inch strips. Spray a baking sheet with cooking spray. Spread the strips over the baking sheet in a single layer. Spray another layer of oil over the wrappers. Sprinkle the wrappers generously with sugar and cinnamon. Bake the strips 400ºF for about 6 to 10 minutes, until they’re browned. Let them cool completely before eating! They continue to crisp up as they cool.
Nutrition
Note: This post was originally published on August 22, 2017 and updated on August 23, 2020.


Lori Rice says
Your video for this is excellent! Love it.
Lisa Lin says
Thank you so much, Lori!!!
patrycja says
Hi Lisa, would you recommend any home made sauce that goes perfectly with these potstickers? Thank you 🙂
patrycja says
Sorry, I just found this sauce 🙂
P says
First time making dumplings, your video made it so easy and the dumplings were a success! Which tbh was a surprise for my first attempt. Absolutely delicious filling, thank you so much 🙂
Emily says
Made these this weekend and they were amazing! I ended up with a bunch extra and ended up freezing them so i’m looking forward to leftovers! I always come to your site for all dumpling recipes and know I’ll always have success! I couldn’t find circular potsticker wrappers so I bought square and didn’t pleat, while they aren’t as pretty they cooked perfectly!
Lili E. says
These were so easy to make a sooooo delicious! I made the wrappers from scratch following your recipe (how soft and warm this dough was, though!) and choose this simple veg filling. I was pretty curious if I would burn everything but no, the came out perfectly with a crispy bottom as they should. Thanks for the recipe and keep on rocking! Xoxo, Lili
Anna Savoie says
I’ve rewatched Lisa’s pleating video many times to get the hang of it. I still have more practice to do but these videos have been invaluable as a starting point.
I tried the veggie dumpling recipe too. I’ll admit I added crumbled tofu, thinly sliced woodears, and chopped bamboo shoots for added body and texture because I feared I wouldn’t be fulfilled by those veggies only. For me this recipe and proportions made a great base to add those extras too.
Lisa Lin says
Anna, thank you for trying this recipe and for providing your cooking notes! The additions you made sound great!
William says
This is not actually a comment. It is a question, and I would be grateful for your answer.
I spend many years in the far east, and always thought, not just Chinese, but all oriental noodles are made of flour and water. On the internet most Chinese recipes are for flour, water and eggs. This is more like Italian noodles, which are flour and eggs, with no water.
I notice your wonton wrappers are only with flour and water.
My question is:
Are Chinese noodle recipes that include eggs authentic Chinese, or are they just something someone with no knowlege of China made up?
On scond though, I do have a comment.
If I go to a Chinese restaurant, almost anwhere except in China, I never get what I expected. It is always adjusted to what they think a “foreign devil” are williing to eat.
But if I go with A Chinese colleague, then I get real Chinese food. That is true with other Asian countries, be it Korean, Japanese, Indonesian, etc.
In fact it is also true for Greek, Italian, and African restaurants as well.
That is why I decided, that if I ever want to have these wonderful foods again, then I have to know how to make them myself.
sarah Gibson says
OMG looks so tasty. Well can we can it momos also or this name is only POTSTICKERS
Linda says
I personally do not care for these. My husband loves them! So being the good wife I try to be😇. I decided to use your recipe. I followed it exactly, use the store bought dough. I could make mine look as pretty as yours with the shells. He loved them, my grandson loved them and my granddaughter (who is a super picky eater) loved the filling. You made the directions very easy to follow. Thanks So Much! I will be making these again and even froze some the way you suggested! 😍😍👍
Linda says
I meant to say….I couldn’t make my pleats as pretty as yours.
Lisa Lin says
Linda, thank you so much for making this recipe! I’m so glad that you tried it!